This article will provide you with a walkthrough on how you can build a water usage meter sensor that integrates with your Home Assistant for under 10 $/EURO without the need for any soldering or coding skills.
This article will also cover the configuration that’s needed in Home Assistants to translate the ‘pulse’ to liters (or any other non-metric measurement) in Home Assistant. In the end you will have clear insights in how much water you are using per day, hour, and week.
Why do you want to measure water usage of your home?
These days it’s all about insights. I measure pretty much all my utilities, including power and city heating. The last missing piece is water usage. Although the water in the Netherlands is not really expensive, I wanted to get more insights into how much water we are using and if there is any way to save some water. Unfortunately, water delivery doesn’t come with a smart meter. There’s just an analog counter. So how do you measure the water usage and make this analog meter smart?
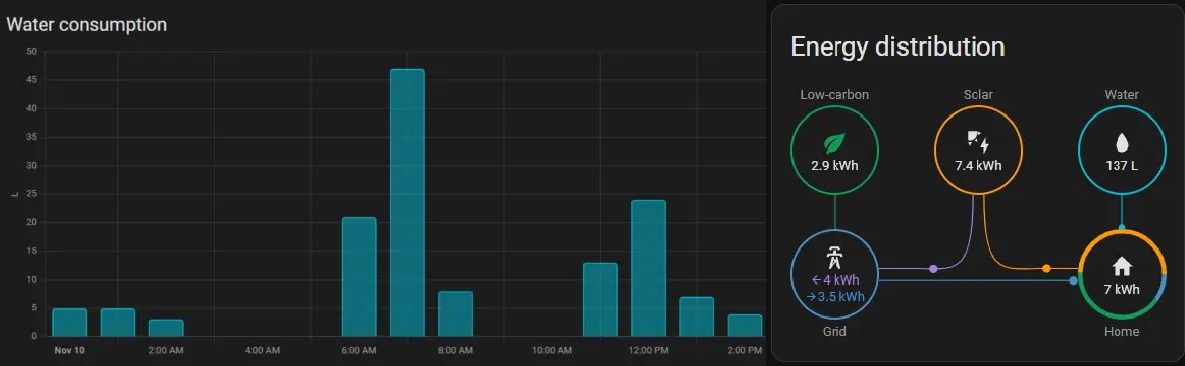
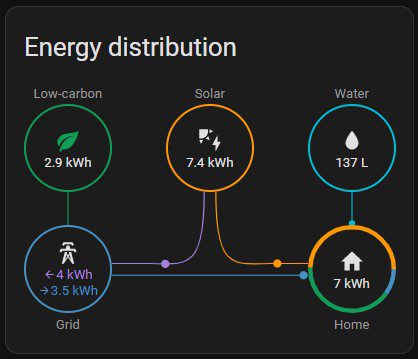
See water usage in the Home Assistant Energy Dashboard
The 2022.11 release of Home Assistant added the option to track water usage in the Home Assistant Energy dashboard. The ESPhome configuration has been updated to support this feature. Thanks to MJV for sharing his configuration on the Home Assistant forums.
A lot is changed since I wrote multiple articles around ESPhome. One of the mayor things is that ESPhome is now part of HomeAssistant core and it comes with a nice integrated User Interface.
What are ESP32 and ESP2866 nodeMCU boards?
ESP boards are a low cost Wi-Fi chips that have built in flash chips allowing you to build a single chip device capable of connecting to Wi-Fi. newer versions like the ESP32 boards also provide you BLE (Bluetooth low energy) and there’s loads of variety of boards you can use.
With ESP you can easy make smart solutions for HomeAutomation. You can buy them for about 4-9 dollar/euro on AliExpress or for a bit more with faster delivery on Amazon.
This article provides you with an overview and links of all articles published around the Bellfire fireplace (Mertik Maxitrol controller) project that was presented during the Home Assistant Conference 2020.
Although this solution is presented around Home Assistant you can easily use the same solution in OpenHab, Domoticz or any other open home automation platform.
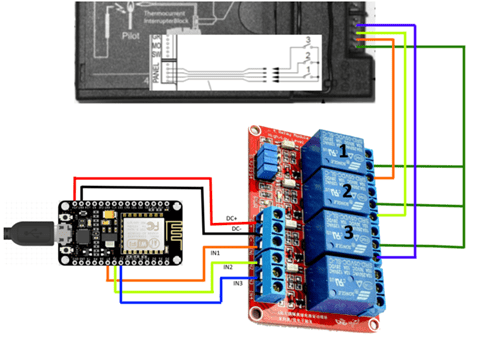
The wiring is now ready, let’s expose three switches to Home Assistant to control the relays.
Expose pins as switches
Open ESPHome and click EDIT on your node. The ESPHome configuration editor will now show. Add following configuration in the bottom of the configuration.
Note: The PIN name is translated from the physical D number printed on the ESP to the addressable name used in configurations and programming. E.g. pin D7 is referred to as GPIO13, all mappings can be found in the image in the ESP Intro section.
UPDATE (thanks Petr): “Fortunately ESPHome knows the mapping from the on-board pin numbers to the internal pin numbering, but you need to prefix the pin numbers with D as in the image below in order for this automatic mapping to occur. In general, it is best to just use the D0, D1, … pin numbering to avoid confusion”
We are adding three switches of the platform type GPIO, this means that the switch will 1:1 control the GPIO pins. For every switch we define the GPIO pin that is controlled, and we provide a name and ID.
Flash the firmware Over The Air (OTA)
That’s it, now flash the firmware of the ESP with the updated firmware based on our new configuration. We do not need to use the flasher tool anymore, we can use the Over-The-Air flash feature to flash the chip with the new firmware over the WiFi Connection. It is as easy as clicking the UPLOAD button.
ESPHome will compile the new firmware, send it over to the ESP that will than flash itself. After flashing the ESP will come back online with the new firmware. It does not get much easier!
Control the relay from Home Assistant
Wait till the ESP has been flashed successful and is connected to the WiFi.
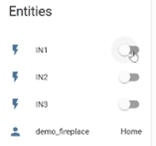
Find your device in Home Assistant, noticed that the device now has 3 entities. Click on the device and you’ll see that it has three switches, called IN1, IN2 and IN3.
Press the switches and enjoy the sound of clicking relays. Every switch should control the matching relay.
Create timing to control the fireplace
To control the fireplace I need to match following sequences with the switches:
Ignition, close contacts 1 and 3 simultaneously for 2 seconds
Fire off, clos contact 1,2, and 3 simultaneously for 1 second
We need to control the relays in these sequences with the ESP board. We can do this by extending the ESP configuration. We’ll add an Ignition switch that will execute sequences above when turned on and off.
Open ESP home and click edit on the node to go to the configuration editor.
Add a new Switch (right under IN3) with following configuration.
Make sure you have some ESP boards ready to go, you can buy ESP boards few dollar on AliExpress. Buy the ESP32 variant if you need Bluetooth (BLE) connectivity.
Now we need to load the configuration of your node to the ESP board. I recommend flashing the firmware from your local laptop and a USB cable, using the Flasher tool from ESPHome. Let’s get started.
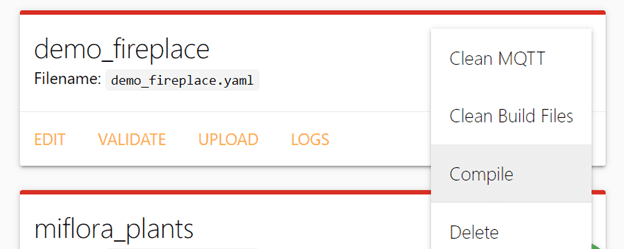
Compile firmware
We need to start by compiling the firmware that we’ll use to flash the ESP chip. In ESPHome select the menu of your node (three dots (…) in the top right of your node) and select Compile.
ESP home will now compile your firmware. After the compilation is finalized you can download the firmware. Download and store the file somewhere you can find it later on.
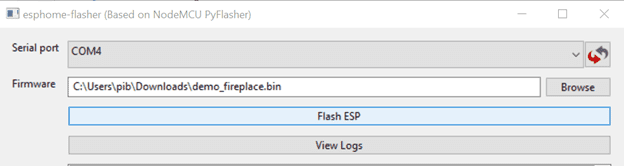
Flash ESP with compiled firmware
Now we’re going to flash the ESP firmware with your compiled firmware.
Serial port: select COM port where the board is connected (there is probably only one option 😊).
Firmware: Browse to the location where you downloaded your compiled firmware and select your firmware.
Click Flash ESP and wait
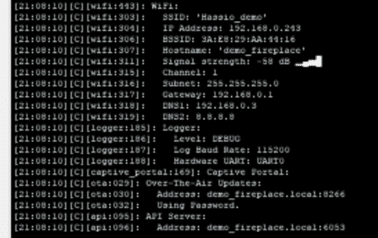
The ESP will be flashed now, you can follow the progress in the console window. When finished writing the firmware the ESP will restart and connect to your WiFi.
The ESP will be ready after it states that it’s ready for Over-The-Air Updates and that he API server is ready.
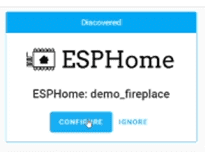
All good so far, now configure the device in Home Assistant.
Configure device in Home Assistant
Home Assistant will automatically recognize the ESP on the network and notify you about the new device found. Click on the notification or click Configuration, Integrations. Find the new discovered device and click configure.
Provide the OTA password that you set during step 3 when you created the node in ESPHome.
Home Assistant will now add your ESP as a new device, there is not much you can do with the device as there are no entities to control.
In the previous article, we introduced ESP boards and Relays that will help to switch the Bellfire fireplace pins of the controller. Now we need to control software that connect the ESP to Home Assistant and that can control the relays using the ESP GPIO pins. We are going to do this with an ESPHome.
ESPHome is a system to control your ESP8266/ESP32 by simple yet powerful configuration files and control them remotely through Home Automation systems like Home Assistant.
ESPHome is amazing, it’s extremely powerful and, more important very stable. It has never failed me. The integration with Home Assistant is seamless, including autodiscovery within Home Assistant and one-click configuration.
If you want, you can build advanced sensors with it. The good thing is that sensors are supported natively by ESPHome and can be used by easy configuration. The possibilities with ESPHome and Home Assistant are endless; the blocking factor is your own imagination.
Key features
Easy to work with, no programming needed
Seamless integration with Home Assistant
Over-The-Air flashing of the firmware
Supports a long list of devices.
We’ll use ESPHome to connect the ESP to Home Assistant and to control the relays using the GIO pins.