
This article is part of the Make your Bellfire fireplace smart project that I presented during the Home Assistant Conference 2020.
In the previous article, we introduced Relays that will help to switch the Bellfire fireplace pins of the controller. Now we need to control the relays, we going to do this with an ESP board.
ESP boards are a low cost Wi-Fi chips that have built in flash chips allowing you to build a single chip device capable of connecting to Wi-Fi. newer versions like the ESP32 boards also provide you BLE (Bluetooth low energy) and there’s loads of variety of boards you can use.
For this project, I’m using the ESP8266, NodeMCU board. I prefer using a Development Board because it comes with a USB and all the pins are pre-soldered, making it easy to use. You can buy this board at your favorite Chinese shop somewhere for a price between 3-10 euros. I usually buy them at AlieExpress (cheap) or Amazon (faster delivery).
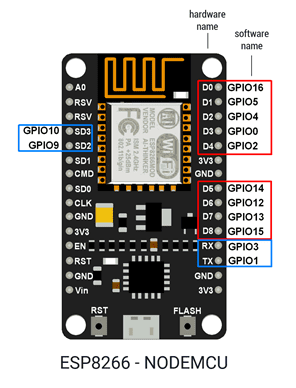
For the fireplace we are going to use the Digital pins D5, D6 and D7 to control the three relays on the board. Be aware that the printed names of the pins like D1 need to be translated to the according to GPIO number to address them in your code and configuration. I will refer to this image in the configuration section.
Now we have the relay and the ESP to use as a controller. Now we need software that will run on the ESP. Software that we can be used to expose the relays as switches to Home Assistant and define interaction with the GPIO pins on the ESP. ESPHome is the perfect solution for this.
The next article will introduce ESPHome.
5 Replies to “Introducing ESP / NodeMCU boards”