Investigating options for making the Bellfire fireplace smart

This article is part of the Make your Bellfire fireplace smart project that I presented during the Home Assistant Conference 2020.

In previous article I addressed four ways of making your dumb devices smart. Let’s jump into the journey of how I made my fireplace smart and the steps that I took through this journey.

The fireplace

Three years back I built a new house. We wanted to have a gas/propane fireplace installed in the house. While ordering I did the normal investigations and comparing different fireplace, we decided to order the Bellfire fireplace. I confirmed that it had a 433MHZ remote, making it easy to automate using a RFXcom. When the house was finished and after using the fireplace a few times, it was time for me to automate the fireplace.

1. Sniffing the 433MHZ signal

I got my good old RFXcom and started to sniff for the remote signals
Nothing happened. No signals where found.

I started investigated the remote and noticed that I had a different version of the remote. After some Googling I noticed that I had the latest version of the fireplace, which is good news, however remote communication was now build based on a Zigbee with a brand-specific layer on top. This makes it hard for me to automate. Forcing me to investigate otherways to make this now dumb fireplace smart.

Don’t get me wrong, I’m very happy that my FIREplace uses an encrypted and more secure communication method than 433Mhz, it just made my automation life a lot harder.

Time for the next option.

2. Googling the “Bellfire homeautomation”

I start searching for “Bellfire homeautomation” which didn’t have any results that provided a solution to making the Bell fire smart.

One of the results was a Wi-Fi module that you could buy from Bellfire. This would make the device smart, but there where no open APIs or ways to integrate the fireplace with Home Assistant

Time do go one level deeper.

3. Time to open the maintenance latch of the fireplace

In the maintenance latch I located a controller. The controller was a Maxitrol from Mertik. I found the manual and it stated four pins for external operations.

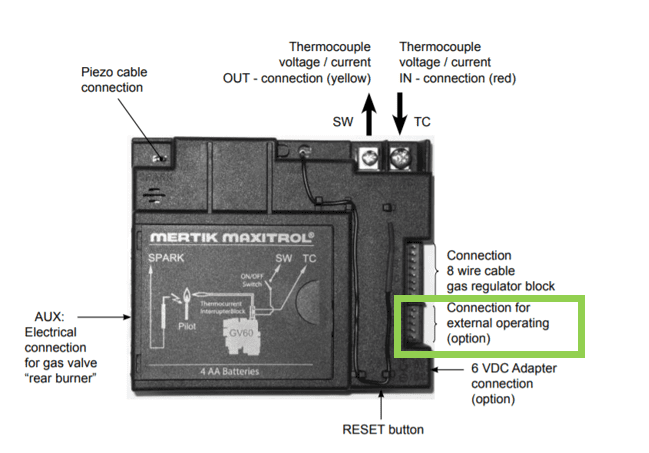
Now I needed to find out what communication and interaction that connection accepted. After more research on the internet I stumbled on documentation of how to ignite and turn off the fireplace using the pins.

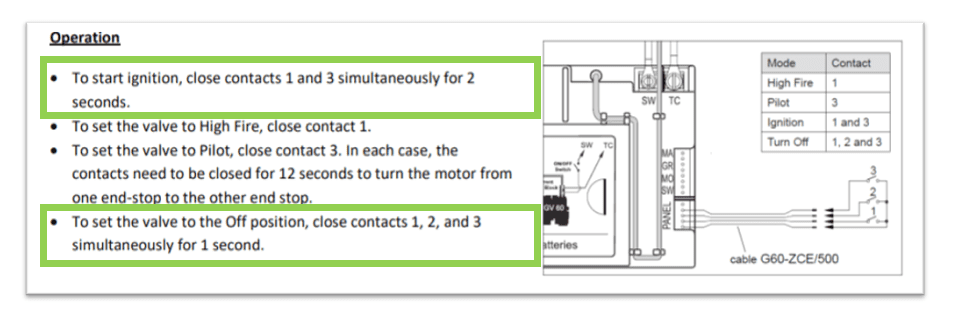
This manual shows that if I want to ignite the fireplace I need to close the contact 1 and 3 for two seconds.
And to turn off the fireplace I need to close Contacts 1, 2 and 3 for only one seconds.

This gives me something to work with! Next challenge how am I going to create these interactions with switches that I can control from Home Assistant. I need to get some relays!

Let’s introduce a relay is in the next article.

Ways to make dumb devices smart

When I buy a new device for my home I it to be smart. I might be pushing it a bit to far, including scales, washing machines, barbeque, toothbrushes…  But sometimes devices are just not smart out of the box.  I use the following four steps, going from easy to hard, to make devices smart and use it in home automation.

Search for integrations, home assistance has very large ecosystem, there’s tons of integrations available out of the box, there’s HACS and then there’s countless blog posts published. You can also find like minds that have similar issues and already solved issue on the Home Assistant forum and Discord server.

2 investigate the remote

If your device has a remote and you have no luck with the device name. You need to start investigating your remote and again this could be an easy solution. If it’s an infrared remote you can use an IR blaster, is it a 433MHZ signal you can use a RFXcom. Open the remote and start Googling the chipsets in the remote, perhaps it’s based on Zigbee protocol that someone already build a solution for.

3 is it a network device

Is the device is in any way smart connect with Internet using Wi-Fi or UTP cable? You can use tools, like WireShark, to sniff the network traffic on your network. This is where it gets more technical and complex. Using these tools you need to reverse engineer requests and build an integration. Don’t forget to opensource your integration so others can help you and benefit of your hard work.

build your own soltution

The final option is to build your own solution. With building your own solution I mean replacing a hardware switch with a electrical switch, a relay. Creating a smart switch that will take over the control of your device. Although this sounds really hard, it’s not. You can get great results without being heavy technical. No advance wiring, soldering or programming is required. However, it does help it you know about this.

At the end, I made my fireplace smart by building my own solutions. Read the next article on how I investigate the different ways of making my fireplace smart and why I decided to go for this solution.

Use your alarm for presence detection in your Home Automation setup

One of the great things about home automation is the possibility to activate scenes based on presence of people in the house. Having solid presence detection in your home is not easy to achieve. There are a lot of ways to do this, but most of them use ping your devices, using network connectivity, Bluetooth or GPS geo-fencing technology. These solutions might work for some use cases, but if your presence detection is based on devices will only work for known devices and people. Meaning you can never be 100% sure that no-one is home.

So do not, I repeat do not, trigger scenes that shut down all the lights if no-one is home based on phones. I’ve a great story about a baby sitter that called me very unhappy about all lights being turned off and also that every time she switched them on they went off again. This go back to one of the essential rules of home automation. Read the 7 tips for a successful home automation.

However, switching lights off when nobody is home or switching random lights on while you are on holiday are great benefits of home automation. This is something you want to achieve. A great way of doing this is by installing an alarm and read the status of the alarm, e.g. Fully Armed, partial armed or off.

Continue reading “Use your alarm for presence detection in your Home Automation setup”

My home automation setup

Let’s start with the first post about home automation.  I’m pretty happy with my current home automation setup.  In this post I would like to share my current setup as on June 2019. This will be a endless work in progress posts, updated with links to more in depth articles.

Before we start with home automation I want to make you aware of following statement.

You will get no compliments or praises for your Home Automation, the best recognition you will get are the complaints when it is not working.

My home automation history

For the last eight years I’ve been busy improving with home automations, also called domotica. The time that I invest divers strongly per period, sometimes I don’t do anything for months, and then I find a new technology and I go all in with my spare time. In these years a lot of I’ve used a lot of different technologies, brands and platforms for my smart home.

I recently switched from Domoticz to OpenHab as my main home automation platform. Domoticz has always worked perfect for me, the reason for me to change was mainly to try something new. I really like working with OpenHab, but the learning curve is steep and it a more technical oriented solution. So if you don’t have a technical background or you’re new to home automation I would advise you to start with Domoticz or Homey (no personal experience with Homey).

Continue reading “My home automation setup”