This article is part of the Make your Bellfire fireplace smart project that I presented during the Home Assistant Conference 2020.
UPDATE January 2025: This article is outdated. ESPHome has introduced the new ESPHome Device Builder with a simplified workflow. Read the 2025 Guide: Getting Started with ESPHome Device Builder for the latest instructions.
It's time to execute the second step, you can find all steps in the overview how it all going to work article.
Make sure you have some ESP boards ready to go, you can buy ESP boards few dollar on AliExpress. Buy the ESP32 variant if you need Bluetooth (BLE) connectivity.
Now we need to load the configuration of your node to the ESP board. I recommend flashing the firmware from your local laptop and a USB cable, using the Flasher tool from ESPHome. Let’s get started.
Compile firmware
We need to start by compiling the firmware that we’ll use to flash the ESP chip.
In ESPHome select the menu of your node (three dots (…) in the top right of your node) and select Compile.
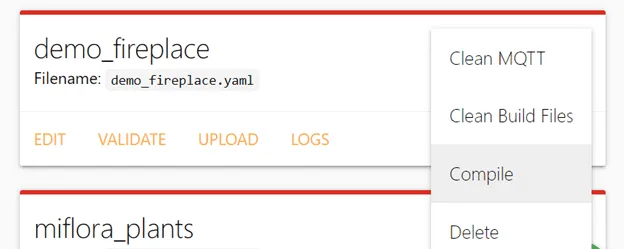
ESP home will now compile your firmware. After the compilation is finalized you can download the firmware. Download and store the file somewhere you can find it later on.
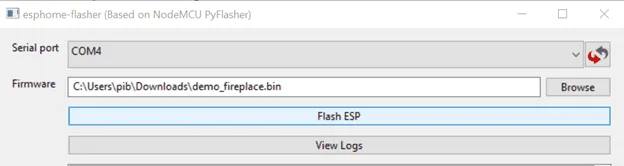
Flash ESP with compiled firmware
Now we’re going to flash the ESP firmware with your compiled firmware.
-
Go to the esphome-flasher GitHub page and download the flasher for the OS you’re using. There is a esp home flash tool for macOS, Ubuntu and Windows :
https://github.com/esphome/esphome-flasher/releases -
Connect your ESP board with USB to your laptop.
-
Open the flasher tool
-
Serial port: select COM port where the board is connected (there is probably only one option 😊).
-
Firmware: Browse to the location where you downloaded your compiled firmware and select your firmware.
-
Click Flash ESP and wait
-
- The ESP will be flashed now, you can follow the progress in the console window. When finished writing the firmware the ESP will restart and connect to your WiFi.
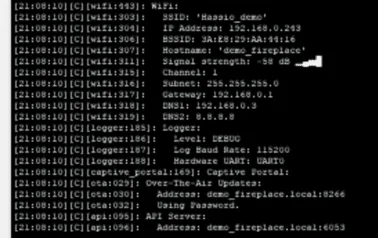
The ESP will be ready after it states that it’s ready for Over-The-Air Updates and that the API server is ready.
All good so far, now configure the device in Home Assistant.
Configure device in Home Assistant
Home Assistant will automatically recognize the ESP on the network and notify you about the new device found. Click on the notification or click Configuration, Integrations. Find the new discovered device and click configure.
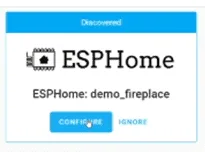
Provide the OTA password that you set during step 3 when you created the node in ESPHome.
Home Assistant will now add your ESP as a new device, there is not much you can do with the device as there are no entities to control.
In the next article, we'll wire the relay to the ESP board.