Step 4: Configure ESPHome to control the relays from Home Assistant

This article is part of the Make your Bellfire fireplace smart project that I presented during the Home Assistant Conference 2020.

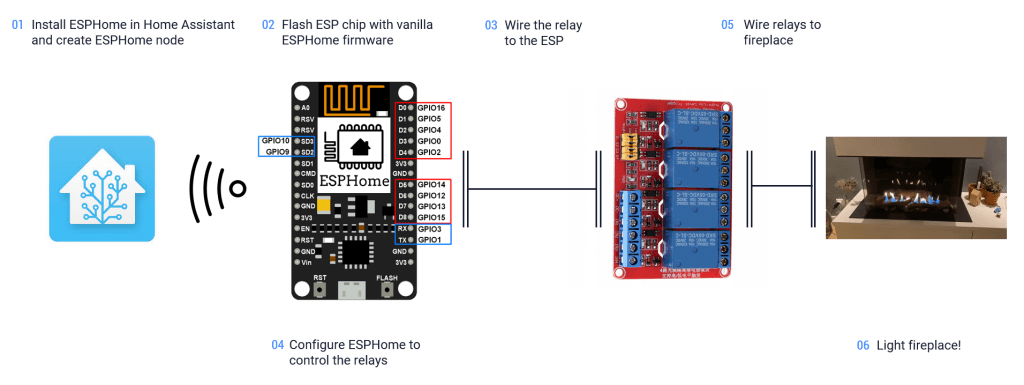
It’s time to execute the fourth step, you can find all steps in the overview how it all going to work article.

The wiring is now ready, let’s expose three switches to Home Assistant to control the relays.

Expose pins as switches

Open ESPHome and click EDIT on your node. The ESPHome configuration editor will now show. Add following configuration in the bottom of the configuration.

switch:
  - platform: gpio
    pin: GPIO13   #D7
    name: "IN1" 
    id: IN1
  - platform: gpio 
    pin: GPIO12  #D6
    name: "IN2"
    id: IN2
  - platform: gpio 
    pin: GPIO14  #D5
    name: "IN3" 
    id: IN3

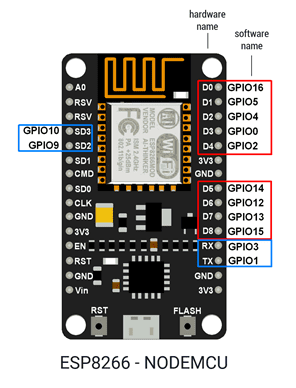
Note: The PIN name is translated from the physical D number printed on the ESP to the addressable name used in configurations and programming.  E.g. pin D7 is referred to as GPIO13, all mappings can be found in the image in the ESP Intro section.

UPDATE (thanks Petr): “Fortunately ESPHome knows the mapping from the on-board pin numbers to the internal pin numbering, but you need to prefix the pin numbers with D as in the image below in order for this automatic mapping to occur. In general, it is best to just use the D0, D1, … pin numbering to avoid confusion”

We are adding three switches of the platform type GPIO, this means that the switch will 1:1 control the GPIO pins. For every switch we define the GPIO pin that is controlled, and we provide a name and ID.

Flash the firmware Over The Air (OTA)

That’s it, now flash the firmware of the ESP with the updated firmware based on our new configuration. We do not need to use the flasher tool anymore, we can use the Over-The-Air flash feature to flash the chip with the new firmware over the WiFi Connection. It is as easy as clicking the UPLOAD button.

ESPHome will compile the new firmware, send it over to the ESP that will than flash itself. After flashing the ESP will come back online with the new firmware. It does not get much easier!

Control the relay from Home Assistant

Wait till the ESP has been flashed successful and is connected to the WiFi.

Find your device in Home Assistant, noticed that the device now has 3 entities. Click on the device and you’ll see that it has three switches, called IN1, IN2 and IN3.

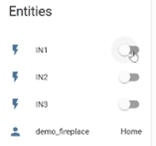
Press the switches and enjoy the sound of clicking relays. Every switch should control the matching relay.

Create timing to control the fireplace

To control the fireplace I need to match following sequences with the switches:

  • Ignition, close contacts 1 and 3 simultaneously for 2 seconds
  • Fire off, clos contact 1,2, and 3 simultaneously for 1 second

We need to control the relays in these sequences with the ESP board. We can do this by extending the ESP configuration. We’ll add an Ignition switch that will execute sequences above when turned on and off.

Open ESP home and click edit on the node to go to the configuration editor.

Add a new Switch (right under IN3) with following configuration.

- platform: template
    name: "Fireplace_ignition"
    id: Fireplace_ignition
    turn_on_action:
      - then:
        - switch.turn_on: IN1
        - switch.turn_on: IN3
        - delay: 2s
        - switch.turn_off: IN1
        - switch.turn_off: IN3
        - switch.template.publish:
            id: Fireplace_ignition
            state: ON
    turn_off_action:
      - then:
        - switch.turn_on: IN1
        - switch.turn_on: IN2
        - switch.turn_on: IN3
        - delay: 1s
        - switch.turn_off: IN1
        - switch.turn_off: IN2
        - switch.turn_off: IN3
        - switch.template.publish:
            id: Fireplace_ignition
            state: OFF

Press the Upload to compile, upload and flash the ESP with the new firmware. Test your new switch and verify that the relay react as expected.

Now it’s time to for the last step, time to wire the relays to the fireplace.

Step 3: Wiring the ESP to the relay

This article is part of the Make your Bellfire fireplace smart project that I presented during the Home Assistant Conference 2020.

It’s time to execute the third step, you can find all steps in the overview how it all going to work article.

To control the relay we need to provide high or low power to the IN ports of the board. This board has four relays. In my example I only need to use three relays.

Wiring the relay board to the ESP is easy. I always use Dupont cables and mini breadboards, this way soldering is not required.

Powering the relay board

The relay board needs 5v power. We will power the relay board directly from the ESP using the 5v VIN pin.

Controlling the relays

Pin D5, D6, and D7 will be used to control the three relays on the board.

See wiring image below for more details.

The wiring is now ready, let’s expose three switches to Home Assistant to control the relays. Read the next article.

Step 1: Install ESPHome in Home Assistant and create first Node

This article is part of the Make your Bellfire fireplace smart project that I presented during the Home Assistant Conference 2020.

It’s time to execute the first steps, you can find all steps in the overview how it all going to work article.

Install ESPHome

Installing ESPHome in Home Assistant is really easy. Go to Supervise, Add-on Store and search for ESPHome.

After installation starts the Add-On, make sure you select that ESPHome is visible in the side menu.

Create first Node

  1. Click on ESPHome in the sidemenu of Home Assistant, ESPHome will load.
  2. Click the green + icon in the button right corner to add a new node.
  3. Complete the new node wizard steps
    1. Node Name: provide the name of your node. Note: only lowercase and no spaces
    1. Device Type: Select the board you are using. I’m using the ESP8266, NodeMCU board.
    1. WiFI & Updates:
      1. Provide your WiFi network details
      1. OTA password: password use to integrate with Home Assistant and to flash the firmware in the future using WiFi.
  4. Finish: Click Submit. Congratulations, you created your first node.
More detailed steps can be found on the ESPHome site. They have a very detailed getting started guide.

Now we need to compile this node and flash the ESP with the firmware.

Home Assistant to Fireplace, how will it work together

This article is part of the Make your Bellfire fireplace smart project that I presented during the Home Assistant Conference 2020.

We now have all ingredients for our solution, covered in the in the previous articles in this series. Before we start building, let’s take a look at how this all will work together end-to-end.

  • Home Assistant, as home automation platform and for user interactions and automation
  • ESP chip low cost connected controller hardware, providing GPIO pins to control the relay and WiFi connectivity
  • ESPHome software that run’s on the ESP, providing the ability to configure actions with the relay and communication with Home Assistant.
  • Relay board with multiple relays that can control switches providing high or low power as input

In six simple steps we’ll make the fireplace smart.

  1. Install ESPHome in Home Assistant and create ESPHome node
  2. Flash ESP chip with vanilla ESPHome firmware
  3. Wire the relay to the ESP
  4. Configure ESPHome to control the relays
  5. Wire relays to fireplace
  6. Light fireplace!

That’s it, let’s go and start building this out! The next article will cover installing ESPHome in Home Assistant and reating your first ESPhome node.

Boom Emoji, Apple style

Introducing ESPHome

This article is part of the Make your Bellfire fireplace smart project that I presented during the Home Assistant Conference 2020.

In the previous article, we introduced ESP boards and Relays that will help to switch the Bellfire fireplace pins of the controller. Now we need to control software that connect the ESP to Home Assistant and that can control the relays using the ESP GPIO pins. We are going to do this with an ESPHome.

ESPHome — ESPHome

ESPHome is a system to control your ESP8266/ESP32 by simple yet powerful configuration files and control them remotely through Home Automation systems like Home Assistant.

ESPHome is amazing, it’s extremely powerful and, more important very stable. It has never failed me. The integration with Home Assistant is seamless, including autodiscovery within Home Assistant and one-click configuration.

If you want, you can build advanced sensors with it. The good thing is that sensors are supported natively by ESPHome and can be used by easy configuration. The possibilities with ESPHome and Home Assistant are endless; the blocking factor is your own imagination.

Key features

  • Easy to work with, no programming needed
  • Seamless integration with Home Assistant
  • Over-The-Air flashing of the firmware
  • Supports a long list of devices.

We’ll use ESPHome to connect the ESP to Home Assistant and to control the relays using the GIO pins.

So we have Home Assistant, a relay, a ESP board, ESP home and a fireplace…. How is this all going to work together? I’m going to tell you that in the next article.

Introducing ESP / NodeMCU boards

This article is part of the Make your Bellfire fireplace smart project that I presented during the Home Assistant Conference 2020.

In the previous article, we introduced Relays that will help to switch the Bellfire fireplace pins of the controller. Now we need to control the relays, we going to do this with an ESP board.

ESP boards are a low cost Wi-Fi chips that have built in flash chips allowing you to build a single chip device capable of connecting to Wi-Fi. newer versions like the ESP32 boards also provide you BLE (Bluetooth low energy) and there’s loads of variety of boards you can use.  

For this project, I’m using the ESP8266, NodeMCU board.  I prefer using a Development Board because it comes with a USB and all the pins are pre-soldered, making it easy to use. You can buy this board at your favorite Chinese shop somewhere for a price between 3-10 euros. I usually buy them at AlieExpress (cheap) or Amazon (faster delivery).

For the fireplace we are going to use the Digital pins D5, D6 and D7 to control the three relays on the board. Be aware that the printed names of the pins like D1 need to be translated to the according to GPIO number to address them in your code and configuration. I will refer to this image in the configuration section.

Now we have the relay and the ESP to use as a controller. Now we need software that will run on the ESP. Software that we can be used to expose the relays as switches to Home Assistant and define interaction with the GPIO pins on the ESP.  ESPHome is the perfect solution for this.

The next article will introduce ESPHome.

Speaking at the Home Assistant conference

At the end of October, the Home Assistant conference was announced. I’m very excited about home automation and sharing my knowledge. So I decided to submit a talk for the conference. Last week I received the good news that I’ve been selected as a speaker and have the honor to talk as one of the few during the conference.

I strongly recommend you to join the conference, it’s a virtual conference and you can just follow along from your couch. The conference has three tracks with amazing sessions. To help you pick your session, hopefully my session :), I would like to share with you more details of my 30-minute session.

Automate everything! How to make your stupid devices smart

Dec 13 9:00PM–9:30PM (CED – Central European time)
Advanced Track

Sounds great? But what’s the story

Three years ago I build our new house. In the new home, we wanted to have a gas (propane) fireplace. When selecting the fireplace I investigated integration options, the fireplace specs claimed 433MHZ remote controller. This 433MHZ remote should be easy to integrate with Home Assistant. After the fireplace was installed in the house I figured out that I received the new version of the fireplace. Which is always great, but the remote was updated to communicate with a variant of Zigbee. Meaning that I couldn’t integrate with Home Assistant.

During the conference, we will follow the story of how I managed to make my fireplace smart. Highlighting different options and routes available to make devices smart.

Wrapping up by sharing the final solution that made my dumb fireplace smart. I will show you how easy it is to make your dumb devices smart by using ESPHome, a cheap ESP WiFi board, relay modules, some basic wiring (no soldering), and a few lines configuration.

I’ll prove how easy it is by doing an end-to-end live demo and if everything goes well we will light up the fireplace in the last minute of the session*.

*only if demo gods are in favor

Get your 1$ conference ticket and join me in this session where I’ll take you along in the learning journey of my fireplace smart. Get inspired and join the movement, automate everything!