Build a cheap water usage sensor using ESPhome and a proximity sensor

water usage in home assistant energy dashboard

This article will provide you with a walkthrough on how you can build a water usage meter sensor that integrates with your Home Assistant for under 10 $/EURO without the need for any soldering or coding skills.

This article will also cover the configuration that’s needed in Home Assistants to translate the ‘pulse’ to liters (or any other non-metric measurement) in Home Assistant. In the end you will have clear insights in how much water you are using per day, hour, and week.

Why do you want to measure water usage of your home?

These days it’s all about insights. I measure pretty much all my utilities, including power and city heating. The last missing piece is water usage. Although the water in the Netherlands is not really expensive, I wanted to get more insights into how much water we are using and if there is any way to save some water. Unfortunately, water delivery doesn’t come with a smart meter. There’s just an analog counter. So how do you measure the water usage and make this analog meter smart?

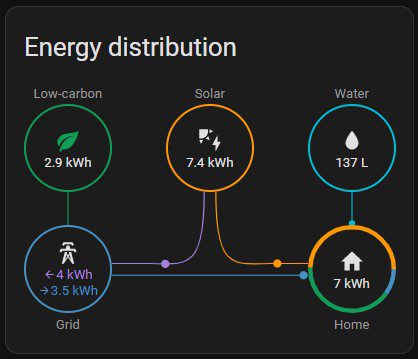
See water usage in the Home Assistant Energy Dashboard

The 2022.11 release of Home Assistant added the option to track water usage in the Home Assistant Energy dashboard. The ESPhome configuration has been updated to support this feature. Thanks to MJV for sharing his configuration on the Home Assistant forums.
Continue reading “Build a cheap water usage sensor using ESPhome and a proximity sensor”

2022 update: Flash ESPhome on ESP32 ESP2866 NodeMCU board

A lot is changed since I wrote multiple articles around ESPhome. One of the mayor things is that ESPhome is now part of HomeAssistant core and it comes with a nice integrated User Interface.

What are ESP32 and ESP2866 nodeMCU boards?

ESP boards are a low cost Wi-Fi chips that have built in flash chips allowing you to build a single chip device capable of connecting to Wi-Fi. newer versions like the ESP32 boards also provide you BLE (Bluetooth low energy) and there’s loads of variety of boards you can use.  

With ESP you can easy make smart solutions for HomeAutomation. You can buy them for about 4-9 dollar/euro on AliExpress or for a bit more with faster delivery on Amazon.

Read more about ESP boards in my introduction to ESP boards article

This article is an updated version of the the Compile and flash your ESP with ESPhome article.

Continue reading “2022 update: Flash ESPhome on ESP32 ESP2866 NodeMCU board”

Bellfire home automation project

This article provides you with an overview and links of all articles published around the Bellfire fireplace (Mertik Maxitrol controller) project that was presented during the Home Assistant Conference 2020.

Although this solution is presented around Home Assistant you can easily use the same solution in OpenHab, Domoticz or any other open home automation platform.

Slides

View Automate Everything! How to make your stupid device smart on Notist.

Introduction articles

The steps

Shopping list

  1. The ESPboard: ESP8266 board or ESP32 if you also want to use Bluetooth features on AliExpress.com, Banggood, Amazon
  2. The 4 channel relay board. Make sure you select the 5V version The relay: 5v relay board AliExpress.com or Banggood, Amazon
  3. If you don’t want to solder order:
    – Mini breadboards AliExpress.com or Banggood
    – Dupont cables male-female AliExpress.com or Banggood

Optional tools

Introducing ESP / NodeMCU boards

This article is part of the Make your Bellfire fireplace smart project that I presented during the Home Assistant Conference 2020.

In the previous article, we introduced Relays that will help to switch the Bellfire fireplace pins of the controller. Now we need to control the relays, we going to do this with an ESP board.

ESP boards are a low cost Wi-Fi chips that have built in flash chips allowing you to build a single chip device capable of connecting to Wi-Fi. newer versions like the ESP32 boards also provide you BLE (Bluetooth low energy) and there’s loads of variety of boards you can use.  

For this project, I’m using the ESP8266, NodeMCU board.  I prefer using a Development Board because it comes with a USB and all the pins are pre-soldered, making it easy to use. You can buy this board at your favorite Chinese shop somewhere for a price between 3-10 euros. I usually buy them at AlieExpress (cheap) or Amazon (faster delivery).

For the fireplace we are going to use the Digital pins D5, D6 and D7 to control the three relays on the board. Be aware that the printed names of the pins like D1 need to be translated to the according to GPIO number to address them in your code and configuration. I will refer to this image in the configuration section.

Now we have the relay and the ESP to use as a controller. Now we need software that will run on the ESP. Software that we can be used to expose the relays as switches to Home Assistant and define interaction with the GPIO pins on the ESP.  ESPHome is the perfect solution for this.

The next article will introduce ESPHome.

ESPeasy rules for Bellfire fireplace / mertik maxitrol

A back-up of the ESP easy rules that that I used to control my Bellfire fireplace . You can find the end-to-end integration of the Bellfire fireplace with Home Assistant here.

ESPeasy rules

//GIO14 == Relay 1
//GPIO4 == Relay 2
//GPIO 12 == Relay 3

on IGNITION do
  // Close relays contacts 
  gpio,14,1 
  gpio,12,1
  timerSet 1,1 // 1 second delay
  Publish,/fireplace/status,event,IGNITION
  
endon

On Rules#Timer=1 do 
   ///Open relays contacts 
  gpio,14,0
  gpio,4,0
  gpio,12,0
 
endon

on FIRE_OFF do
  // Close relays contacts 
  gpio,14,1 
  gpio,4,1
  gpio,12,1
  timerSet 1,1 // 1 second delay
  Publish,/fireplace/status,event,FIRE_OFF
endon

on SECONDBURNER_ON do
  // Close relays contacts 
  gpio,14,1 
  gpio,4,1
  timerSet 1,1 // 1 second delay
  Publish,/fireplace/status/centerfire,event,SECONDBURNER_ON
endon


on SECONDBURNER_OFF do
  // Close relays contacts 
  gpio,4,1 
  gpio,12,1
  timerSet 1,1 // 1 second delay
  Publish,/fireplace/status/centerfire,event,SECONDBURNER_OFF
endon

on INCREASE_FIRE do
  // Close relays contacts 
  gpio,14,1 
  timerSet 1,3 // 1 second delay
endon

on DECREASE_FIRE do
  // Close relays contacts 
  gpio,12,1 
  timerSet 1,3 // 1 second delay
endon

Wiring photos

Wiring to controller
Wiring from ESP to relay

Hope this helps.