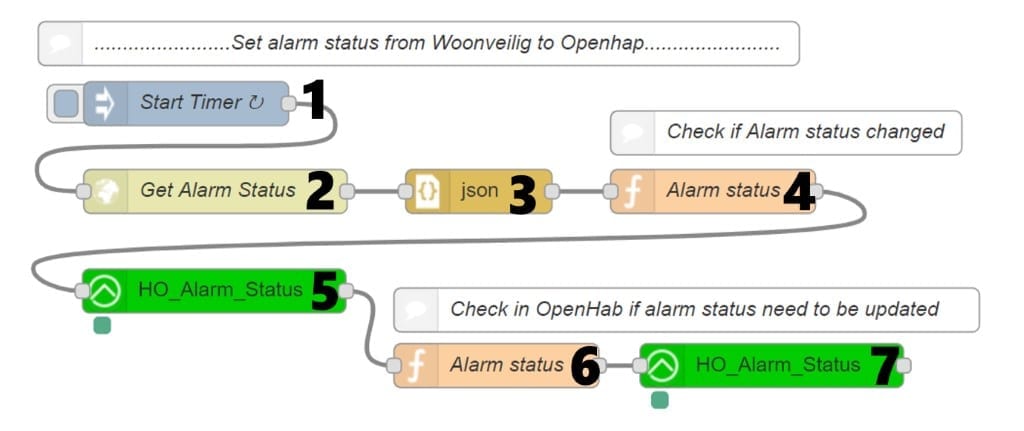
The above screenshots shows the flow in Node-red. The flow has following steps:
TIP: the flow is available for import at the end of this article.
1. Start flow every 20 seconds
2. Do a webrequest to the woonveilig hub to get the current status
http://[YOUR WOONVEILIG IP/action/panelCondGet
3. Convert the responds to JSON
4. Check if the status of the alarm has changed if not exit the flow
The returned currentAlarmStatus variable has three values:
- 0: the alarm is turned disabled
- 1: the alarm is partial armed
- 2: the alarm is armed
See code below
var currentAlarmStatus = context.get('currentAlarmStatus')||99;
var newAlarmStatus = msg.payload.forms.pcondform1.mode;
//node.warn(currentAlarmStatus);
if(newAlarmStatus == currentAlarmStatus){
//node.warn("Same status of the alarm, Exit");
return null;
}

context.set('currentAlarmStatus',newAlarmStatus);
if (newAlarmStatus == "0") { //Off
global.set('currentAlarmStatus',newAlarmStatus);
return msg;
} else if (newAlarmStatus === "1") { //Partial Armed
global.set('currentAlarmStatus',newAlarmStatus);
return msg;
} else { //Armed
global.set('currentAlarmStatus',newAlarmStatus);
return msg;
}
5. Get the status of the Alarm in from OpenHab
6. Run function to compare currentAlarmStatus
Compare Woonveilig alarm status with the status of the alarm in OpenHab. If changed update global variable and continue, if no change exit flow.
var currentAlarmStatus = global.get('currentAlarmStatus');
node.warn("current alarm : " + currentAlarmStatus);

var ohAlarmStatus = msg.payload.state;
node.warn("OH alarm status : " + ohAlarmStatus);

if(ohAlarmStatus == currentAlarmStatus){
node.warn("Status in OH is same as alarm status, Exit");
return null;
}

msg.payload = currentAlarmStatus;

return msg;
7. Update alarm item in Openhab
Import following flow directly into Node-red
Copy and import the flow below into Node-Red, make sure you update your OpenHab instance and Woonveilig details.
[{"id":"96c97991.eeefe8","type":"inject","z":"fb8e5ae4.e53ae8","name":"Start Timer ","topic":"","payload":"","payloadType":"date","repeat":"20","crontab":"","once":false,"onceDelay":"","x":151,"y":152.99999904632568,"wires":[["ce82f7fb.ce0b08"]]},{"id":"ce82f7fb.ce0b08","type":"http request","z":"fb8e5ae4.e53ae8","name":"Get Alarm Status","method":"GET","ret":"txt","url":"http://192.168.0.13/action/panelCondGet","tls":"","x":171,"y":212.99999904632568,"wires":[["4cc27829.c6f228"]]},{"id":"4cc27829.c6f228","type":"json","z":"fb8e5ae4.e53ae8","name":"","property":"payload","action":"","pretty":false,"x":351,"y":212.99999904632568,"wires":[["b0eaca39.9416c8"]]},{"id":"e08a64c5.b4c9d8","type":"function","z":"fb8e5ae4.e53ae8","name":"Alarm status","func":"var currentAlarmStatus = global.get('currentAlarmStatus');\nnode.warn(\"current alarm : \" + currentAlarmStatus);\n\nvar ohAlarmStatus = msg.payload.state;\nnode.warn(\"OH alarm status : \" + ohAlarmStatus);\n\nif(ohAlarmStatus == currentAlarmStatus){\n node.warn(\"Status in OH is same as alarm status, Exit\");\n return null;\n}\n\nmsg.payload = currentAlarmStatus;\n\nreturn msg;","outputs":1,"noerr":0,"x":363.0000305175781,"y":332.0000047683716,"wires":[["e26d4b11.ee8228"]]},{"id":"b0eaca39.9416c8","type":"function","z":"fb8e5ae4.e53ae8","name":"Alarm status","func":"var currentAlarmStatus = context.get('currentAlarmStatus')||99;\nvar newAlarmStatus = msg.payload.forms.pcondform1.mode;\n//node.warn(currentAlarmStatus);\nif(newAlarmStatus == currentAlarmStatus){\n //node.warn(\"Same status of the alarm, Exit\");\n return null;\n}\n\ncontext.set('currentAlarmStatus',newAlarmStatus);\nif (newAlarmStatus == \"0\") { //Uit\n global.set('currentAlarmStatus',newAlarmStatus);\n // node.warn(\"new alarm 0\");\n return msg;\n} else if (newAlarmStatus === \"1\") { //Thuis\n global.set('currentAlarmStatus',newAlarmStatus);\n //node.warn(\"new alarm 1\");\n return msg;\n} else { //Aan\n //node.warn(\"new alarm overig\");\n global.set('currentAlarmStatus',newAlarmStatus);\n return msg;\n}","outputs":1,"noerr":0,"x":511,"y":212.99999904632568,"wires":[["f00db576.387518"]]},{"id":"e0560d60.8cc0f","type":"comment","z":"fb8e5ae4.e53ae8","name":"Check if Alarm status changed","info":"Check if alarm status changed, if not exit\n\n0: uit\n1: Thuis\n2: aan","x":561,"y":172.99999904632568,"wires":[]},{"id":"54de2a09.70ac34","type":"comment","z":"fb8e5ae4.e53ae8","name":"Check in OpenHab if alarm status need to be updated","info":"","x":493.0000915527344,"y":294.0000047683716,"wires":[]},{"id":"f00db576.387518","type":"openhab2-get","z":"fb8e5ae4.e53ae8","name":"","controller":"e263d712.1e7b38","itemname":"HO_Alarm_Status","x":170.1666717529297,"y":281.0000238418579,"wires":[["e08a64c5.b4c9d8"]]},{"id":"e26d4b11.ee8228","type":"openhab2-out","z":"fb8e5ae4.e53ae8","name":"","controller":"e263d712.1e7b38","itemname":"HO_Alarm_Status","topic":"ItemCommand","payload":"","x":551.1666870117188,"y":332.0000047683716,"wires":[[]]},{"id":"d08ad29f.6f20f","type":"comment","z":"fb8e5ae4.e53ae8","name":"........................Set alarm status from Woonveilig to Openhap........................","info":"Check if alarm status changed, if not exit\n\n0: uit\n1: Thuis\n2: aan","x":310,"y":112.00000286102295,"wires":[]},{"id":"e263d712.1e7b38","type":"openhab2-controller","z":"","name":"Openhab","protocol":"http","host":"localhost","port":"8080","path":"","username":"","password":""}]


