
This article will provide you with a walkthrough on how you can build a water usage meter sensor that integrates with your Home Assistant for under 10 $/EURO without the need for any soldering or coding skills.
This article will also cover the configuration that’s needed in Home Assistants to translate the ‘pulse’ to liters (or any other non-metric measurement) in Home Assistant. In the end you will have clear insights in how much water you are using per day, hour, and week.
Why do you want to measure water usage of your home?
These days it’s all about insights. I measure pretty much all my utilities, including power and city heating. The last missing piece is water usage. Although the water in the Netherlands is not really expensive, I wanted to get more insights into how much water we are using and if there is any way to save some water. Unfortunately, water delivery doesn’t come with a smart meter. There’s just an analog counter. So how do you measure the water usage and make this analog meter smart?
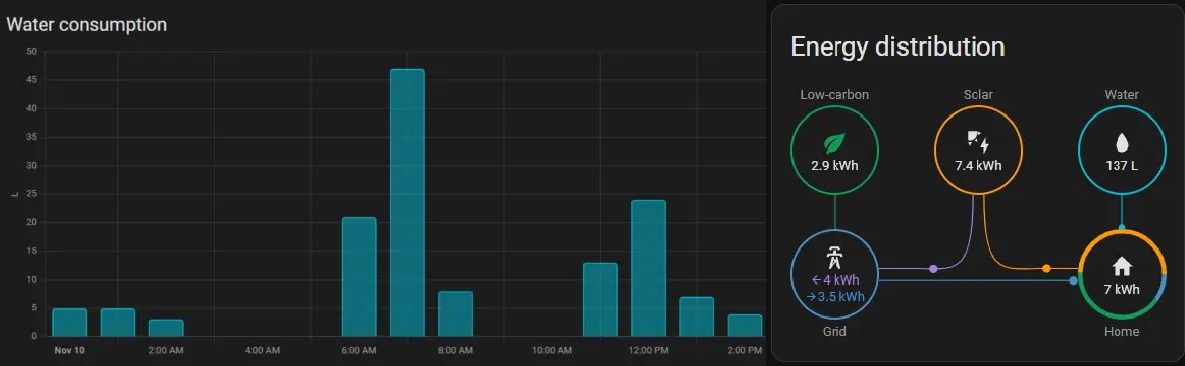
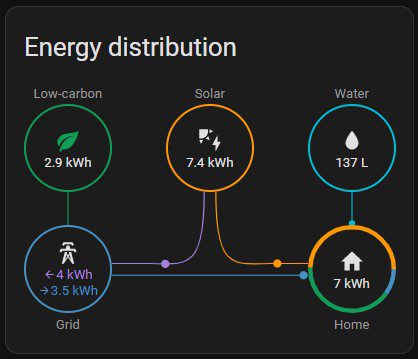
See water usage in the Home Assistant Energy Dashboard
The 2022.11 release of Home Assistant added the option to track water usage in the Home Assistant Energy dashboard. The ESPhome configuration has been updated to support this feature. Thanks to MJV for sharing his configuration on the Home Assistant forums.
How do you get data out of your water meter?
A water meter is an analog measuring instrument. Luckily the meter provides a spinning wheel that contains a magnet. That magnet can be recognized by a proximity sensor. This will provide you with a pulse, every pulse is equal to what has been defined by the meter. In my case; 1 pulse == 0.0001 M3 x 10 == 1 liter.
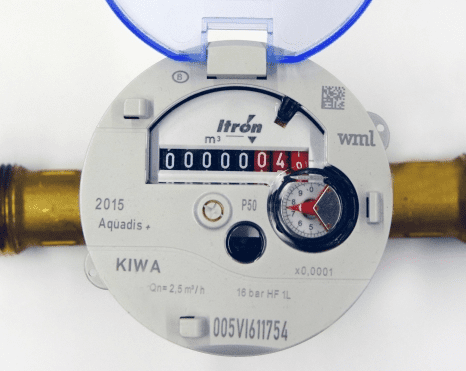
Be aware that there are many different water meters out there. Each meter can have a different magnet that the proximity sensor recognizes and also different values for a pulse meter. This information can be found on the meter.
What do we need to build the smart water meter?
Now let’s get started. What do you need to build the solution.
A proximity sensor (LJ18A3)
A proximity sensor recognizes the proximity of metal. This sensor will be able to recognize the piece of metal that is placed on the meter and will provide a pulse whenever a full cycle of the meter has passed.
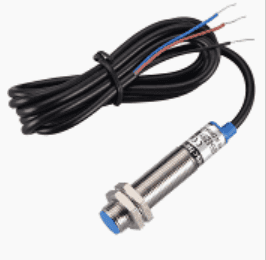
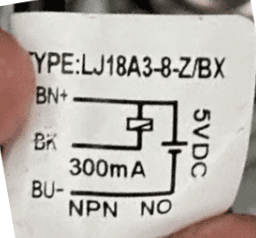
There are many different proximity sensors and it’s easy to buy the wrong one. Also, there are many solutions written that need resistors to work. If you buy a LJ18A3 you don’t need those. It’s also important to make sure you buy a 5V version so you can power the sensor directly from the ESP. I did a lot of research and ended up with this LJ18A3-8Z/BX sensor sold on AliExpress.com . Important that you buy this sensor and not another variant, the resistor is already built in and it works on 5v.
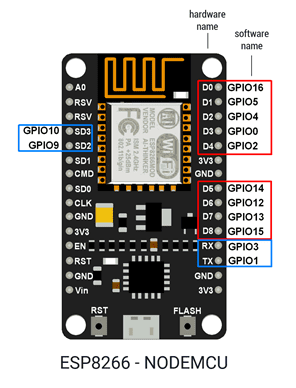
An ESP controller board
ESP boards are a low-cost Wi-Fi chips that have built-in flash chips allowing you to build a single-chip device capable of connecting to Wi-Fi. newer versions like the ESP32 boards also provide you BLE (Bluetooth low energy) and there’s loads of variety of boards you can use.
For this project, I’m using the ESP8266, NodeMCU board. I prefer using a Development Board because it comes with a USB and all the pins are pre-soldered, making it easy to use. You can buy this board at your favorite Chinese shop or Amazon somewhere for a price between 3-10 euros.
Here are deep links to a number of stores AliExpress.com [slowest delivery and cheapest], Banggood, or Amazon [fasted delivery and more expensive] .
Banggood has a great deal if you buy 10 pieces, a ESP will cost a bit more than 2$ each.
Shopping list
Required
- A ESP8266 board or ESP32 if you also want to use Bluetooth features (not required)
For this project, I’m using the ESP8266, NodeMCU board. You can buy them at any of your favorite stores, here are some deep links:
AliExpress.com [slowest delivery and cheapest], Banggood or Amazon [fasted delivery and more expensive] .
Banggood has a great deal if you buy 10 pieces, a ESP will costs a bit more than 2$ each. - LJ18A3-8Z/BX Proximity sensor
Make sure you buy a 5v LJ18A3-8Z/BX sensor, see paragraph about the sensor above.
I could only find this sensor at AliExpress. - Tyraps or Velcro strips to connect the proximity sensor to your water meter
AliExpress - Housing to securely fit all electronics on Banggood (or buy 5 and it’s way cheaper)
Optional
- Dupont cables (Amazon, Banggood or AliExpress) and a Hot Glue gun or Soldering iron or shrink solder seal connectors (Banggood or AliExpress)
Build the water usage meter sensor
Building the sensor is done in a few easy steps, even soldering is optional.
Some steps might to generic introduction articles. Make sure you find your way back to this article to follow along.
To build the water usage meter, we’re going to execute the following easy 5 steps:
- Install ESPHome in Home Assistant and create the water sensor node
- Flash your ESP chip with ESPHome firmware
- Wire the proximity sensor to the ESP board
- Place the proximity sensor on your water meter
- Configure ESPHome to make proximity sensor measurements available in Home Assistant
- Configure Home Assistant; add sensors and UI components (Lovelace)
1. Install ESPHome in Home Assistant and create the water sensor node
ESPHome is a system to control your ESP8266/ESP32 by simple yet powerful configuration files and control them remotely through Home Automation systems like Home Assistant.
ESPHome is amazing, it’s extremely powerful, easy and, more important very stable. It has never failed me. The integration with Home Assistant is seamless, including autodiscovery within Home Assistant and one-click configuration. Learn more about ESPHome in my Introducing ESPHome article.
2. Flash the ESP with ESPHome firmware
You should have ESPHome running and your first node created, it’s time to compile the firmware and flash the ESP board with vanilla ESPHome firmware. You can find step-by-step guidance in the Flash ESP chip with ESPHome node firmware article.
3. Wire the proximity sensor to the ESP board and place the sensor on the water meter
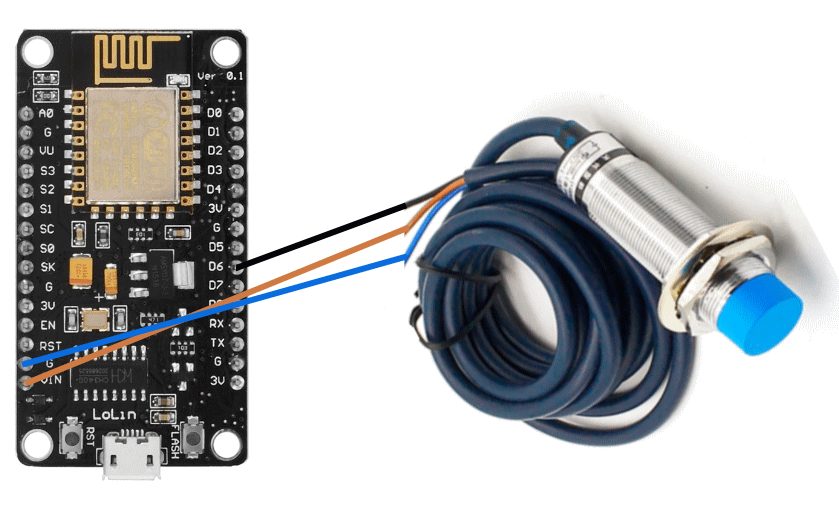
As explained above at the proximity sensor paragraph, the LJ18A3-8Z/BX sensor already includes the resistor and runs on 5 volts. Wiring this sensor is a really easy job. If you want to make it really easy, you order some female Dupont cables (Banggood or AliExpress) and shrink solder seal connectors (Banggood or AliExpress).
Wire colors can be slightly different, I’ve seen both orange and pink be used for ground.
| Proximity Sensor LJ18A3-8Z/BX | ESP8266 (ESP32) |
| Black | D6 |
| Orange / Pink | 5V (VIN) |
| Blue | Ground (G/GRN) |
Below is an image of the wiring that needs to happen.
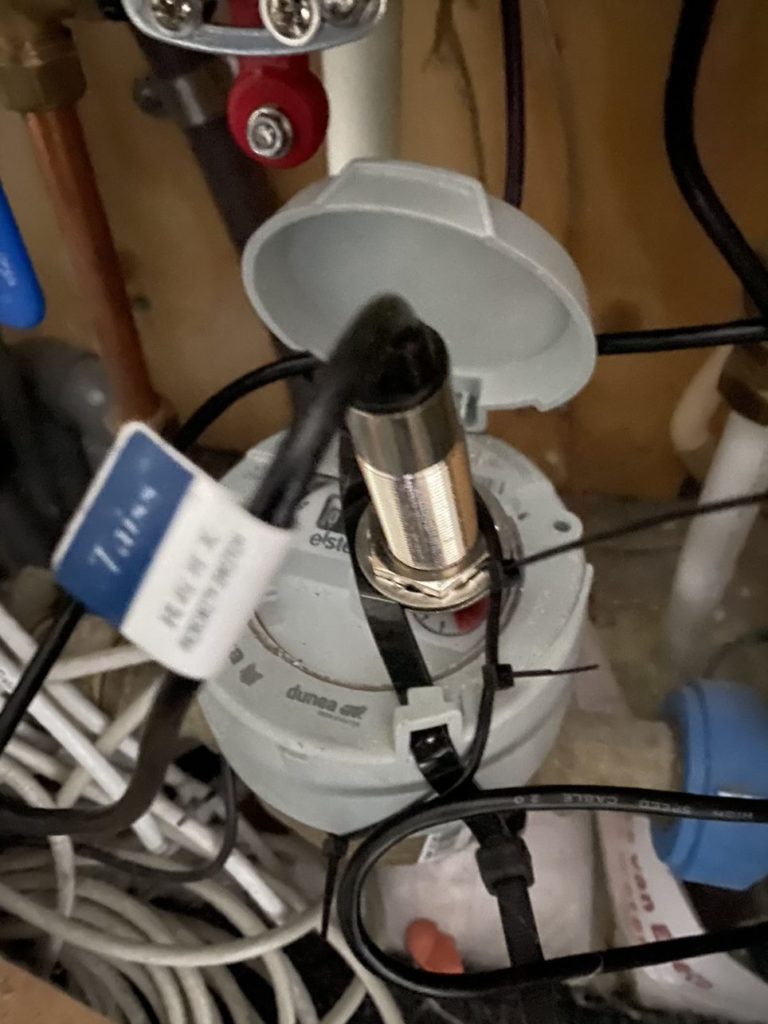
4. Place the proximity sensor on your water meter
The proximity sensor needs to be placed directly on the spinning wheel that contains a magnet. It should look something like this, the location might vary per meter.
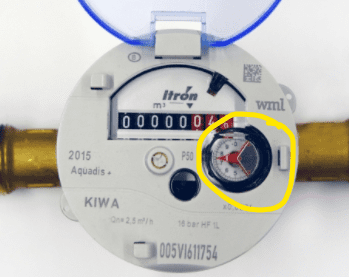
To find the right location, you need to open a water tap and let the water flow. The small radar will start spinning. Place the sensor directly on the sensor. The sensor has a red LED light on top, the led will turn one when the magnet passes. Every time the magnet passes and LED lights up means that a full cycle has occurred. The meter will also show the measurement of a full cycle, in my case this was liters.
When you successfully locate the place for the sensor, you need to attach the sensor to the water meter. There are multiple ways to do this. Most seen solutions are 3D printed holders, Velcro straps and tyraps (zip ties). I’ve chosen large Tyraps (zip ties) for my solution. See the picture below.
5. Configure ESPHome to make proximity sensor measurements available in Home Assistant
All set, the sensor is placed, and it’s time to expose the measurement values and send them over to Home Assistant.
Open ESPHome and click EDIT on your node. The ESPHome configuration editor will now show. Add the following configuration at the bottom of the configuration.
sensor:
sensor:
- platform: pulse_counter
    pin: GPIO12
    update_interval : 6s
    name: "water pulse"
    id: water_pulse

- platform: pulse_meter
    pin: GPIO12
    name: "Water Pulse Meter"
    unit_of_measurement: "liter/min"
    icon: "mdi:water"
    total:
      name: "Water Total"
      unit_of_measurement: "liter"

  - platform: pulse_meter
    pin: GPIO12
    name: "Water Pulse Meter"
    unit_of_measurement: "liter/min"
    icon: "mdi:water"
    total:
      name: "Water Meter Total"
      unit_of_measurement: "m³"
      id: water_meter_total
      accuracy_decimals: 3
      device_class: water
      state_class: total_increasing
      filters:
        - multiply: 0.001

  - platform: template
    name: "Water Usage Liter"
    id: water_flow_rate
    accuracy_decimals: 1
    unit_of_measurement: "l/min"
    icon: "mdi:water"
    lambda: return (id(water_pulse).state * 10);
    update_interval: 6s
7. Add the water sensor to the Energy Dashboard
In Home Assistant go to Settings -> Dashboards and select the Energy dashboard.
Find the Water Consumption section and add the Water Meter Total sensor as a water data source.
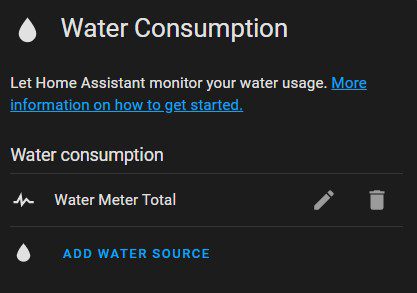
Give Home Assistant a few hours and your water consumption will show in the energy dashboard!
6. Configure Home Assistant; add sensors and UI components (Lovelace)
Before we can show the measurements in Home Assistant we need to add a utility meter sensor to Home Assistant.
The utility meter sensor provides functionality to track consumptions of various utilities, including water. The sensor operates in cycles that can be defined. From hourly all the way till yearly. You will supply a total value of usage and the sensor will track the delta (difference) of the total between the period. It also comes with some additional reports and insights about usage. More info can be find on the Utility meter page on the Home Assistant website
Add the utility meter to the Home Assistant configuration.yaml
For the water meter we’re going to track hourly, daily, monthly and yearly. Create the utility meter and sensors by adding following configuration to your configuration.yaml file.
utility_meter:
  util_water_usage_hourly:
    source: sensor.water_total
    cycle: hourly
  util_water_usage_daily:
    source: sensor.water_total
    cycle: daily
  util_water_usage_monthly:
    source: sensor.water_total
    cycle: monthly
  util_water_usage_yearly:
    source: sensor.water_total
    cycle: yearly
Restart Home Assistant, now the sensors are available, and you can add them to the dashboard.
Add the sensors to Home Assistant Lovelace UI
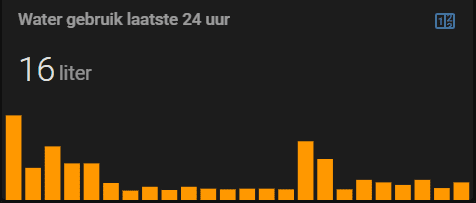
For viewing the measurements in my lovelace dashboard I used a custom card called mini-graph-card, this card can be easily installed using HACS. I use the following Lovelace configuration to show the water usage.
# Hourly water usage
type: custom:mini-graph-card
entities:
  - entity: sensor.util_water_usage_hourly
name: Water usage last 24 hours
group_by: hour
hours_to_show: 24
show:
  graph: bar
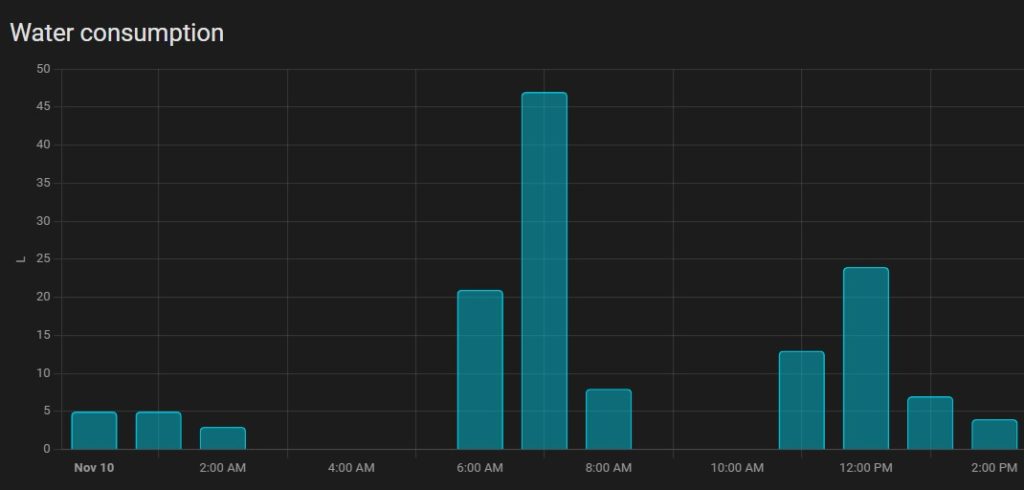
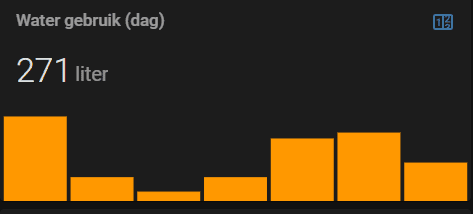
# Daily water usage
type: custom:mini-graph-card
entities:
  - entity: sensor.util_water_usage_daily
name: Water usage (day)
hours_to_show: 168
aggregate_func: max
group_by: date
show:
  graph: bar
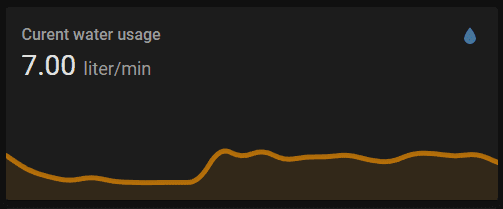
I also like to use a standard sensor card to reflect the current water usage.
type: sensor
entity: sensor.water_pulse_meter
graph: line
name: Current water usage
These are just three examples of UI components. You can easily create your variants by using different Lovelace cards or mini-graph configurations. You can also decide if you want to report on Hour, Day, Month or Year. All these sensors are available as we defined them in the previous step (step 5).
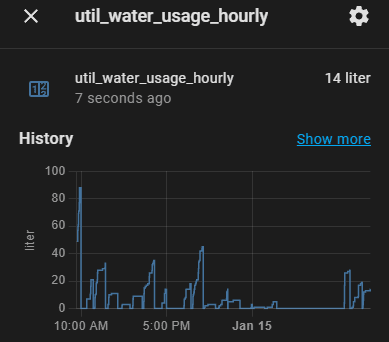
The cool thing about using the utility meter sensor is that you can drill into reports. If you click the Lovelace card you will see a historic chart.
In this card, you can also click show more. This will bring you to the historical reports. In these reports you can filter down on selected times and get more insights.
That’s it! Now you are tracking your water usage using a simple sensor that costs under 10$. Let me know how you use the water meter and what Lovelace configuration you use to visualize the water usage.