Sitecore Rules Engine: How to remove conditions and actions

When using the Sitecore Rules Engine you don’t want your business user to see all the Conditions and Actions. Conditions and Actions are also items (everything is a Item ;-)) so you can apply security on them. Deny a user Read access on a Condition or Action and the user will not see them in the Rule Set Editor.

Create the role Deny Conditions

Open the Role Editor and create a new Role called Deny Conditions. Click Members and Add the business users to the role. Close the Role Manager.

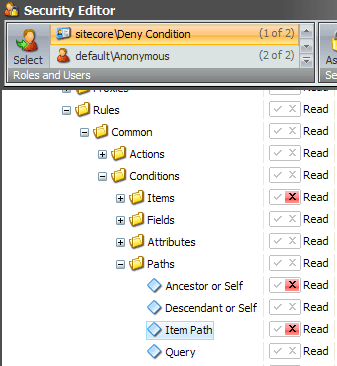
Open the Security Editor en select the created role Deny Conditions. Go to SystemSettingsRulesConditional RenderingsConditions and deny read rights on the conditions (or folder) you want to hide for the business user. Repeat this for conditions in SystemSettingsRulesCommonConditions.

Sitecore rule engine disable and hide conditions

Login as the business user and open the Rule Set Editor

Now test the settings and log-in as the business user, go to the Marketing Center and create a new conditional rendering rule. All the condition where the read access is denied are not in the Rule Set Editor.

Sitecore rule engine disable and hide conditions result

At this point the business user will only see condition he/she can understand.

Sitecore Rules Engine: How to create a custom condition

In this How to I will build a custom condition for the Sitecore Rules Enginge. This How To is a proof of concepts based on a webinar (in Dutch)  about the Rules Engine. I presented this webinar earlier this year and you can watch the webinar on Youtube by clicking this link.

Before we start writing code I’ll explain the business case we are trying to resolve.

The ‘case’:
The business user want to personalize the website based on the website the visitor comes from (the http referrer).  For now he is only interested in Facebook and Twitter.
If the visitor visits our site from Facebook the Facebook Like button of our own Facebook page must be visible on the homepage.
If the visitor visits our site from Twitter our Twitter Tweet stream must be visible on the homepage.

Oke, Now start building it!

Create templates

Create a template called Sidebar Text, this template has two field; a Sidebar Title (Single-Line Text field) and a Sidebar Text (Rich Text field).

Create a template called Standaard Text, this template one field called Text (Multi-line Text).

Set up the content tree

Create a folder called Sidebars  and add two Sidebar Text items with the following values:

Create a folder called Http Referrers and add the following items:

  • Item name: Twitter
    • Text: twitter.com
  • Item name: Facebook
    • Text: facebook.com

Create presentation component

Create the Sidebar Text rendering for displaying the Sidebar Title and Sidebar Text.

Open development center and click Create a New XSLT rendering and name the rendering Sidebar Text. Add the following code to the rendering template:
Continue reading “Sitecore Rules Engine: How to create a custom condition”

From BlogEngine.Net to WordPress

After blogging a long time on BlogEngine.Net I thought it was time to switch to WordPress. The conversion wasn’t great.

The biggest problem was that the syntax highlighter is not compatible and the image where not exported. But the content is here, excluding the images. I will try to clean it up and add the images and the syntax highlighter. And if everything is back online I will get back to the blogging.

Cheers,
Pieter

New Job: Solution Architect for Sitecore

As from the 1st of january I’m the new solution architect for Sitecore the Netherlands. My responsibilities wil be:

  • Technical Presentations and demonstrations
  • Providing Technical Trainings
  • Defining Sitecore architecture/blueprint for customer and partners
  • Developing CMS relevant (sales) propositions
  • Develop demo’s and POC with sales, product specialist and product development
  • Support local sales in responding to tenders/rfi/rfp
  • Keep relevant technical/market knowledge up to date
  • Advise customers & partners on how to best use Sitecore products

So from now on more blogging about Sitecore.

Design Patterns(C#): Basic example Strategy pattern

In this example I´m going to explane the strategy pattern. With this example you can do a calculation with two numbers (-/+) and expand the number of operators (/, *, etc.).

First create a interface which defines the interface of the operator classes. For this example an operator can only calculate two values.


//The interface for the strategies
public interface ICalculateInterface
{
//define method
int Calculate(int value1, int value2);
}

Next create the operators (strategies) Minus (which subtract value 2 from value 1) and Plussus (which addition value 1 with value 2). The classes need to inherit from the interface ICalculateInterface.


//Strategy 1: Minus
class Minus : ICalculateInterface
{
public int Calculate(int value1, int value2)
{
//define logic
return value1 - value2;
}
}

//Strategy 2: Plussus
class Plussus : ICalculateInterface
{
public int Calculate(int value1, int value2)
{
//define logic
return value1 + value2;
}
}

At last we need to create a Client that will execute the strategy.


//The client
class CalculateClient
{
private ICalculateInterface calculateInterface;

//Constructor: assigns strategy to interface
public CalculateClient(ICalculateInterface strategy)
{
calculateInterface = strategy;
}

//Executes the strategy
public int Calculate(int value1, int value2)
{
return calculateInterface.Calculate(value1, value2);
}
}

Now we have two operators (minus & plussus) and a client (CalculateClient) that can execute the operators. Let’s test the code. Create a new webapplication, console app or something else that can write output. For this example I will use a webpage.

Initialize a new CalculateClient with argument operator Minus of Plussus and Calculate two values.


protected void Page_Load(object sender, EventArgs e)
{
CalculateClient minusClient = new CalculateClient(new Minus());
Response.Write("<br />Minus: " + minusClient.Calculate(7, 1).ToString());

CalculateClient plusClient = new CalculateClient(new Plussus());
Response.Write("<br />Plussus: " + plusClient.Calculate(7, 1).ToString());
}

This code will give the following output.


<br />Minus: 6
<br />Plussus: 8

The great thing about this pattern is that you can easily add new opertators (strategies) to your code.

Cheers,
Pieter

Asp.Net: Webtest trough proxy (WebTestPlugin)

The test-team came to me with a problem involving connection errors while running webtests trough the company proxy. The webrequest needed to go to the webproxy including authentication. Visual Studion 2008 doesn’t support proxy authentication out of the box, but you can create a WebTestPlugin that does the authentication for every request.

The following class inherits from WebTestPlugin and overrides the PreWebTest method. In the PreWebTest method it will authenticate the request with your credentials.


public class LoadTestProxyAuthentication : WebTestPlugin
{
        public override void PreWebTest(object sender, PreWebTestEventArgs e)
        {
            // Create WebProxy (enter your proxy url)
            WebProxy webProxy = new WebProxy("ProxyAdres");

            // Use the proxy for the webtest
            e.WebTest.WebProxy = webProxy;

            e.WebTest.PreAuthenticate = true;
            NetworkCredential proxyCredentials;

            proxyCredentials = new NetworkCredential();

            proxyCredentials.Domain = "domain";
            proxyCredentials.UserName = "username";
            proxyCredentials.Password = "password";
            e.WebTest.WebProxy.Credentials = proxyCredentials;
        }
 }

How to use the webtestplugin
Ad the class to your test project, change the credentials and proxyadres. After a build open the webtest press the ‘add  Webtest plugin’ button (on the top screenmenu), select the LoadTestProxyAuthentication and press OK. You need to add the webtestplugin for every webtest.

Now you can run your webtests trough the proxy.

Hope it helps,
Pieter

Asp.Net: keyboard sort items

As proof of concept I wanted to sort images in a Grid by keyboard. The sort logic needed to be implemented on the server. My solution for this problem is a combination of Javascript and C#.

First add following html to you .aspx. Notice that the body tag has runat=”server” and a ID.


&lt;body<strong> runat="server" ID="bodyTag"</strong>&gt;
<form id="form1">

<br />


<br />
<br />

</form>


Now add the following JavaScript to your page. This script will fetch all keyboard input and press the corresponding button.


document.onkeydown = checkKeycode
function checkKeycode(e) {
var keycode;
if (window.event) keycode = window.event.keyCode;
else if (e) keycode = e.which;
switch (keycode) {
case 37:
var obj = document.getElementById('');
obj.focus();
obj.click();
break;
case 38:
var obj = document.getElementById('');
obj.focus();
obj.click();
break;
case 39:
var obj = document.getElementById('');
obj.focus();
obj.click();
break;
case 40:
var obj = document.getElementById('');
obj.focus();
obj.click();
break;
}

}


At last we need to add the following C# code to the page.


protected void Page_Load(object sender, EventArgs e)
{
//Ad clientside onkeypress event to the body
bodyTag.Attributes.Add("OnKeyPress", "keyhandlers()");
}

protected void DownButton_Command(object sender, CommandEventArgs e)
{
//Just for testing
clickedLabel.Text = (string)e.CommandArgument;
}

Enjoy, Pieter