This article will provide you with a walkthrough on how you can build a water usage meter sensor that integrates with your Home Assistant for under 10 $/EURO without the need for any soldering or coding skills.
This article will also cover the configuration that’s needed in Home Assistants to translate the ‘pulse’ to liters (or any other non-metric measurement) in Home Assistant. In the end you will have clear insights in how much water you are using per day, hour, and week.
Why do you want to measure water usage of your home?
These days it’s all about insights. I measure pretty much all my utilities, including power and city heating. The last missing piece is water usage. Although the water in the Netherlands is not really expensive, I wanted to get more insights into how much water we are using and if there is any way to save some water. Unfortunately, water delivery doesn’t come with a smart meter. There’s just an analog counter. So how do you measure the water usage and make this analog meter smart?
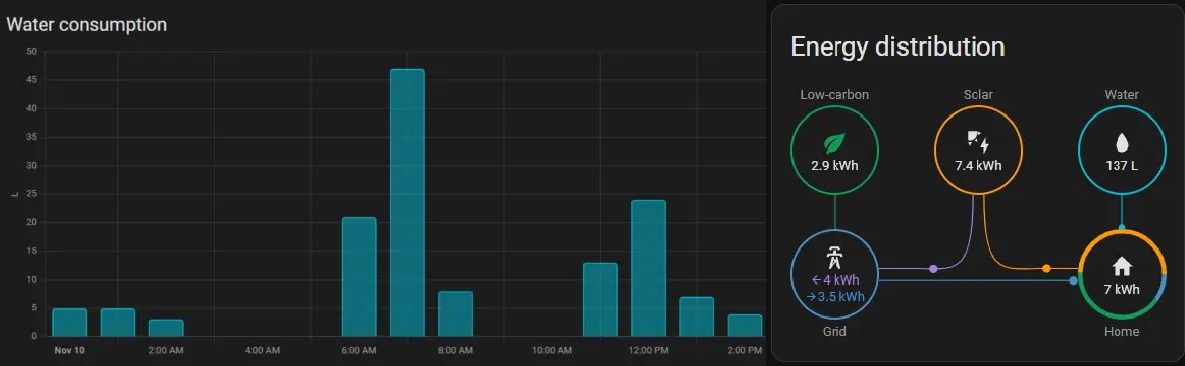
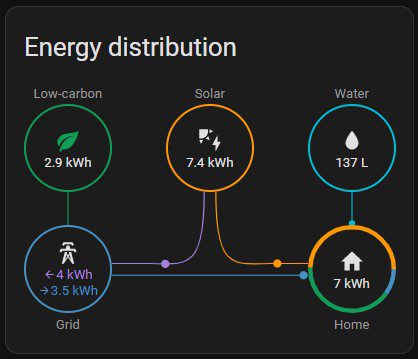
See water usage in the Home Assistant Energy Dashboard
The 2022.11 release of Home Assistant added the option to track water usage in the Home Assistant Energy dashboard. The ESPhome configuration has been updated to support this feature. Thanks to MJV for sharing his configuration on the Home Assistant forums.
This article will provide a walkthrough of how you can build a Particulate Matter Air Quality meter that integrates with your Home Assistant for under 20$, without any soldering or coding skills needed.
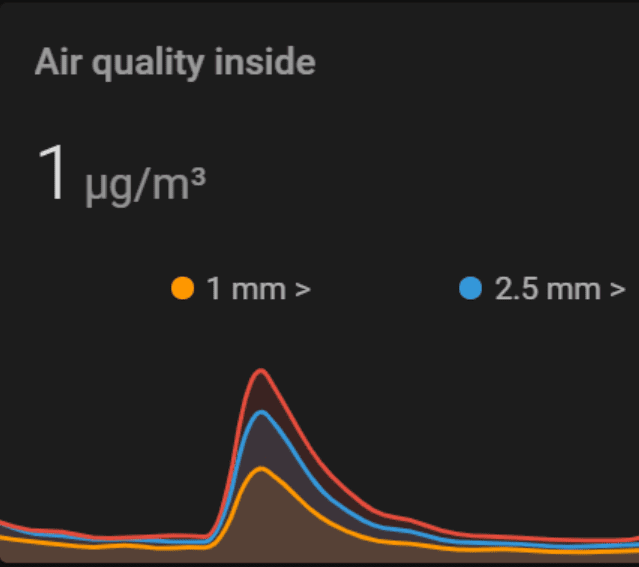
The sensor will provide multiple air-quality measurements directly visible in Home Assistant.
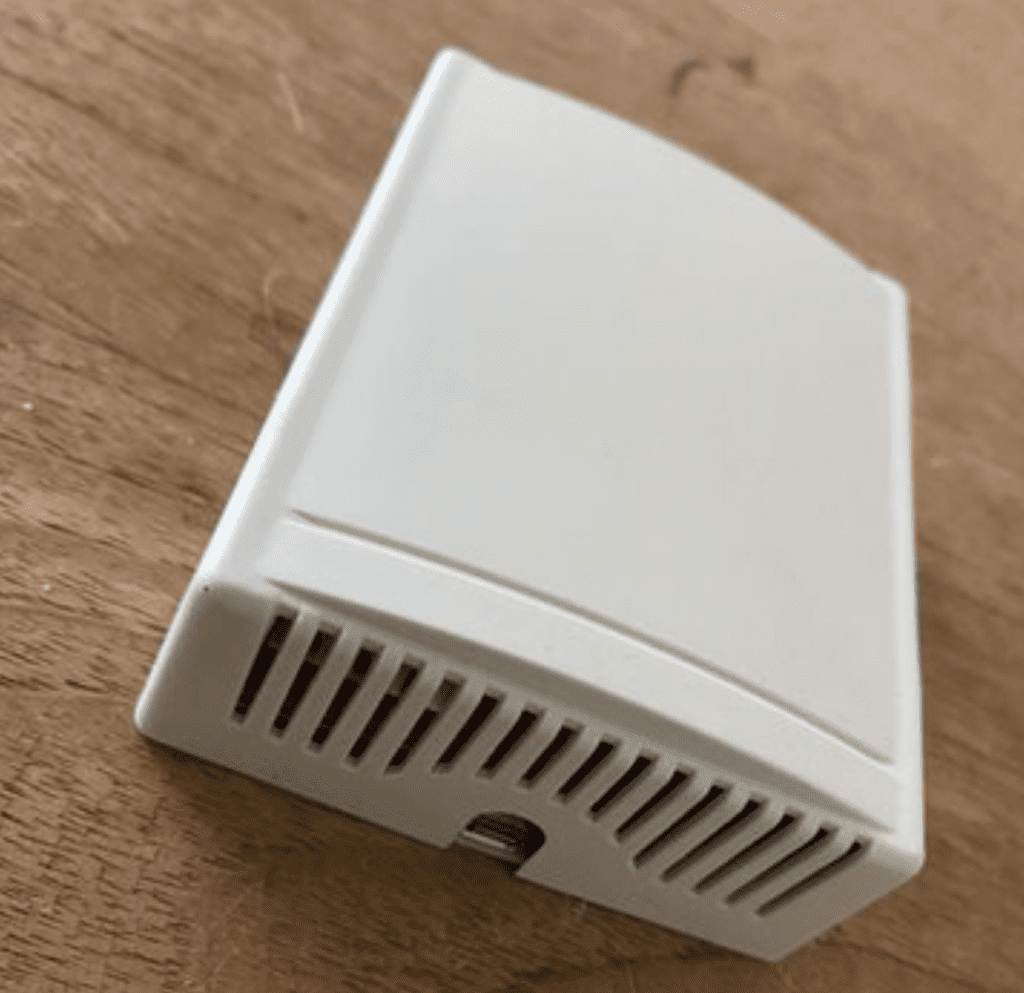
Final result: The air quality sensor and the measurements in Home Assistant
After seeing all kinds of air purifiers in the market, like the one from Xiaomi and Philips. I got interested in the topic air quality. First, I needed to learn more about how and what to measure, followed by actually measuring the air quality in my home. I don’t want to buy a air purifier if the quality of the air in my home is not bad. But how do you measure air quality?
What is a Particulate Matter sensor?
My search started with looking for a particulate matter sensor. A particulate matter sensor measures tiny particles or droplets in the air that have a specific size in microns or micrometers (µm). Like inches, meters and miles, a micron is a unit of measurement for distance. There are about 25,000 microns in an inch.
Particulate matter is the sum of all solid and liquid particles suspended in air many of which are hazardous. This complex mixture includes both organic and inorganic particles, such as dust, pollen, soot, smoke, and liquid droplets. These particles vary greatly in size, composition, and origin.
Source: www.greenfacts.org
Particulate matter (PM) is generally classified into two main size categories: PM10 and PM2.5. As an example, the particulate classified as PM2.5 is the size of 2.5 µm and would be thirty times smaller than that of a human hair.
This article is based on a Dutch webinar that I presented august 2012 and will refer to the video recording, slides, the How to documentation and used resources.
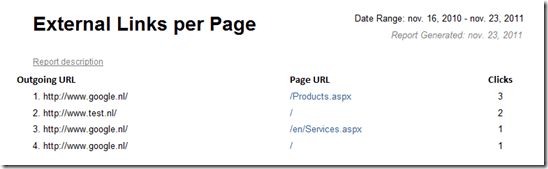
For this solution I want to measure all the outgoing link using the Analytics Database of Sitecore Digital Marketing System (DMS). Based on this data I want to create a report in the Sitecore Engagement Analytics that will show all outgoing clicks by page. I want to create a solution that rewrites all external links within rich-text fields and General Link fields. With this solution all external links on an existing website will be automatically rewritten and measured.
In this article I will create a solution for measuring outgoing links in the following steps:
Create a processor to rewrite all external links on the website.
Let get started!
Create the processor for rewriting external links
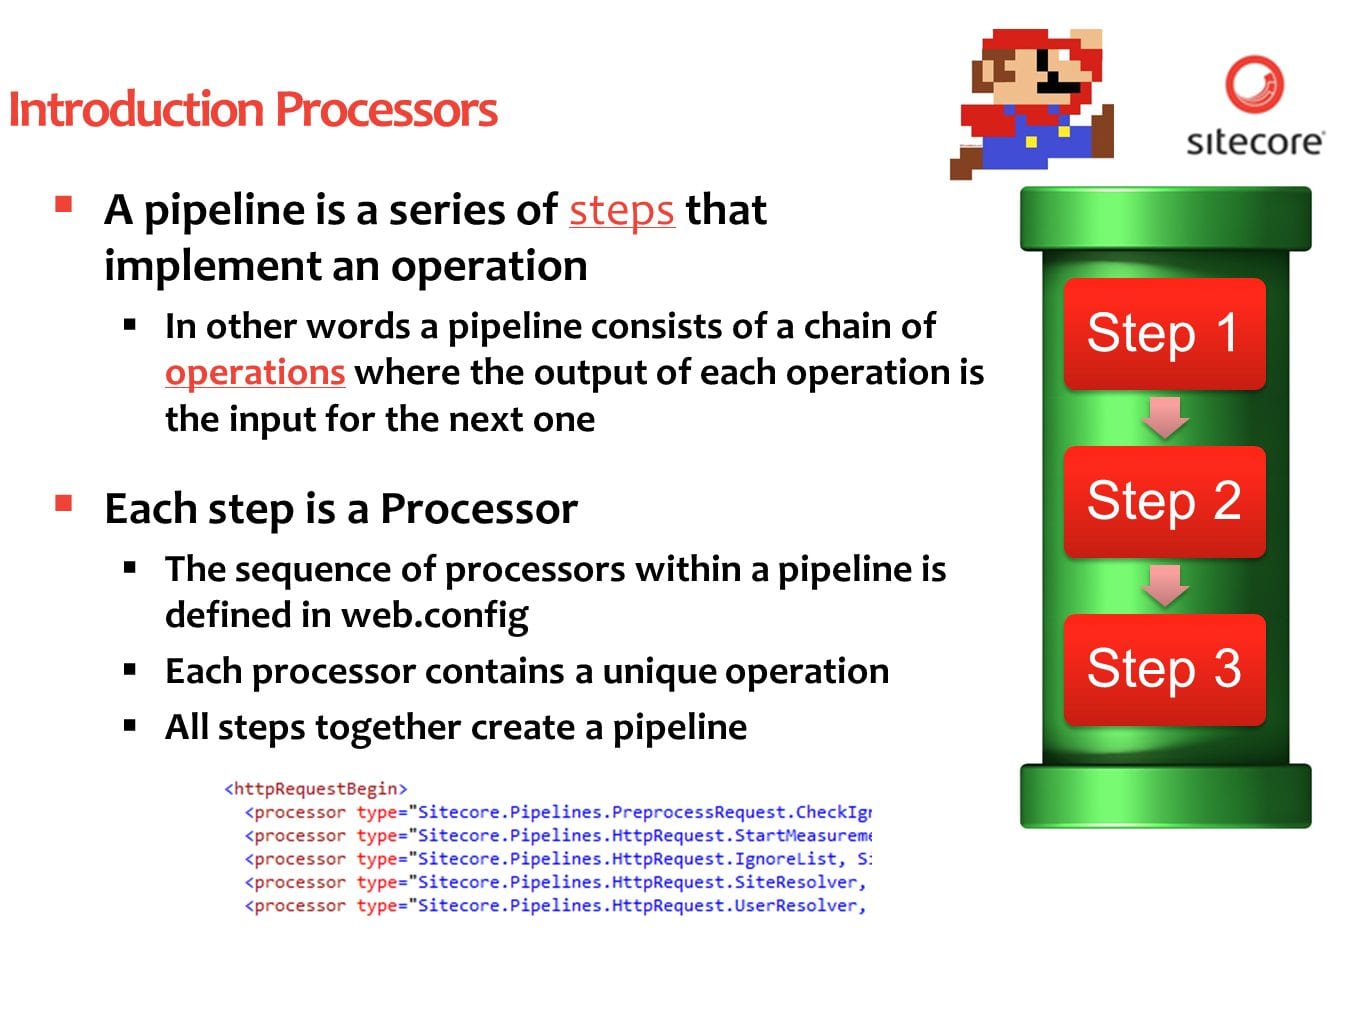
For the rewriting of the external links we are creating a Render Field Processor. This processor will fire for every field that is rendered. During this process we will rewrite the URL.
The easiest way to create a new processor is with the Visual Studio 2010 plugin Sitecore Rocks. One of the many things Sitecore Rocks does is creating Visual Studio Templates. These templates will help you extending Sitecore. Open your solution in VS2010 and add a new item. In the dialog window go to Sitecore –> Pipelines en selecteer Render Field Processor. Name the processor ExternalUrlReWriterProcessor.cs and click Add.
The Render Field Processor Template will generate two files for you; the ExternalUrlReWriterProcessor.cs and a ExternalUrlReWriterProcessor.config.
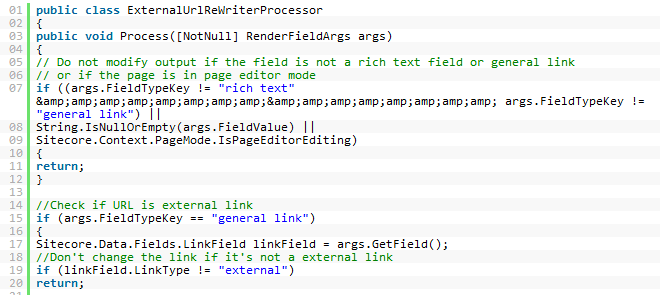
Modify the ExternalUrlReWriterProcessor class that all external URLs are rewritten to out /link.aspx page that we are going to create next. Below is my POC code. Please take notice of the comments and the TODO comments.
[code language=”csharp”]
public class ExternalUrlReWriterProcessor
{
public void Process([NotNull] RenderFieldArgs args)
{
// Do not modify output if the field is not a rich text field or general link
// or if the page is in page editor mode
if ((args.FieldTypeKey != “rich text” && args.FieldTypeKey != “general link”) ||
String.IsNullOrEmpty(args.FieldValue) ||
Sitecore.Context.PageMode.IsPageEditorEditing)
{
return;
}
//Check if URL is external link
if (args.FieldTypeKey == “general link”)
{
Sitecore.Data.Fields.LinkField linkField = args.GetField();
//Don’t change the link if it’s not a external link
if (linkField.LinkType != “external”)
return;
}
string fieldValue = args.Result.FirstPart;
string changedUrl = Regex.Replace(fieldValue, @”href=””(.*?)”””, delegate(Match match)
{
//Regex definition to check if URL contains HTTP or HTTPS (so it’s an external link)
Regex rgxExternal = new Regex(@”Regex rgxExternal = new Regex(@”(((http(s?))\://){1}\S+)”);”);
string orriginalUrl = match.Groups[1].Value.ToString();
if (rgxExternal.IsMatch(orriginalUrl))
{
//Rewrite the url to the redirect item
//TODO: Make the path configurable
return @”href=””/link.aspx?url=” + orriginalUrl + @””””;
}
return match.Value;
}, RegexOptions.Compiled);
args.Result.FirstPart = changedUrl;
}
}
[/code]
If you check your website all external links will be rewritten to /link.aspx?url=[EXTERNAL LINK]. Now let’s create the links.aspx and save the outgoing link information to the DMS Analytics database.
Test if it works
You can test if the solution is working on your website by testing the following functionalities
Action
Expected result
Create a internal link in a rich-text field
The link is not rewritten.
Create a external link in a rich-text field
The link is rewritten to /link.aspx?url=[THE LINK]
Create a internal link in a general link field
The link is not rewritten.
Create a external link in a general link field
The link is rewritten to /link.aspx?url=[THE LINK]
Click a external URL
The visitor is redirected to the external website.
This step is the first of the series: How to track External Links with Sitecore DMS. In this step we are going to create a page (link.aspx) that will register the outgoing traffic into the Sitecore Analytics database and redirects the visitor to the external website.
Save the outgoing click information to the Analytics database
Create the custom page event
Open the content editor, go to /sitecore/system/Settings/Analytics/Page Events and create a Page event called External Link.
Under the Options field section select the IsSystem checkbox
We refer to the name of this Page Event Item when saving the outgoing link to the Analytics database.
Create the sublayout
Create a sublayout called LogExternalLink. In the Page_Load event add the code.
[code language=”csharp”]
protected void Page_Load(object sender, EventArgs e)
{
if (Tracker.IsActive)
{
bool trackClick = true;
//Check if outgoing traffic is generated within a visit of the site
if (Tracker.CurrentVisit.PreviousPage == null)
{
//The visit is a direct visit or from another website, don’t add this link to the analytics db.
//OPTIONAL; Log these links based on referrer url.
trackClick = false;
}
//Get linkUrl from querystring
string externalUrl = Request.QueryString[“url”];
//Check if link is set
if (!string.IsNullOrEmpty(externalUrl))
{
if (trackClick)
{
//Create PageEvent, the name must match Page Event item in Sitecore
PageEventData data = new PageEventData(“External Link”);
//Set PageEvent data
data.Text = string.Format(“Outgoing traffic to: {0}”, externalUrl); ;
data.DataKey = externalUrl;
data.Data = externalUrl;
//Add the event to the previouspage; that’s where the link is clicked
Tracker.CurrentVisit.PreviousPage.Register(data);
Tracker.Submit();
}
//Redirect visitor
Response.Redirect(externalUrl);
}
}
//Something not right here, send them back to the homepage
//TODO: Log Error or Warning
Response.Redirect(“/”);
}
[/code]
Based on your businesscase you could choose to create a handler. A handler will have less overhead. If you create a Sublayout you could create a screen telling the visitor that there are leaving the website (for example like Facebook does).
Now create an item link underneath the website root and place the LogExternalLink sublayout that we just created on this item. This item will be the link.aspx page. All external links will be redirected and processed trough this page.
Test if it works
At this point we cannot test this part of the solution. Testing this solution is only possible if the tracking page (link.aspx) is referred from the website. We don’t want to track URLs that are triggered from a direct request.
In this How To I’ll show you how to extend Sitecore to track outgoing links trough the Sitecore Digital Marketing System (DMS).
First of we start with creating a sublayout that saves the outgoing link clicks to the Analytics database. Next step is creating a solution for tracking the outgoing link. There are multiple solutions of tracking external links but in this series we are creating the following two solutions; one that tracks all outgoing links automatically (step 2.1) and the other solution where it´s possible to enable tracking for-each outgoing link (step 2.2)And off-course we finish with report that will show you the most clicked outgoing links.