In this article I’m going to explain how to convert .mrt reports from the Sitecore Online Marketing Suite (Sitecore 6.4) to the Sitecore Digital Marketing System (Sitecore 6.5).
Report related changes between OMS and DMS
Both the OMS and the DMS use .mrt reports for Analitics reporting. There are two mayor changes between the OMS and DMS reporting; a full redesign of the datamodel and the location of the SQL query for the report data.
Mapping the datamodel of the OMS with the DMS
If you compare the datamodel of the OMS to the DMS datamodel you will see that it’s completely different. But the main concept of both datamodels is almost the same.
OMS table
DMS Table
Description
GlobalSession
Vistors
Contains the Visitor information.
Session
Visits
Contains the information of all the visits. A visits is underneed a Visitors.
Page
Pages
Contains all pages that are visited and are connected to a Session.
The following drawing will show the relation of Visitor->Sessions->Pages.
In this post I will extend the basic e-mail template for Sitecore ECM with a title and text listing. With this e-mail template the business user can create new Title and Text items within the page-editor (Sitecore 6.4 and higher) or the content-editor (all versions of Sitecore). This article is a follow-up article of the Sitecore ECM: How to create a Email template from Scratch – Part I.
Create the Newsletter Text template
Createa template Newsletter Text with the following fields: Message Title and Message Text.
Add standard values for the Message Title and Message Text fields.
Add Newsletter Text folder to the Branche Template
Go to the BasicNewletter branche template and create a folder Newsletter Text. Assign the Newsletter Text template as Insert option.
Create Newsletter Text rendering
Create a new layout called Newsletter Text and copythe following code.
In this post I will create a e-mail template for ECM from scratch. This article is based on a Webinar (in Dutch) I did about the Email Campaign Manager (ECM) you can see the Webinar on YouTube.
[youtube]hGmzaK79cvI[/youtube]
We build a custom template the same way that we build a page. First we will create the templates, than we will create the presentation components and at the end we will bind the presentation components to the template standard values. Let’s start building!
Create Basic Newsletter template
1. Open the template manager and create a new template called Basic Newsletter, Select the following base templates
/sitecore/templates/Modules/Email Campaign/Messages/Inner Content/Message Root
2. Specify the following fields :
a. Title
b. Text, set the source property to /sitecore/system/Settings/Html Editor Profiles/ Message Content
c. Header Text
d. Header Link Text
e. Footer Text
The Basic Newsletter template in will look like this:
1. Create a branch template
2. Select the /sitecore/templates/Modules/Email Campaign/Messages/Pre-existing page template
3. Rename the create Pre-exiting Page branche template to Basic NewsLetter
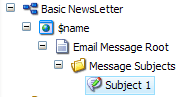
4. Underneath the $name item create the Email Message root item based on the Basic newsletter template
5. Underneath the created Email Message root item insert a folder called Message Subjects. This folder will contain all subjects for the e-mail.
6. Remove the folder template to insert options of the Message Subject folder and add the Subject template: /sitecore/templates/Modules/Email Campaign/Messages/Inner Content/Newsletter/Subject.
7. Insert a Subject item in the Message Subject folder with the name Subject 1.
You can automatically add a insert option using a insert option rule in the Sitecore Rule Engine.
The ‘case’:
In our Sitecore content tree we have a Meta-Data folder where we store al our meta-data information. The Meta-Data folder is organized in folders which contains meta-data items based on a template called Standard Text. What we want to achieve is that when a new folder is created within the Meta-Data folder the Standard Text template will be automatically available as insert option.
Open the content editor and find the Rules folder: /sitecore/system/Settings/Rules/Insert Options/Rules/
In the Rules folder create a new Insert Option Rule named Meta-Data rule. For the name enter Meta-Data rule and click, the Rule Set Editor will open. Select the condition Where the parent name compares to value and for the action check Add specific insert option. Specify the rule that it will look like this:
We don’t have to specify or activate the rule for the Meta-Data folder because the insert Option Rules will be automatically processed by the GetInsertRule pipeline.
Now test the result and create a new folder underneath the Meta-Data folder and check if the Standard Text template is added to the insert options.
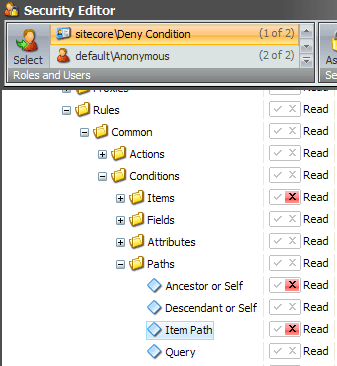
When using the Sitecore Rules Engine you don’t want your business user to see all the Conditions and Actions. Conditions and Actions are also items (everything is a Item ;-)) so you can apply security on them. Deny a user Read access on a Condition or Action and the user will not see them in the Rule Set Editor.
Create the role Deny Conditions
Open the Role Editor and create a new Role called Deny Conditions. Click Members and Add the business users to the role. Close the Role Manager.
Open the Security Editor en select the created role Deny Conditions. Go to SystemSettingsRulesConditional RenderingsConditions and deny read rights on the conditions (or folder) you want to hide for the business user. Repeat this for conditions in SystemSettingsRulesCommonConditions.
Login as the business user and open the Rule Set Editor
Now test the settings and log-in as the business user, go to the Marketing Center and create a new conditional rendering rule. All the condition where the read access is denied are not in the Rule Set Editor.
At this point the business user will only see condition he/she can understand.
In this How to I will build a custom condition for the Sitecore Rules Enginge. This How To is a proof of concepts based on a webinar (in Dutch) about the Rules Engine. I presented this webinar earlier this year and you can watch the webinar on Youtube by clicking this link.
Before we start writing code I’ll explain the business case we are trying to resolve.
The ‘case’:
The business user want to personalize the website based on the website the visitor comes from (the http referrer). For now he is only interested in Facebook and Twitter.
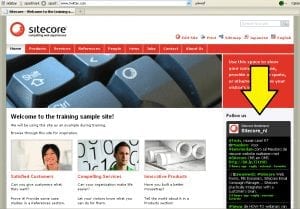
If the visitor visits our site from Facebook the Facebook Like button of our own Facebook page must be visible on the homepage.
If the visitor visits our site from Twitter our Twitter Tweet stream must be visible on the homepage.
Oke, Now start building it!
Create templates
Create a template called Sidebar Text, this template has two field; a Sidebar Title (Single-Line Text field) and a Sidebar Text (Rich Text field).
Create a template called Standaard Text, this template one field called Text (Multi-line Text).
Set up the content tree
Create a folder called Sidebars and add two Sidebar Text items with the following values: