Using Woonveilig / Egardia alarm with OpenHab using Node-Red

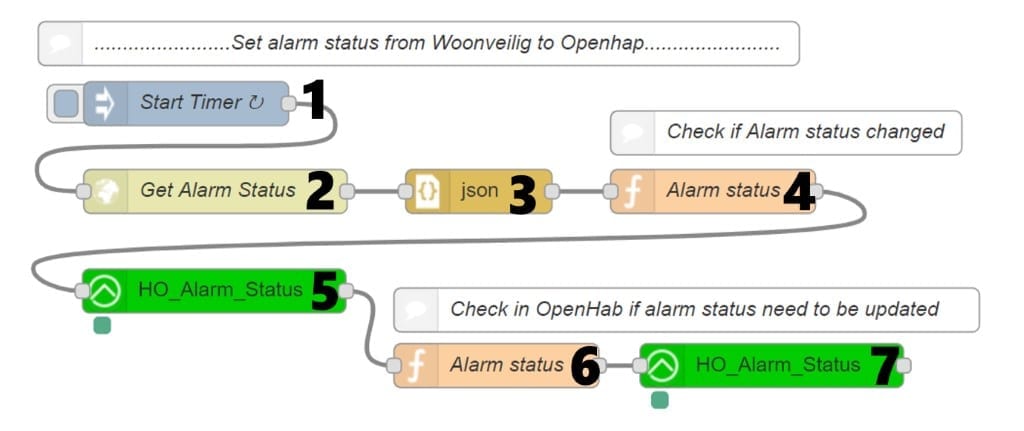
The above screenshots shows the flow in Node-red. The flow has following steps:

TIP: the flow is available for import at the end of this article.

1. Start flow every 20 seconds

2.  Do a webrequest to the woonveilig hub to get the current status

http://[YOUR WOONVEILIG IP/action/panelCondGet

3. Convert the responds to JSON

4. Check if the status of the alarm has changed if not exit the flow

The returned currentAlarmStatus variable has three values:

  • 0: the alarm is turned disabled
  • 1: the alarm is partial armed
  • 2: the alarm is armed

See code below

var currentAlarmStatus = context.get('currentAlarmStatus')||99;
var newAlarmStatus = msg.payload.forms.pcondform1.mode;
//node.warn(currentAlarmStatus);
if(newAlarmStatus == currentAlarmStatus){
//node.warn("Same status of the alarm, Exit");
return null;
}

context.set('currentAlarmStatus',newAlarmStatus);
if (newAlarmStatus == "0") { //Off
global.set('currentAlarmStatus',newAlarmStatus);
return msg;
} else if (newAlarmStatus === "1") { //Partial Armed
global.set('currentAlarmStatus',newAlarmStatus);
return msg;
} else { //Armed
global.set('currentAlarmStatus',newAlarmStatus);
return msg;
}

5. Get the status of the Alarm in from OpenHab

6. Run function to compare currentAlarmStatus

Compare Woonveilig alarm status with the status of the alarm in OpenHab. If changed update global variable and continue, if no change exit flow.

var currentAlarmStatus = global.get('currentAlarmStatus');
node.warn("current alarm : " + currentAlarmStatus);

var ohAlarmStatus = msg.payload.state;
node.warn("OH alarm status : " + ohAlarmStatus);

if(ohAlarmStatus == currentAlarmStatus){
node.warn("Status in OH is same as alarm status, Exit");
return null;
}

msg.payload = currentAlarmStatus;

return msg;


7. Update alarm item in Openhab

Import following flow directly into Node-red

Copy and import the flow below into Node-Red, make sure you update your OpenHab instance and Woonveilig details.

[{"id":"96c97991.eeefe8","type":"inject","z":"fb8e5ae4.e53ae8","name":"Start Timer ","topic":"","payload":"","payloadType":"date","repeat":"20","crontab":"","once":false,"onceDelay":"","x":151,"y":152.99999904632568,"wires":[["ce82f7fb.ce0b08"]]},{"id":"ce82f7fb.ce0b08","type":"http request","z":"fb8e5ae4.e53ae8","name":"Get Alarm Status","method":"GET","ret":"txt","url":"http://192.168.0.13/action/panelCondGet","tls":"","x":171,"y":212.99999904632568,"wires":[["4cc27829.c6f228"]]},{"id":"4cc27829.c6f228","type":"json","z":"fb8e5ae4.e53ae8","name":"","property":"payload","action":"","pretty":false,"x":351,"y":212.99999904632568,"wires":[["b0eaca39.9416c8"]]},{"id":"e08a64c5.b4c9d8","type":"function","z":"fb8e5ae4.e53ae8","name":"Alarm status","func":"var currentAlarmStatus = global.get('currentAlarmStatus');\nnode.warn(\"current alarm : \" + currentAlarmStatus);\n\nvar ohAlarmStatus = msg.payload.state;\nnode.warn(\"OH alarm status : \" + ohAlarmStatus);\n\nif(ohAlarmStatus == currentAlarmStatus){\n node.warn(\"Status in OH is same as alarm status, Exit\");\n return null;\n}\n\nmsg.payload = currentAlarmStatus;\n\nreturn msg;","outputs":1,"noerr":0,"x":363.0000305175781,"y":332.0000047683716,"wires":[["e26d4b11.ee8228"]]},{"id":"b0eaca39.9416c8","type":"function","z":"fb8e5ae4.e53ae8","name":"Alarm status","func":"var currentAlarmStatus = context.get('currentAlarmStatus')||99;\nvar newAlarmStatus = msg.payload.forms.pcondform1.mode;\n//node.warn(currentAlarmStatus);\nif(newAlarmStatus == currentAlarmStatus){\n //node.warn(\"Same status of the alarm, Exit\");\n return null;\n}\n\ncontext.set('currentAlarmStatus',newAlarmStatus);\nif (newAlarmStatus == \"0\") { //Uit\n global.set('currentAlarmStatus',newAlarmStatus);\n // node.warn(\"new alarm 0\");\n return msg;\n} else if (newAlarmStatus === \"1\") { //Thuis\n global.set('currentAlarmStatus',newAlarmStatus);\n //node.warn(\"new alarm 1\");\n return msg;\n} else { //Aan\n //node.warn(\"new alarm overig\");\n global.set('currentAlarmStatus',newAlarmStatus);\n return msg;\n}","outputs":1,"noerr":0,"x":511,"y":212.99999904632568,"wires":[["f00db576.387518"]]},{"id":"e0560d60.8cc0f","type":"comment","z":"fb8e5ae4.e53ae8","name":"Check if Alarm status changed","info":"Check if alarm status changed, if not exit\n\n0: uit\n1: Thuis\n2: aan","x":561,"y":172.99999904632568,"wires":[]},{"id":"54de2a09.70ac34","type":"comment","z":"fb8e5ae4.e53ae8","name":"Check in OpenHab if alarm status need to be updated","info":"","x":493.0000915527344,"y":294.0000047683716,"wires":[]},{"id":"f00db576.387518","type":"openhab2-get","z":"fb8e5ae4.e53ae8","name":"","controller":"e263d712.1e7b38","itemname":"HO_Alarm_Status","x":170.1666717529297,"y":281.0000238418579,"wires":[["e08a64c5.b4c9d8"]]},{"id":"e26d4b11.ee8228","type":"openhab2-out","z":"fb8e5ae4.e53ae8","name":"","controller":"e263d712.1e7b38","itemname":"HO_Alarm_Status","topic":"ItemCommand","payload":"","x":551.1666870117188,"y":332.0000047683716,"wires":[[]]},{"id":"d08ad29f.6f20f","type":"comment","z":"fb8e5ae4.e53ae8","name":"........................Set alarm status from Woonveilig to Openhap........................","info":"Check if alarm status changed, if not exit\n\n0: uit\n1: Thuis\n2: aan","x":310,"y":112.00000286102295,"wires":[]},{"id":"e263d712.1e7b38","type":"openhab2-controller","z":"","name":"Openhab","protocol":"http","host":"localhost","port":"8080","path":"","username":"","password":""}]

Use your alarm for presence detection in your Home Automation setup

One of the great things about home automation is the possibility to activate scenes based on presence of people in the house. Having solid presence detection in your home is not easy to achieve. There are a lot of ways to do this, but most of them use ping your devices, using network connectivity, Bluetooth or GPS geo-fencing technology. These solutions might work for some use cases, but if your presence detection is based on devices will only work for known devices and people. Meaning you can never be 100% sure that no-one is home.

So do not, I repeat do not, trigger scenes that shut down all the lights if no-one is home based on phones. I’ve a great story about a baby sitter that called me very unhappy about all lights being turned off and also that every time she switched them on they went off again. This go back to one of the essential rules of home automation. Read the 7 tips for a successful home automation.

However, switching lights off when nobody is home or switching random lights on while you are on holiday are great benefits of home automation. This is something you want to achieve. A great way of doing this is by installing an alarm and read the status of the alarm, e.g. Fully Armed, partial armed or off.

Continue reading “Use your alarm for presence detection in your Home Automation setup”

7 tips for a successful home automation

For the last eight years I’ve been busy improving with home automations, also called domotica. The time that I invest divers strongly per period, sometimes I don’t do anything for months, and then I find a new technology and I go all in with my spare time. In these years a lot of I’ve used a lot of different technologies, brands and platforms for my smart home.

I’m pretty happy with my current home automation setup and I got asked a lot by people that visited my house “How do I get started with home automation?”.

Let’s start with sharing my 7 rules for home-automations.

My requirements for a successful smart home

1. Keep it simple

Main requirement, people should not notice that you have home automation in place. Everything should work as is normal for your guests. The next two tips are about that. I would call this rule; think about the babysitter.

The main rule for home automation –> think about the babysitter

Your babysitter will not have your home automation app installed or interest to visit the mobile website. Also she wouldn’t be able to use your voice assistant as she doesn’t know the names of the lights. Make sure that every light is controllable by everyone that visits your house.

Continue reading “7 tips for a successful home automation”

My home automation setup

Let’s start with the first post about home automation.  I’m pretty happy with my current home automation setup.  In this post I would like to share my current setup as on June 2019. This will be a endless work in progress posts, updated with links to more in depth articles.

Before we start with home automation I want to make you aware of following statement.

You will get no compliments or praises for your Home Automation, the best recognition you will get are the complaints when it is not working.

My home automation history

For the last eight years I’ve been busy improving with home automations, also called domotica. The time that I invest divers strongly per period, sometimes I don’t do anything for months, and then I find a new technology and I go all in with my spare time. In these years a lot of I’ve used a lot of different technologies, brands and platforms for my smart home.

I recently switched from Domoticz to OpenHab as my main home automation platform. Domoticz has always worked perfect for me, the reason for me to change was mainly to try something new. I really like working with OpenHab, but the learning curve is steep and it a more technical oriented solution. So if you don’t have a technical background or you’re new to home automation I would advise you to start with Domoticz or Homey (no personal experience with Homey).

Continue reading “My home automation setup”

Install Node-Red on openHABian (openHABian PI)

Node-Red is available as an extension on Openhabian, this short post will explain you how to do this.

  1. Open Putty and start SSH session to your OpenHabian server. Login as with user Openhabian.
  2. Start the openHABian configuration tool

sudo openhabian-config

  1. In the openHABian configuration tool select Optional Components.
  2. In the optional components menu find NodeRED and press Enter. The installation of Node Red wil now start.
  3. Wait till the installation finalized and go to your browsers and visit your openHAB start page
    http://openhabianpi:8080

Node-Red will now be available in the start menu.

You are now ready to go and to start with Node-Red!

Sharing is caring

During my professional career I’ve always been an advocate of sharing knowledge. Share what you’ve learned so others can learn from it, this way at the end we all get to a better end-results. However, I noticed that in my private live I have passions that I haven’t shared my learnings about.

Next to my wife, kids, family and friends I like to spend time on windsurfing and home automation. My goal is to start sharing my insights on these topics -family, kids and friends excluded :)- and perhaps help others making their choices or getting started.

Again this is a goal, so let’s reflect on how I did in a year… Life is all about setting the priorities, we’ll see if I can make this work :).