Introducing ESPHome

This article is part of the Make your Bellfire fireplace smart project that I presented during the Home Assistant Conference 2020.

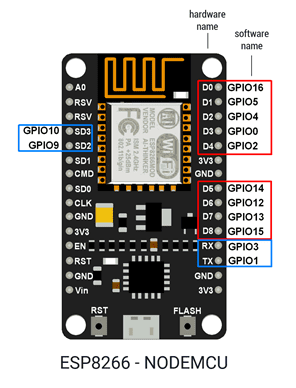
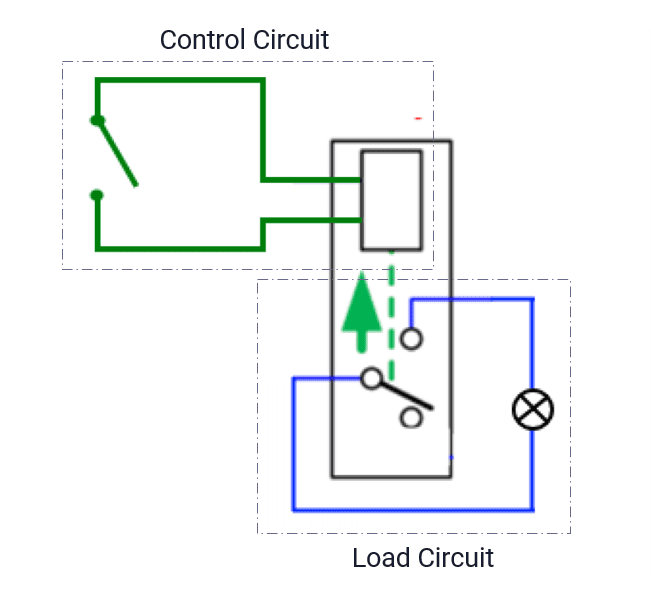
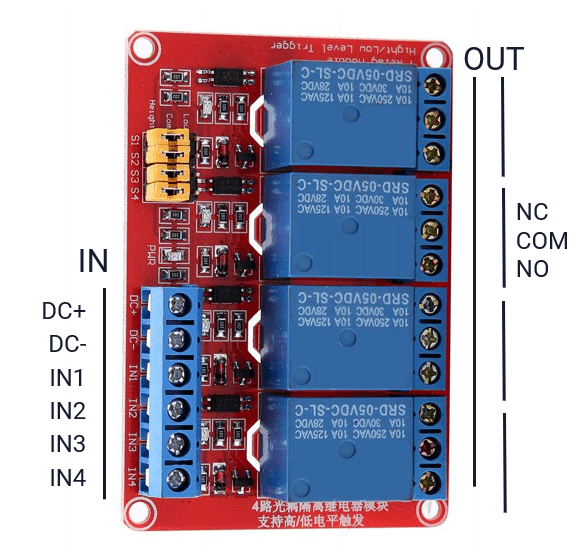
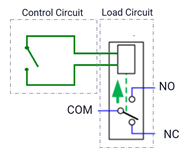
In the previous article, we introduced ESP boards and Relays that will help to switch the Bellfire fireplace pins of the controller. Now we need to control software that connect the ESP to Home Assistant and that can control the relays using the ESP GPIO pins. We are going to do this with an ESPHome.

ESPHome — ESPHome

ESPHome is a system to control your ESP8266/ESP32 by simple yet powerful configuration files and control them remotely through Home Automation systems like Home Assistant.

ESPHome is amazing, it’s extremely powerful and, more important very stable. It has never failed me. The integration with Home Assistant is seamless, including autodiscovery within Home Assistant and one-click configuration.

If you want, you can build advanced sensors with it. The good thing is that sensors are supported natively by ESPHome and can be used by easy configuration. The possibilities with ESPHome and Home Assistant are endless; the blocking factor is your own imagination.

Key features

  • Easy to work with, no programming needed
  • Seamless integration with Home Assistant
  • Over-The-Air flashing of the firmware
  • Supports a long list of devices.

We’ll use ESPHome to connect the ESP to Home Assistant and to control the relays using the GIO pins.

So we have Home Assistant, a relay, a ESP board, ESP home and a fireplace…. How is this all going to work together? I’m going to tell you that in the next article.

Introducing ESP / NodeMCU boards

This article is part of the Make your Bellfire fireplace smart project that I presented during the Home Assistant Conference 2020.

In the previous article, we introduced Relays that will help to switch the Bellfire fireplace pins of the controller. Now we need to control the relays, we going to do this with an ESP board.

ESP boards are a low cost Wi-Fi chips that have built in flash chips allowing you to build a single chip device capable of connecting to Wi-Fi. newer versions like the ESP32 boards also provide you BLE (Bluetooth low energy) and there’s loads of variety of boards you can use.  

For this project, I’m using the ESP8266, NodeMCU board.  I prefer using a Development Board because it comes with a USB and all the pins are pre-soldered, making it easy to use. You can buy this board at your favorite Chinese shop somewhere for a price between 3-10 euros. I usually buy them at AlieExpress (cheap) or Amazon (faster delivery).

For the fireplace we are going to use the Digital pins D5, D6 and D7 to control the three relays on the board. Be aware that the printed names of the pins like D1 need to be translated to the according to GPIO number to address them in your code and configuration. I will refer to this image in the configuration section.

Now we have the relay and the ESP to use as a controller. Now we need software that will run on the ESP. Software that we can be used to expose the relays as switches to Home Assistant and define interaction with the GPIO pins on the ESP.  ESPHome is the perfect solution for this.

The next article will introduce ESPHome.

Introducing Relays

This article is part of the Make your Bellfire fireplace smart project that I presented during the Home Assistant Conference 2020.

In previous article I addressed a way to make a Bellfire fireplace smart using the pins of the controller. To do this we need to use relays.

What is a relay?

In really short; A relay is an electrically operated switch.

How does it work?

A relay has two circuits:

  1. The control circuit.
    This circuit is used to control the switch, switching the control circuit will change the state of the load circuit switch
  2. The load circuit.
    The load circuit is where you connect the device that you want to interact with.

Both circuits are separated circuits, there is no direct connection or current flow between the control and the load circuit. This makes using relays very safe.

There is multiple variations of switching the load circuit. For usage with the ESP boards and 5v I prefer using Optocoupler relays. The switch is controlled using light and a photosensor to control the switch. Ensuring 100% separation of circuits.

For this solution, I’m using one board with 4 relays on it. You can buy it for a few dollars on AliExpress.

On the left we have IN top control the board; this is where you provide it with Power and one input to control every relay.

For OUT there are three outputs per relay:

  • Normal Close (NC)
  • Common, to close the circuit
  • Normal Open (NO)

You always connect the Common, but you need to choose between Normal Open and Normal Close. The difference between NO and NC is the default behavior for the relay if it is not power/switched on. If you select Normal Open the circuit will be not closed in a default state, when you use the Normal Close the relay will have a closed load circuit in a default state. 

Now we know we can use relays as a solution for the switches. But how are we going to control the relays? We need a solution to switch the controller circuit using high with voltage to close the control circuit and low voltage to open.  We need a controller for the relay, this is where the ESP boards come in.

The next article will introduce the ESP boards.

Investigating options for making the Bellfire fireplace smart

This article is part of the Make your Bellfire fireplace smart project that I presented during the Home Assistant Conference 2020.

In previous article I addressed four ways of making your dumb devices smart. Let’s jump into the journey of how I made my fireplace smart and the steps that I took through this journey.

The fireplace

Three years back I built a new house. We wanted to have a gas/propane fireplace installed in the house. While ordering I did the normal investigations and comparing different fireplace, we decided to order the Bellfire fireplace. I confirmed that it had a 433MHZ remote, making it easy to automate using a RFXcom. When the house was finished and after using the fireplace a few times, it was time for me to automate the fireplace.

1. Sniffing the 433MHZ signal

I got my good old RFXcom and started to sniff for the remote signals
Nothing happened. No signals where found.

I started investigated the remote and noticed that I had a different version of the remote. After some Googling I noticed that I had the latest version of the fireplace, which is good news, however remote communication was now build based on a Zigbee with a brand-specific layer on top. This makes it hard for me to automate. Forcing me to investigate otherways to make this now dumb fireplace smart.

Don’t get me wrong, I’m very happy that my FIREplace uses an encrypted and more secure communication method than 433Mhz, it just made my automation life a lot harder.

Time for the next option.

2. Googling the “Bellfire homeautomation”

I start searching for “Bellfire homeautomation” which didn’t have any results that provided a solution to making the Bell fire smart.

One of the results was a Wi-Fi module that you could buy from Bellfire. This would make the device smart, but there where no open APIs or ways to integrate the fireplace with Home Assistant

Time do go one level deeper.

3. Time to open the maintenance latch of the fireplace

In the maintenance latch I located a controller. The controller was a Maxitrol from Mertik. I found the manual and it stated four pins for external operations.

Now I needed to find out what communication and interaction that connection accepted. After more research on the internet I stumbled on documentation of how to ignite and turn off the fireplace using the pins.

This manual shows that if I want to ignite the fireplace I need to close the contact 1 and 3 for two seconds.
And to turn off the fireplace I need to close Contacts 1, 2 and 3 for only one seconds.

This gives me something to work with! Next challenge how am I going to create these interactions with switches that I can control from Home Assistant. I need to get some relays!

Let’s introduce a relay is in the next article.

Ways to make dumb devices smart

When I buy a new device for my home I it to be smart. I might be pushing it a bit to far, including scales, washing machines, barbeque, toothbrushes…  But sometimes devices are just not smart out of the box.  I use the following four steps, going from easy to hard, to make devices smart and use it in home automation.

Search for integrations, home assistance has very large ecosystem, there’s tons of integrations available out of the box, there’s HACS and then there’s countless blog posts published. You can also find like minds that have similar issues and already solved issue on the Home Assistant forum and Discord server.

2 investigate the remote

If your device has a remote and you have no luck with the device name. You need to start investigating your remote and again this could be an easy solution. If it’s an infrared remote you can use an IR blaster, is it a 433MHZ signal you can use a RFXcom. Open the remote and start Googling the chipsets in the remote, perhaps it’s based on Zigbee protocol that someone already build a solution for.

3 is it a network device

Is the device is in any way smart connect with Internet using Wi-Fi or UTP cable? You can use tools, like WireShark, to sniff the network traffic on your network. This is where it gets more technical and complex. Using these tools you need to reverse engineer requests and build an integration. Don’t forget to opensource your integration so others can help you and benefit of your hard work.

build your own soltution

The final option is to build your own solution. With building your own solution I mean replacing a hardware switch with a electrical switch, a relay. Creating a smart switch that will take over the control of your device. Although this sounds really hard, it’s not. You can get great results without being heavy technical. No advance wiring, soldering or programming is required. However, it does help it you know about this.

At the end, I made my fireplace smart by building my own solutions. Read the next article on how I investigate the different ways of making my fireplace smart and why I decided to go for this solution.