How to access the Align command with keyboard shortcuts in PowerPoint

I make a lot of presentations using PowerPoint and I’m also on the receiving end of a lot of presentation.

I truly believe that a good presentations is not made with slides but with a good story and talk track. However, the slides need to be clean and not distracting. One thing that always distracts me is miss alignment of visuals, icons not being centered or columns not evenly distributed.

PowerPoint Align objects functions
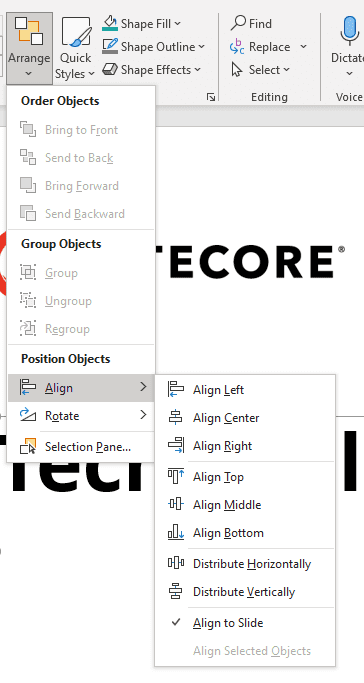
PowerPoint has a great feature called Align to help you address this. You can find the Align options under the Arrange button located in the Drawing section underneath the Home Tab.

Using these Align option will save you a lot of time and increase the quality of your presentations. I use these options every day, and unfortunately I couldn’t find a way to access them using keyboard shortcuts. In this post I’ll share the workaround I use to access the align options using keyboard shortcuts.

Continue reading “How to access the Align command with keyboard shortcuts in PowerPoint”

Daily Tip: Use the SitecoreInstaller to create quick Sitecore instances including modules

As Solution Architect a part of my job is doing product demo’s and building Proof Of Concepts. The best way for me is to build stuff based on a clean install of Sitecore with the involved modules installed (like DMS, SES or ECM). Normally you will do this with the default Sitecore installer and manually install the modules you need, but this will take to much of your precious time.

With the  SitecoreInstaller you can install Sitecore with selected modules in one click.

How to use the Sitecore Installer?

There are two things you need to do for the SitecoreInstaller:

  • Create the build library
  • Download and configure the SitecoreInstaller

Create the build library

The build library is where the tool stores files needed for installation such as Sitecore versions, licenses and modules.  And has the following structure:

  • <PathToBuildLibrary>\Licenses
  • <PathToBuildLibrary>\Sitecore
  • <PathToBuildLibrary>\Modules

Read all the information on the projectpage on codeplex:
http://sitecoreinstaller.codeplex.com/wikipage?title=Build library

Download and configure the SitecoreInstaller

  1. Download the Sitecore Installer from Codeplex
    http://sitecoreinstaller.codeplex.com/
  2. Extract the .zip and open the SitecoreInstaller.exe
    Sitecore Installer
  3. First time a configuration wizard will open, insert your SQL credentials
    Sitecore SQL setting
  4. Next step is to select your Build Library folder.

Sitecore Build Library

Run the SitecoreInstaller

By default the SitecoreInstaller runs in a “User friendly” mode, with wizard functionality.

Sitecore Installer example

I’m not that fan of the wizard. But locally you can set the Installer in a more advance mode by selecting View –> Use Developer layout and View –> Show Advanced View.

Sitecore Advance settings

This will give you a great all-in-one interface. Where you can give your install a name, select the CMS version and modules and install with one click.

Sitecore module installer

All credits go to Rasmus Rasmussen for creating and sharing this great tool!

Daily Tip: Great tool the Sitecore Log Analyzer

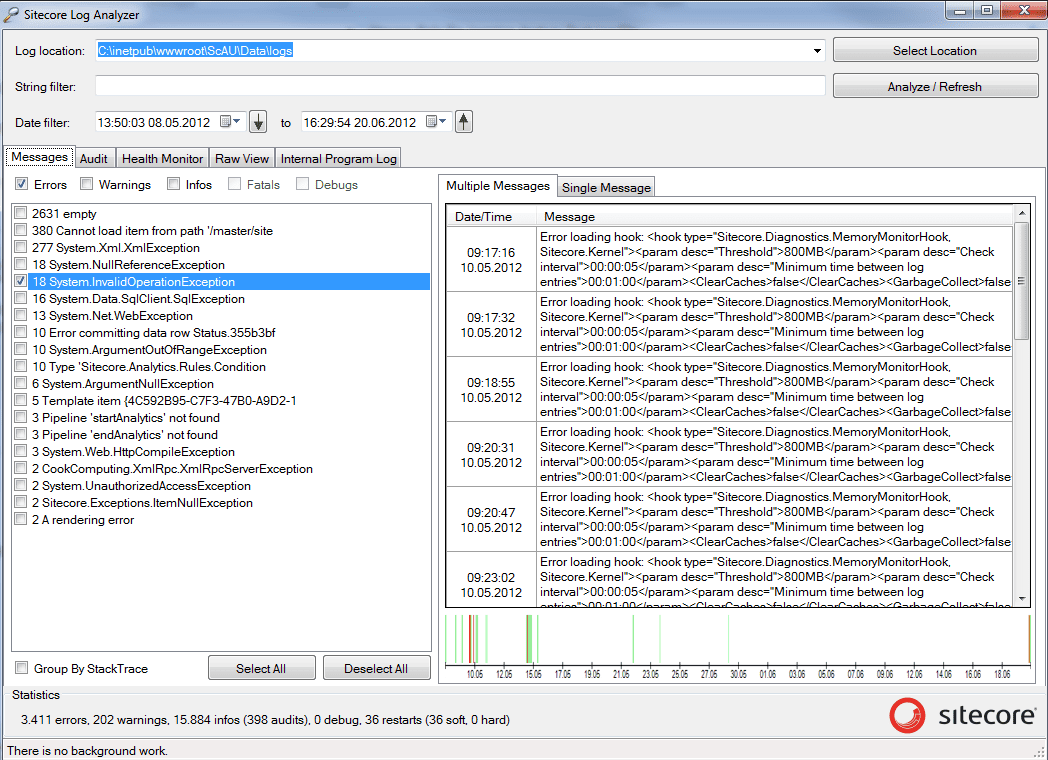
Did you hear of the Sitecore Log Analyzer? The Sitecore Log Analyzer is a great tool. It does what the name claims; It will help you analyze your log files!

A short list of some great features:

  • Quick analyze of all log files in a directory
  • Date and string filter

Sitecore Log Analyzer Date Filter

  • Tabs for the different categories; Messages, Audit and Health Monitor
  • Filters for log levels; Errors, Warnings and Info’s

Sitecore Log Analyzer Categories Error Warning Info

  • Log entries sorted on number of occurrences

Sitecore Log Analyzer Sorting

  • Timeline overview of the (filtered) log entries

Sitecore Log Analyzer Timeline overview

  • Great statistics 🙂

Sitecore Log Analyzer Statistics

Go ahead and download the Log Analyzer from SDN and analyze you’re log files on a regular basis:
http://sdn.sitecore.net/resources/tools/log%20analyzer/download.aspx

Happy Analyzing,
Pieter

DailyTip: Enable Personalization section in Sitecore 6.5

In Sitecore you can personalize your website with conditions and actions using the Rules Engine (so called Conditional Rendering rules).  In Sitecore 6.5 the interface for defining conditional rendering rules is integrated in to the page-editor, this way it´s easier for the marketeer to create and maintain pesonalization rules.

But as a developer you want to create predefined rules and activate them on the template standard values, the same way personalisation was working in Sitecore 6.4. This is still posible with 6.5 only by default the Personalisation section of the presentation component properties is hidden in Sitecore 6.5.

The following steps will enable the Personalisation section in the Presentation Component Properties dialog window.

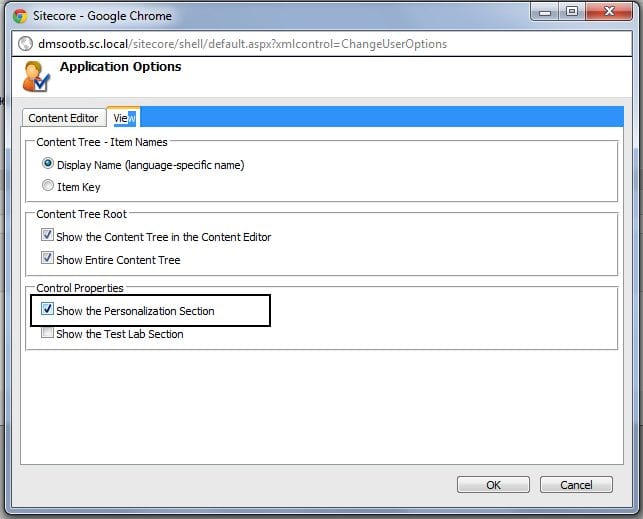
Open the Content Editor, press the Sitecore Logo button on the top left and select Application Options.

In the Application Options dialog window go to the View tab. Underneath the Control Properties section, tick the checkbox Show Personalization Section and press Ok.

That´s it! The Personalization Section will be visible again.


Daily Tip: Use the Customized Startbar module

Tired of switching between the Master and Core database during development? Making the mistake of making changes on the wrong database? Install the Customized Startbar Module.

This module will do multiple things, but the main two things that I really like are:

  • You can add buttons to the Quicklaunch bar.
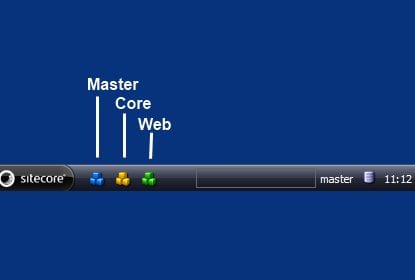
  • Add the database name next to the database icon (bottom right)

The startbar before installation

The startbar after installation

image image

You can download the Customized Startbar module from trac:
http://trac.sitecore.net/CustomizedStartbar/ (Thanks to Alistair Deneys for this module.)

A good example of the use of the customized start bar is a startbar with Quick action buttons that open the Content editor for the master, web and core database.

image

You can download this CUSTOM customized startbar here.

Happy developing!

Daily Tip: Add icons to Fieldsections

To make thinks easier for the business-users you can use Icons for templates. This is a great way to make the business-user recognize the different types of content they can create. But did you know you can also use icons for your Fieldsections?

Set Icon with the webinterface

You can set icons for Fieldsections the same way as you do for your templates. Just open the content editor, expand a template and underneath a template you will find all your FieldSections. Select a field section and set the icon!`

For example. Let’s say we have a template called Sample Item with a Fieldsection Page Title and Text.
If you expand Sample Item Template you can see that there is a Item named Page Title and Text this is the Template Section defined in the Template builder.

Sitecore Template Icon

Select the Page Title and Text item and assign a icon (Configure –> Appearance –> Icon). That’s it. Now create a new Item based on the template and see the result.

Sitecore fieldtype item content editor

Try doing this on your templates. It’s so easy and it will make the Content Editor more attractive for your business-user. Feel free to add comments of questions below.

Update: Set Icon with Sitecore Rocks

You can also set the Template Section Icon with Sitecore Rocks. Expand the template in the Sitecore Explorer and right click the Template Section. Go to Tasks, Set Icon and select the Icon.  (Thanks to @kayeeNL for his Tweet about setting the icon with Rocks)

image

If you want more information about Sitecore Rocks please watch the (Dutch) webinar I gave about Sitecore Rocks.