Want to help your business user? Create a custom Macro

When talking to business users (people that actually work with Sitecore on a day to day base) I created a small list of minor custom changes that would help the business users with there day to day work.

One of the items on this list is the condition for User Profile fields, by default the input of this field is a manual typed String. Which is a painful process for the business user They are not sure of the fieldname and go to the usermanager to verify the name. And even when they know the fieldname they surely can make a typo. After all even a business user is just human.

Typo and human errors

So after a small thought I started coding. My solution for this problem is simple. Create  a custom Macro with a tree selection and return the item name! Let’s do this!

Create the custom Macro class

Open VS, and create a class called UserProfileFieldMacro that inherits from the IRuleMacro class.

Override the Execute method, in this method we need to define the custom Macro. Please read the code comments for explanation.

The UserProfileFieldMacro class has the following code
[code language=”c#”]
public class UserProfileFieldMacro : IRuleMacro
{
public UserProfileFieldMacro() { }

public void Execute(XElement element, string name, UrlString parameters, string value)
{
Database coreDatabase = Sitecore.Configuration.Factory.GetDatabase(“core”);

//Define default path to profile template
string profilePath = “/sitecore/templates/System/Security/User”;

//Check if custom path is set in Macro parameters
if (parameters.HasPath)
profilePath = parameters.Path;

Item userProfileRootItem = coreDatabase.GetItem(profilePath);

//The path isn’t correct, we want to log this error and send the user to the system administrator
if (userProfileRootItem == null)
{
string error = string.Format(“The path ({0}) set in the user profile field condition doesn’t exist”, profilePath);
Sitecore.Diagnostics.Log.Error(error, this);
SheerResponse.ShowError(error + ” Please contact your system administrator”, string.Empty);
return;
}

SelectItemOptions options = new SelectItemOptions();

//Set and hide the root of the tree in the dialog window
options.Root = userProfileRootItem;
options.ShowRoot = false;

//User can only select Templatefields
options.IncludeTemplatesForSelection = new List { TemplateManager.GetTemplate(TemplateIDs.TemplateField, coreDatabase) };

//Return the item name to the public property
options.ResultType = SelectItemOptions.DialogResultType.Name;

//Set dialog window info
options.Title = “Select User profile field”;
options.Text = “Select the user profile field to use in this rule.”;
options.Icon = “applications/32×32/media_stop.png”;

//Trigger the dialog window
SheerResponse.ShowModalDialog(options.ToUrlString().ToString(), true);
}
}
[/code]
Compile your code.

Create the Items in Sitecore

Login to Sitecore and open the content editor.

Create the macro item

Go to  the /sitecore/system/Settings/Rules/Common/Macros folder and create a new Macro item called UserProfileFieldMacro. Set the Type field to match your custom Macro class and assembly.

image

Create the condition item

Go to the /sitecore/system/Settings/Rules/Common/Conditions/Security folder and duplicate the User Profile Condition Item, name the duplicated itemUser Profile Field Selection Condition.

Now we need to change the Text field so it will use the custom create Macro instead of the default string input. Go to the Text field, I highlighted the part that we are changing

where user profile [FieldName,,,specific] field [operatorid,StringOperator,,compares to] [Value,,,value]

What you see is a four column seperated string. The four columns are representing the following functionatily:

  1. the public property in the condition that will be set.
  2. the macro used to get the user input (blank is string input)
  3. optional parameters to pass to the macro
  4. the text value that appears to the business user when the value is not set

Now change this to use the custom created Macro

where user profile [FieldName,ProfileFieldOperator,,specific] field  [operatorid,StringOperator,,compares to] [Value,,,value]

If you look at the Macro code you will see that if no parameters are passed we use the path to the default user profile. If you have custom user profile you can pass the path as a parameter. For example;

where user profile [FieldName,ProfileFieldOperator,/sitecore/templates/System/Security/Jetstream User,select] field [operatorid,StringOperator,,compares to] [Value,,,value]

Now where all set to test the new condition!

Activate and test the condition

Open the page editor and select a presentation component you want to personalize. Click the personalize button and create a new rule.

Select the for the where user profile select field compares to value  condition and click the red select link. The custom Macro will now fire the dialog window where all the profile fields are available for selection.

image

And the best thing is if the business user selects a Field section the a message will appear. No more humon errors here 🙂

So for my example I configured the following rule for a component called Summer sun.

image

Test the conditional rendering rule

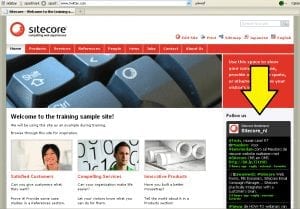
If I visit the website as a logged-in user with the firsts name Pieter the Summer sun component will appear. Otherwise the component will be hidden.

Let’s visit the website as a anonymous visitor.

image

Now after I login with my account (and yes my first name is Pieter) the control will appear.

image

Wrap up!

This solution is specifically created for user profile fields, you could also create a more generic Macro with more custom parameters. For me the most important part is that I showed you how easy it is to create a custom Macro. The next time the business user confront you with their problems, don’t just tell them this is the way Sitecore works. Tell them that you can easily change the behavior of Sitecore within a few hours. And of course share your customizations with us!

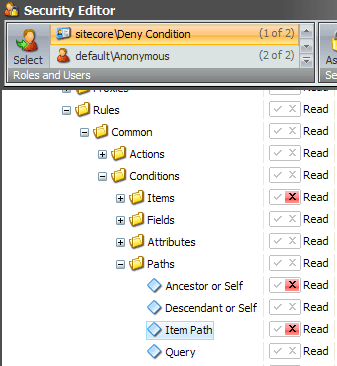
Don’t forget to hide the old user profile field condition. Read the article about removing conditions and actions for you business user based on Security.

If you have any questions, comments or own customizations you want to share? Please leave a comment.

Happy coding!

DailyTip: Enable Personalization section in Sitecore 6.5

In Sitecore you can personalize your website with conditions and actions using the Rules Engine (so called Conditional Rendering rules).  In Sitecore 6.5 the interface for defining conditional rendering rules is integrated in to the page-editor, this way it´s easier for the marketeer to create and maintain pesonalization rules.

But as a developer you want to create predefined rules and activate them on the template standard values, the same way personalisation was working in Sitecore 6.4. This is still posible with 6.5 only by default the Personalisation section of the presentation component properties is hidden in Sitecore 6.5.

The following steps will enable the Personalisation section in the Presentation Component Properties dialog window.

Open the Content Editor, press the Sitecore Logo button on the top left and select Application Options.

In the Application Options dialog window go to the View tab. Underneath the Control Properties section, tick the checkbox Show Personalization Section and press Ok.

That´s it! The Personalization Section will be visible again.


Tested: Sitecore Wildcards and DMS statistics

With this test we want to check what Sitecore DMS does with Wildcards. How are Wildcard URL’s and shown on the Analytics Reports?

Wildcard items in Sitecore are a convenient way to handle dynamic URLs. They let you pass data through the URL instead of relying on query string values that are appended to the URL. More information about the Wildcards and a introduction to the Wildcard Shared Source Module can be found in this article (written by Adam Conn).

Creating a testing environment

For this testing environment I’ve installed the shared source Wildcard module. After installing the module I opened the Content Editor and created a ‘products’ item, underneath the products item I created a wildcard item (*).

image

Configure the Wildcard Module

Go to /sitecore/system/Modules/Wildcards/. Create a new token called ‘Product Detail’ in the Tokens folder. And create the a new route called ‘Product Route’ within the Routes folder. In the Product Route item add the Wildcard item (*) to the Items field and define the rule in the Rules field.

image

The Wildcard module comes with two Sublayouts; DisplayDynamicUrls and DisplayTokenValues. For this test we are going to use the DisplayDynamicUrls sublayout. We need to alter the GetSampleData() method in DisplayDynamicUrls.ascx.cs. Open the DisplayDynamicUrls.ascx.cs and navigate to the GetSampleData() method and change the code so it will look like the following code:

[code language=”csharp”]

//The following constants must match tokens defined in Sitecore
const string TOKEN_PRODUCT_DETAIL = “%Product Detail%”;

private List GetSampleData()
{
var list = new List();
list.Add(new NameValueCollection { { TOKEN_PRODUCT_DETAIL, “product1” } });
list.Add(new NameValueCollection { { TOKEN_PRODUCT_DETAIL, “product2” } });
list.Add(new NameValueCollection { { TOKEN_PRODUCT_DETAIL, “product3” } });
return list;
}

[/code]

Now add the DisplayDynamicUrls sublayout to the Layout Details of the products item.

The test

Generate analytics data

Open a new browser, clear all cookies (I use Chrome Incognito Window) and visit the products item. You can see that the DisplayDynamicUrls sublayout generates Sample links based on the Sample data you configured in the GetSampleData() method.

image

Click the Sample links and close the browser.

View the Latest Visit Report

Open the Latest Visits report in the Engagement Analytics and select the latest visit. In the bottom of report you can find the visited pages. You can see that Sitecore has logged the wildcard page visits.

image

The verdict

At this point there is no indication that Wildcards are causing any problems with Sitecore DMS statistics. This is a straight forward simple test without any other complex systems involved, implementing wildcard in combination with DMS on complex systems needs thorough testing before deployment. Consider creating a Proof of Concept before starting to developt your sollution.

Please leave a comment if you have experience with Wildcards and DMS in a more complex scenario.

Sitecore Rules Engine: How to remove conditions and actions

When using the Sitecore Rules Engine you don’t want your business user to see all the Conditions and Actions. Conditions and Actions are also items (everything is a Item ;-)) so you can apply security on them. Deny a user Read access on a Condition or Action and the user will not see them in the Rule Set Editor.

Create the role Deny Conditions

Open the Role Editor and create a new Role called Deny Conditions. Click Members and Add the business users to the role. Close the Role Manager.

Open the Security Editor en select the created role Deny Conditions. Go to SystemSettingsRulesConditional RenderingsConditions and deny read rights on the conditions (or folder) you want to hide for the business user. Repeat this for conditions in SystemSettingsRulesCommonConditions.

Sitecore rule engine disable and hide conditions

Login as the business user and open the Rule Set Editor

Now test the settings and log-in as the business user, go to the Marketing Center and create a new conditional rendering rule. All the condition where the read access is denied are not in the Rule Set Editor.

Sitecore rule engine disable and hide conditions result

At this point the business user will only see condition he/she can understand.

Sitecore Rules Engine: How to create a custom condition

In this How to I will build a custom condition for the Sitecore Rules Enginge. This How To is a proof of concepts based on a webinar (in Dutch)  about the Rules Engine. I presented this webinar earlier this year and you can watch the webinar on Youtube by clicking this link.

Before we start writing code I’ll explain the business case we are trying to resolve.

The ‘case’:
The business user want to personalize the website based on the website the visitor comes from (the http referrer).  For now he is only interested in Facebook and Twitter.
If the visitor visits our site from Facebook the Facebook Like button of our own Facebook page must be visible on the homepage.
If the visitor visits our site from Twitter our Twitter Tweet stream must be visible on the homepage.

Oke, Now start building it!

Create templates

Create a template called Sidebar Text, this template has two field; a Sidebar Title (Single-Line Text field) and a Sidebar Text (Rich Text field).

Create a template called Standaard Text, this template one field called Text (Multi-line Text).

Set up the content tree

Create a folder called Sidebars  and add two Sidebar Text items with the following values:

Create a folder called Http Referrers and add the following items:

  • Item name: Twitter
    • Text: twitter.com
  • Item name: Facebook
    • Text: facebook.com

Create presentation component

Create the Sidebar Text rendering for displaying the Sidebar Title and Sidebar Text.

Open development center and click Create a New XSLT rendering and name the rendering Sidebar Text. Add the following code to the rendering template:
Continue reading “Sitecore Rules Engine: How to create a custom condition”