Want to help your business user? Create a custom Macro

When talking to business users (people that actually work with Sitecore on a day to day base) I created a small list of minor custom changes that would help the business users with there day to day work.

One of the items on this list is the condition for User Profile fields, by default the input of this field is a manual typed String. Which is a painful process for the business user They are not sure of the fieldname and go to the usermanager to verify the name. And even when they know the fieldname they surely can make a typo. After all even a business user is just human.

Typo and human errors

So after a small thought I started coding. My solution for this problem is simple. Create  a custom Macro with a tree selection and return the item name! Let’s do this!

Create the custom Macro class

Open VS, and create a class called UserProfileFieldMacro that inherits from the IRuleMacro class.

Override the Execute method, in this method we need to define the custom Macro. Please read the code comments for explanation.

The UserProfileFieldMacro class has the following code
[code language=”c#”]
public class UserProfileFieldMacro : IRuleMacro
{
public UserProfileFieldMacro() { }

public void Execute(XElement element, string name, UrlString parameters, string value)
{
Database coreDatabase = Sitecore.Configuration.Factory.GetDatabase(“core”);

//Define default path to profile template
string profilePath = “/sitecore/templates/System/Security/User”;

//Check if custom path is set in Macro parameters
if (parameters.HasPath)
profilePath = parameters.Path;

Item userProfileRootItem = coreDatabase.GetItem(profilePath);

//The path isn’t correct, we want to log this error and send the user to the system administrator
if (userProfileRootItem == null)
{
string error = string.Format(“The path ({0}) set in the user profile field condition doesn’t exist”, profilePath);
Sitecore.Diagnostics.Log.Error(error, this);
SheerResponse.ShowError(error + ” Please contact your system administrator”, string.Empty);
return;
}

SelectItemOptions options = new SelectItemOptions();

//Set and hide the root of the tree in the dialog window
options.Root = userProfileRootItem;
options.ShowRoot = false;

//User can only select Templatefields
options.IncludeTemplatesForSelection = new List { TemplateManager.GetTemplate(TemplateIDs.TemplateField, coreDatabase) };

//Return the item name to the public property
options.ResultType = SelectItemOptions.DialogResultType.Name;

//Set dialog window info
options.Title = “Select User profile field”;
options.Text = “Select the user profile field to use in this rule.”;
options.Icon = “applications/32×32/media_stop.png”;

//Trigger the dialog window
SheerResponse.ShowModalDialog(options.ToUrlString().ToString(), true);
}
}
[/code]
Compile your code.

Create the Items in Sitecore

Login to Sitecore and open the content editor.

Create the macro item

Go to  the /sitecore/system/Settings/Rules/Common/Macros folder and create a new Macro item called UserProfileFieldMacro. Set the Type field to match your custom Macro class and assembly.

image

Create the condition item

Go to the /sitecore/system/Settings/Rules/Common/Conditions/Security folder and duplicate the User Profile Condition Item, name the duplicated itemUser Profile Field Selection Condition.

Now we need to change the Text field so it will use the custom create Macro instead of the default string input. Go to the Text field, I highlighted the part that we are changing

where user profile [FieldName,,,specific] field [operatorid,StringOperator,,compares to] [Value,,,value]

What you see is a four column seperated string. The four columns are representing the following functionatily:

  1. the public property in the condition that will be set.
  2. the macro used to get the user input (blank is string input)
  3. optional parameters to pass to the macro
  4. the text value that appears to the business user when the value is not set

Now change this to use the custom created Macro

where user profile [FieldName,ProfileFieldOperator,,specific] field  [operatorid,StringOperator,,compares to] [Value,,,value]

If you look at the Macro code you will see that if no parameters are passed we use the path to the default user profile. If you have custom user profile you can pass the path as a parameter. For example;

where user profile [FieldName,ProfileFieldOperator,/sitecore/templates/System/Security/Jetstream User,select] field [operatorid,StringOperator,,compares to] [Value,,,value]

Now where all set to test the new condition!

Activate and test the condition

Open the page editor and select a presentation component you want to personalize. Click the personalize button and create a new rule.

Select the for the where user profile select field compares to value  condition and click the red select link. The custom Macro will now fire the dialog window where all the profile fields are available for selection.

image

And the best thing is if the business user selects a Field section the a message will appear. No more humon errors here 🙂

So for my example I configured the following rule for a component called Summer sun.

image

Test the conditional rendering rule

If I visit the website as a logged-in user with the firsts name Pieter the Summer sun component will appear. Otherwise the component will be hidden.

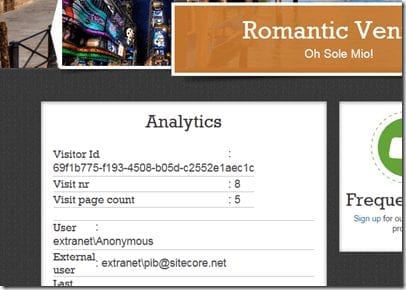
Let’s visit the website as a anonymous visitor.

image

Now after I login with my account (and yes my first name is Pieter) the control will appear.

image

Wrap up!

This solution is specifically created for user profile fields, you could also create a more generic Macro with more custom parameters. For me the most important part is that I showed you how easy it is to create a custom Macro. The next time the business user confront you with their problems, don’t just tell them this is the way Sitecore works. Tell them that you can easily change the behavior of Sitecore within a few hours. And of course share your customizations with us!

Don’t forget to hide the old user profile field condition. Read the article about removing conditions and actions for you business user based on Security.

If you have any questions, comments or own customizations you want to share? Please leave a comment.

Happy coding!

Step 3: Create the outgoing link report

This article is part 3 of Sitecore How To: Track Exteral links with DMS series. Before starting with this step you need to be finished with Step 2. Otherwise you don’t have any report data.

Show the outgoing links in a report

The easiest way to generate a report is find a report that matches your needs, copy the report and change the datasource and layout. For this POC the Slow Pages report matches 80% of my requirements, so let’s use the Slow Pages report as a base for our new report.

Download the External Links per Page.mrt Report

You can download the External Links per Page report. Unpack the zip file and save .mrt the file in the folder /sitecore/shell/Applications/AnalyticsReports.

This report is a customized version of the slow pages report. For more information about report designing you can read the Report Designer Cookbook

Copy the Slow Pages Report SQL Query Item

Duplicate the slow pages Report SQL Query item (/sitecore/system/Settings/Analytics/Reports SQL Queries/Slow Pages) and name the Item External Links per Page.

Delete the SQL query in the SQL server field and add the following SQL query.

[code language=”sql”]

select    top 100
Pages.Url,
PageEvents.Data as Link,
COUNT(*) as Clicks
from
Pages,
PageEvents,
Visits,
PageEventDefinitions
where
Pages.VisitId = Visits.VisitId
AND Pages.PageId = PageEvents.PageId
AND PageEventDefinitions.PageEventDefinitionId = PageEvents.PageEventDefinitionId
AND PageEventDefinitions.Name = ‘External Link’
AND Visits.StartDateTime BETWEEN @StartDate AND @EndDate
group by
Pages.Url, PageEvents.Data
order by
Clicks desc

[/code]

This query will return all outgoing clicks from every page.

Copy the Slow Pages Report Item

Open the content editor and duplicate the Slow Pages Report item located at: /sitecore/system/Settings/Analytics/Reports/Reports/Site Health/Slow Pages

Name the duplicated report External Links per Page.

In the External Links per Page item change the Filename to External Links per Page.mrt and change the Report Title field.

In the Queries section. For Failure select the External Links per Page Report SQL Query item.


Sitecore DMS Queries
Note: You might want to rename the datasource name Failure to something like Datasource. If you do this you need to do a search and replace within the .mrt file.

Test you report

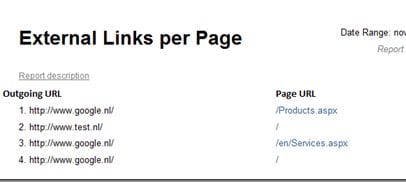
Login to the Sitecore Desktop and open the Engagement Analytics. Underneath the Site Health node you will find the External Links per Page report.


In this report we can see that we generated three clicks from our products page to Google.nl and two clicks from our homepage to test.nl.

This report is only a example. You can create all kind of reports all based on the event table in the Analytics Database.

Step 2-1: Track all external links with a custom processor

This article is part of Sitecore How To: Track Exteral links with DMS series. Before starting with this step you need to be finished with Step 1: Save outgoing click to the DMS analytics database.

For this solution I want to measure all the outgoing link using the Analytics Database of Sitecore Digital Marketing System (DMS). Based on this data I want to create a report in the Sitecore Engagement Analytics that will show all outgoing clicks by page. I want to create a solution that rewrites all external links within rich-text fields and General Link fields. With this solution all external links on an existing website will be automatically rewritten and measured.

In this article I will create a solution for measuring outgoing links in the following steps:

  • Create a processor to rewrite all external links on the website.

Let get started!

Create the processor for rewriting external links

For the rewriting of the external links we are creating a Render Field Processor. This processor will fire for every field that is rendered. During this process we will rewrite the URL.

The easiest way to create a new processor is with the Visual Studio 2010  plugin Sitecore Rocks. One of the many things Sitecore Rocks does is creating Visual Studio Templates. These templates will help you extending Sitecore. Open your solution in VS2010 and add a new item. In the dialog window go to Sitecore –> Pipelines en selecteer Render Field Processor. Name the processor ExternalUrlReWriterProcessor.cs and click Add.

Sitecore custom processor

The Render Field Processor Template will generate two files for you; the ExternalUrlReWriterProcessor.cs and a  ExternalUrlReWriterProcessor.config.


Custom sitecore config processor

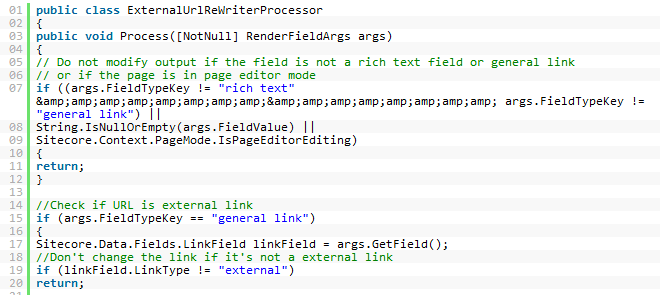
Modify the ExternalUrlReWriterProcessor class that all external URLs are rewritten to out /link.aspx page that we are going to create next. Below is my POC code. Please take notice of the comments and the TODO comments.

[code language=”csharp”]
public class ExternalUrlReWriterProcessor
{
public void Process([NotNull] RenderFieldArgs args)
{
// Do not modify output if the field is not a rich text field or general link
// or if the page is in page editor mode
if ((args.FieldTypeKey != “rich text” && args.FieldTypeKey != “general link”) ||
String.IsNullOrEmpty(args.FieldValue) ||
Sitecore.Context.PageMode.IsPageEditorEditing)
{
return;
}

//Check if URL is external link
if (args.FieldTypeKey == “general link”)
{
Sitecore.Data.Fields.LinkField linkField = args.GetField();
//Don’t change the link if it’s not a external link
if (linkField.LinkType != “external”)
return;

}
string fieldValue = args.Result.FirstPart;

string changedUrl = Regex.Replace(fieldValue, @”href=””(.*?)”””, delegate(Match match)
{
//Regex definition to check if URL contains HTTP or HTTPS (so it’s an external link)
Regex rgxExternal = new Regex(@”Regex rgxExternal = new Regex(@”(((http(s?))\://){1}\S+)”);”);

string orriginalUrl = match.Groups[1].Value.ToString();
if (rgxExternal.IsMatch(orriginalUrl))
{
//Rewrite the url to the redirect item
//TODO: Make the path configurable
return @”href=””/link.aspx?url=” + orriginalUrl + @””””;

}

return match.Value;
}, RegexOptions.Compiled);

args.Result.FirstPart = changedUrl;

}
}

[/code]

If you check your website all external links will be rewritten to /link.aspx?url=[EXTERNAL LINK]. Now let’s create the links.aspx and save the outgoing link information to the DMS Analytics database.

Test if it works

You can test if the solution is working on your website by testing the following functionalities

Action Expected result
Create a internal link in a rich-text field The link is not rewritten.
Create a external link in a rich-text field The link is rewritten to /link.aspx?url=[THE LINK]
Create a internal link in a general link field The link is not rewritten.
Create a external link in a general link field The link is rewritten to /link.aspx?url=[THE LINK]
Click a external URL The visitor is redirected to the external website.

Step 1: Save outgoing click to the DMS Analytics database

This step is the first of the series: How to track External Links with Sitecore DMS. In this step we are going to create a page (link.aspx) that will register the outgoing traffic into the Sitecore Analytics database and redirects the visitor to the external website.

Save the outgoing click information to the Analytics database

Create the custom page event

Open the content editor, go to /sitecore/system/Settings/Analytics/Page Events and create a Page event called External Link.

Under the Options field section select the IsSystem checkbox


We refer to the name of this Page Event Item when saving the outgoing link to the Analytics database.

Create the sublayout

Create a sublayout called LogExternalLink. In the Page_Load event add the code.

[code language=”csharp”]

protected void Page_Load(object sender, EventArgs e)
{
if (Tracker.IsActive)
{
bool trackClick = true;
//Check if outgoing traffic is generated within a visit of the site
if (Tracker.CurrentVisit.PreviousPage == null)
{
//The visit is a direct visit or from another website, don’t add this link to the analytics db.
//OPTIONAL; Log these links based on referrer url.
trackClick = false;
}

//Get linkUrl from querystring
string externalUrl = Request.QueryString[“url”];

//Check if link is set
if (!string.IsNullOrEmpty(externalUrl))
{
if (trackClick)
{
//Create PageEvent, the name must match Page Event item in Sitecore
PageEventData data = new PageEventData(“External Link”);
//Set PageEvent data
data.Text = string.Format(“Outgoing traffic to: {0}”, externalUrl); ;
data.DataKey = externalUrl;
data.Data = externalUrl;

//Add the event to the previouspage; that’s where the link is clicked
Tracker.CurrentVisit.PreviousPage.Register(data);
Tracker.Submit();
}
//Redirect visitor
Response.Redirect(externalUrl);
}
}

//Something not right here, send them back to the homepage
//TODO: Log Error or Warning
Response.Redirect(“/”);
}

[/code]

Based on your businesscase you could choose to create a handler. A handler will have less overhead.  If you create a Sublayout you could create a screen telling the visitor that there are leaving the website (for example like Facebook does).

Now create an item link underneath the website root and place the LogExternalLink sublayout that we just created on this item. This item will be the link.aspx page. All external links will be redirected and processed trough this page.

Test if it works

At this point we cannot test this part of the solution. Testing this solution is only possible if the tracking page (link.aspx) is referred from the website. We don’t want to  track URLs that are triggered from a direct request.

We will test this part of the solution after Step 2  of the series: How to track External Links with Sitecore DMS.


Sitecore How To: Track Exteral links with DMS

In this How To I’ll show you how to extend Sitecore to track outgoing links trough the Sitecore Digital Marketing System (DMS).

First of we start with creating a sublayout that saves the outgoing link clicks to the Analytics database. Next step is creating a solution for tracking the outgoing link. There are multiple solutions of tracking external links but in this series we are creating the following two solutions; one that tracks all outgoing links automatically (step 2.1) and the other solution where it´s possible to enable tracking for-each outgoing link (step 2.2)And off-course we finish with  report that will show you the most clicked outgoing links.

This how to is part of the series: How to track External Links with Sitecore DMS and contains the following steps:

  • Step 1: Save outgoing click to the DMS analytics database (status: finished, published)
  • Step 2: Two solutions for outgoing link tracking
    • Step 2.1: Measure alloutgoing links with a custom processor  (status: finished, published)
    • Step 2.2: Measure specific outgoing links by creating a custom external link fieldtype
      • Step 2.2.1: Creating the custom external link fieldtype (status: review, publishdate: 17/05/2012)
      • Step 2.2.2: Creating pageeditor support for the custom external link fieldtype (status: coding)
      • Step 2.2.2: Tracking the external links that need to be tracked (status: on hold)
  • Step 3: Creating the outgoing link report  (status: finished, published) 
And off-course all publishdates are subjected to changes ;=)

Want to receive a reminder when a new article is publish subscribe to the RSS feed, maillinglist (in the right sidebar) or follow us on @new_guid

Feel free to ask your questions in the comment form below.

Converting .mrt reports from OMS to DMS

In this article I’m going to explain how to convert .mrt reports from the Sitecore Online Marketing Suite (Sitecore 6.4) to the Sitecore Digital Marketing System (Sitecore 6.5).

Report related changes between OMS and DMS

Both the OMS and the DMS use .mrt reports for Analitics reporting. There are two mayor changes between the OMS and DMS reporting; a full redesign of the datamodel and the location of the SQL query for the report data.

Mapping the datamodel of the OMS with the DMS

If you compare the datamodel of the OMS to the DMS datamodel you will see that it’s completely different. But the main concept of both datamodels is almost the same.

OMS table DMS Table Description
GlobalSession Vistors Contains the Visitor information.
Session Visits Contains the information of all the visits. A visits is underneed a Visitors.
Page Pages Contains all pages that are visited and are connected to a Session.

The following drawing will show the relation of Visitor->Sessions->Pages.

image

In this example we have a Continue reading “Converting .mrt reports from OMS to DMS”

Sitecore ECM: How to extend personalization

Check the default subscriber profile by clicking the E-Mail Campaign node and go to the content folder. In the Implementation Details section check the selected profile in the Default Subsciber Profile field. By default this will be Profiles/Subscriber:

clip_image002

You can find the different profiles in the Profiles folder located at /sitecore/system/Settings/Security/Profiles/Subscriber in the Core database.

The Subscriber profile item is based on the Subscriber template. Open the /sitecore/templates/Modules/EmailCampaign/Subscriber template in the Template Manager and add a custom field called Hobby.

clip_image004

The hobby field will be added to the profile of the EmailCampaign Subscribers. Go to the User Manager, select a subscriber and click Edit. On the profile tab the hobby field will appear, insert a value into the hobby field.

clip_image005

Now let’s use the Hobby value to personalize the e-mail message.

There are two ways how you can use these fields within the e-mails. You can type $Hobby$ in a text field or within a richtext area you can select the field in the Insert Field dropdownlist.

clip_image007

To have the Insert Field options you need to add the Html Drop Down item to the toolbar of your Rich text profile or you can use the default Message profile by adding /sitecore/system/Settings/Html Editor Profiles/ Message Content to the source field of the rich text field.

Create a new e-mail in the EmailCampaign manager. And add the hobby fields to the E-mail by typing $Hobby$ or selecting hobby from the Insert Field dropdown in the rich text editor.

clip_image009

Save the change and close the Editor. Now reload your E-mail in the Message Preview tab and the $hobby$ field will be personalized and show my Hobby surfing.

clip_image010