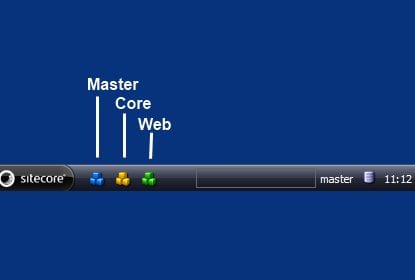
Tired of switching between the Master and Core database during development? Making the mistake of making changes on the wrong database? Install the Customized Startbar Module.
This module will do multiple things, but the main two things that I really like are:
You can add buttons to the Quicklaunch bar.
Add the database name next to the database icon (bottom right)
A good example of the use of the customized start bar is a startbar with Quick action buttons that open the Content editor for the master, web and core database.
You can download this CUSTOM customized startbar here.
Check the default subscriber profile by clicking the E-Mail Campaign node and go to the content folder. In the Implementation Details section check the selected profile in the Default SubsciberProfile field. By default this will be Profiles/Subscriber:
You can find the different profiles in the Profiles folder located at /sitecore/system/Settings/Security/Profiles/Subscriber in the Core database.
The Subscriber profile item is based on the Subscriber template. Open the /sitecore/templates/Modules/EmailCampaign/Subscriber template in the Template Manager and add a custom field called Hobby.
The hobby field will be added to the profile of the EmailCampaign Subscribers. Go to the User Manager, select a subscriber and click Edit. On the profile tab the hobby field will appear, insert a value into the hobby field.
Now let’s use the Hobby value to personalize the e-mail message.
There are two ways how you can use these fields within the e-mails. You can type $Hobby$ in a text field or within a richtext area you can select the field in the Insert Field dropdownlist.
To have the Insert Field options you need to add the Html Drop Down item to the toolbar of your Rich text profile or you can use the default Message profile by adding /sitecore/system/Settings/Html Editor Profiles/ Message Content to the source field of the rich text field.
Create a new e-mail in the EmailCampaign manager. And add the hobby fields to the E-mail by typing $Hobby$ or selecting hobby from the Insert Field dropdown in the rich text editor.
Save the change and close the Editor. Now reload your E-mail in the Message Preview tab and the $hobby$ field will be personalized and show my Hobby surfing.
In this post I will extend the basic e-mail template for Sitecore ECM with a title and text listing. With this e-mail template the business user can create new Title and Text items within the page-editor (Sitecore 6.4 and higher) or the content-editor (all versions of Sitecore). This article is a follow-up article of the Sitecore ECM: How to create a Email template from Scratch – Part I.
Create the Newsletter Text template
Createa template Newsletter Text with the following fields: Message Title and Message Text.
Add standard values for the Message Title and Message Text fields.
Add Newsletter Text folder to the Branche Template
Go to the BasicNewletter branche template and create a folder Newsletter Text. Assign the Newsletter Text template as Insert option.
Create Newsletter Text rendering
Create a new layout called Newsletter Text and copythe following code.
In this post I will create a e-mail template for ECM from scratch. This article is based on a Webinar (in Dutch) I did about the Email Campaign Manager (ECM) you can see the Webinar on YouTube.
[youtube]hGmzaK79cvI[/youtube]
We build a custom template the same way that we build a page. First we will create the templates, than we will create the presentation components and at the end we will bind the presentation components to the template standard values. Let’s start building!
Create Basic Newsletter template
1. Open the template manager and create a new template called Basic Newsletter, Select the following base templates
/sitecore/templates/Modules/Email Campaign/Messages/Inner Content/Message Root
2. Specify the following fields :
a. Title
b. Text, set the source property to /sitecore/system/Settings/Html Editor Profiles/ Message Content
c. Header Text
d. Header Link Text
e. Footer Text
The Basic Newsletter template in will look like this:
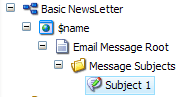
1. Create a branch template
2. Select the /sitecore/templates/Modules/Email Campaign/Messages/Pre-existing page template
3. Rename the create Pre-exiting Page branche template to Basic NewsLetter
4. Underneath the $name item create the Email Message root item based on the Basic newsletter template
5. Underneath the created Email Message root item insert a folder called Message Subjects. This folder will contain all subjects for the e-mail.
6. Remove the folder template to insert options of the Message Subject folder and add the Subject template: /sitecore/templates/Modules/Email Campaign/Messages/Inner Content/Newsletter/Subject.
7. Insert a Subject item in the Message Subject folder with the name Subject 1.