Step 3: Create the outgoing link report

This article is part 3 of Sitecore How To: Track Exteral links with DMS series. Before starting with this step you need to be finished with Step 2. Otherwise you don’t have any report data.

Show the outgoing links in a report

The easiest way to generate a report is find a report that matches your needs, copy the report and change the datasource and layout. For this POC the Slow Pages report matches 80% of my requirements, so let’s use the Slow Pages report as a base for our new report.

Download the External Links per Page.mrt Report

You can download the External Links per Page report. Unpack the zip file and save .mrt the file in the folder /sitecore/shell/Applications/AnalyticsReports.

This report is a customized version of the slow pages report. For more information about report designing you can read the Report Designer Cookbook

Copy the Slow Pages Report SQL Query Item

Duplicate the slow pages Report SQL Query item (/sitecore/system/Settings/Analytics/Reports SQL Queries/Slow Pages) and name the Item External Links per Page.

Delete the SQL query in the SQL server field and add the following SQL query.

[code language=”sql”]

select    top 100
Pages.Url,
PageEvents.Data as Link,
COUNT(*) as Clicks
from
Pages,
PageEvents,
Visits,
PageEventDefinitions
where
Pages.VisitId = Visits.VisitId
AND Pages.PageId = PageEvents.PageId
AND PageEventDefinitions.PageEventDefinitionId = PageEvents.PageEventDefinitionId
AND PageEventDefinitions.Name = ‘External Link’
AND Visits.StartDateTime BETWEEN @StartDate AND @EndDate
group by
Pages.Url, PageEvents.Data
order by
Clicks desc

[/code]

This query will return all outgoing clicks from every page.

Copy the Slow Pages Report Item

Open the content editor and duplicate the Slow Pages Report item located at: /sitecore/system/Settings/Analytics/Reports/Reports/Site Health/Slow Pages

Name the duplicated report External Links per Page.

In the External Links per Page item change the Filename to External Links per Page.mrt and change the Report Title field.

In the Queries section. For Failure select the External Links per Page Report SQL Query item.


Sitecore DMS Queries
Note: You might want to rename the datasource name Failure to something like Datasource. If you do this you need to do a search and replace within the .mrt file.

Test you report

Login to the Sitecore Desktop and open the Engagement Analytics. Underneath the Site Health node you will find the External Links per Page report.


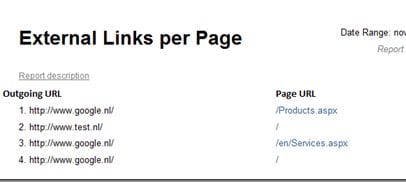
In this report we can see that we generated three clicks from our products page to Google.nl and two clicks from our homepage to test.nl.

This report is only a example. You can create all kind of reports all based on the event table in the Analytics Database.

Converting .mrt reports from OMS to DMS

In this article I’m going to explain how to convert .mrt reports from the Sitecore Online Marketing Suite (Sitecore 6.4) to the Sitecore Digital Marketing System (Sitecore 6.5).

Report related changes between OMS and DMS

Both the OMS and the DMS use .mrt reports for Analitics reporting. There are two mayor changes between the OMS and DMS reporting; a full redesign of the datamodel and the location of the SQL query for the report data.

Mapping the datamodel of the OMS with the DMS

If you compare the datamodel of the OMS to the DMS datamodel you will see that it’s completely different. But the main concept of both datamodels is almost the same.

OMS table DMS Table Description
GlobalSession Vistors Contains the Visitor information.
Session Visits Contains the information of all the visits. A visits is underneed a Visitors.
Page Pages Contains all pages that are visited and are connected to a Session.

The following drawing will show the relation of Visitor->Sessions->Pages.

image

In this example we have a Continue reading “Converting .mrt reports from OMS to DMS”

Linq to Sql: Retrieve properties from related data (LoadWith)

You have to specify which related-data you want to retrieve from a object so you can access them outside the Linq data-context. You can achieve this by using the LoadWith method of the DataLoadOptions Class. The LoadWith method accepts an lambda expression that specifies which object you want to retrieve.

In the following example I have a employee table that has a relation with the company table. In my code I want to show the employee with the company name (outside the DataContext).

[code language=’c#’]
Employee employee;

using (LinqDataContext db = new (LinqDataContext())
{
   DataLoadOptions dlo = new DataLoadOptions(); 
   dlo.LoadWith(e => e.Company);
   db.LoadOptions = dlo;

   employee = from item in db.Employees
                      select item).First();
}

string companyName = employee.Company.Name;

[/code]

Because of the DataLoadOptions I can now use the company properties to print the company name outside the DataContext.

Enjoy.

MSSQL: Database diagram support objects cannot be installed because this database does not gave a valid owner.

For a customer I needed to do a review there database (MSSQL 2000 database). For this I wanted to create some database diagrams. When I tried to create a diagram with Sql Sever Management Studio I got the following message:

"Database diagram support objects cannot be installed because this database does not gave a valid owner."

To fix this problem you need to set the owner and change the Compatibility Level of the database. You can do this with the following steps within Sql Sever Management Studio:

1. Right Click on your database, choose properties
2. Goto the Options Page
3. In the Dropdown at right labeled "Compatibility Level" choose "SQL Server 2005(90)"
4. Goto the Files Page
5. Enter "sa" in the owner textbox, or any other user you want to be the owner.
6. Click the OK button

Microsoft SQL Server Database Publishing Wizard 1.1

When I was trying to publish a database to my shared hosting provider I encountered some problems with backup and restoring my database. To restore a database on my provider I needed a full Sql script (schema and data).

After a few attempts with SQL comparer and Management studio I found a link to ‘Microsoft SQL Server Database Publishing Wizard 1.1’. The Publising Wizard does complete backups to SQL script (including data).

When I tried running the Publishing Wizard on my Vista workstation it failed with the following error:
Could not load file or assembly 'Microsoft.SqlServer.BatchParser, Version=9.0.242.0, Culture=neutral, PublicKeyToken=89845dcd8080cc91' or one of its dependencies. An attempt was made to load a program with an incorrect format.

I fixed this error by installing the ‘Feature Pack for Microsoft SQL Server 2005 – November 2005’.

The Publishing Wizard a great tool!


Linq to Sql: Change connectionstring to load from Web.config

Update 20 may 2009: New easy sollution

Set the Connection -> Application Settings property True. This will generate a connection string in your app.config.


Copy this connection string to your web.config and your all set!


================================================================= 

Old post: 

If you want to use your connectionstring from the web.config with Linq to Sql (dbml) you have to add the following partial class to your project:

[code:c#]

namespace Your.Namespace
{
  partial class yourDataContext
  {
    partial void OnCreated()
    {
       ConnectionStringSettings s = ConfigurationManager.ConnectionStrings["YourConnectionString"];
       if (s != null)
         Connection.ConnectionString = s.ConnectionString;
    }
  }
}

[/code]

Don't forget to change the Your.Namespace, yourDataContext and YourConnectionString to fit your project.

Hope this helps.

MsSql: How to enable clr (to run c# / vb code in SQL)

Execute the next query to enable CLR.  

[code:c#]

// Turn advanced options on

EXEC sp_configure 'show advanced options' , '1';

go

reconfigure;

go

EXEC sp_configure 'clr enabled' , '1'

go

reconfigure;

// Turn advanced options back off

EXEC sp_configure 'show advanced options' , '0';

go

[/code]

More info about CLR on Microsoft MSDN.