
I’m on a quest to decrease the number of points of failure in my home automation setup. Moving everything as close to Home Assistant core functionality. Recently I moved to ZHA for Zigbee support and removed external bridges like Xiaomi Gateway and Philips Hue.
Now it’s time to remove a Raspberry Pi that’s running Zwave2MQTT. I want to start saying that Zwave2MQTT has always worked very well for me, it never let me down. I just don’t trust Raspberry Pi’s anymore, SD-card get corrupted and they sometimes just die on me. This is also a reason why I prefer embedded solution with ESP boards.
I noticed Z-Wave JS in the release notes of Home Assistant 2021.2. After a quick read I got excited and was ready to move from Zwave2MQTT to Z-Wave JS.
A few of the garden lights, our bedroom window and a few power plugs are on Z-wave.
Most important are the lights downstairs that are all controlled with Fibaro Dimmer 2. These are lights used by the family every day and are also included in automation for automated turn off and on based on presence. So this migration needed to go seamless.
I documented my steps for future reference and to help others. To be hones the installation was pretty seamless. For continuity I choose to rename the entity IDs to match the old entity IDs. All details and steps can be found below.
Get network key from Zwave2Mqtt
For secure Z-Wave connections you need to create connection with a network key. Make sure you copy the network key from your Zwave2Mqtt instance.
Open Zwave2Mqtt in your browser, go to settings and copy the Network key. See example below.

Z-Wave JS installation in Home Assistant
Although the documentation points you to start adding the integration, this didn’t work for me. I couldn’t select the USB device. The installation was easy if you start with installing and configuring the supervisor addon and then adding the integration.
Attach Z-Wave controller
Remove the USB Z-Wave controller from the Zwave2Mqtt RPI and plug it into a USB port of your Home Assistant server. I prefer adding a USB extension cable to make sure that there is no interference from the server hardware on the Z-Wave network.
Restart Home Assistant, not sure if this is a requirement. But I did it 😊.
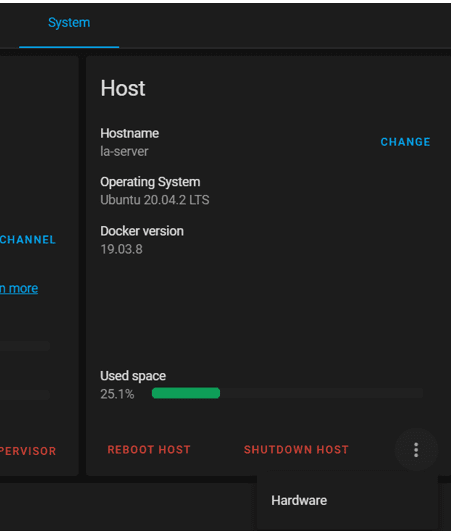
Now go to the log in Supervisor, system and look for the USB device. Should be called something /dev/serial/by-id/usb-#####

You can also check the hardware list in Supervisor, system and click the three … in the bottom of the Host section.
You should now have the USB device path and you also have the network key from Zwave2Mqtt. It’s time to install the Z-Wave JS addon.
Install Supervisor Z-Wave JS addon
Go to Supervisor, open the Add-on store and search for and install the Z-Wave JS addon.
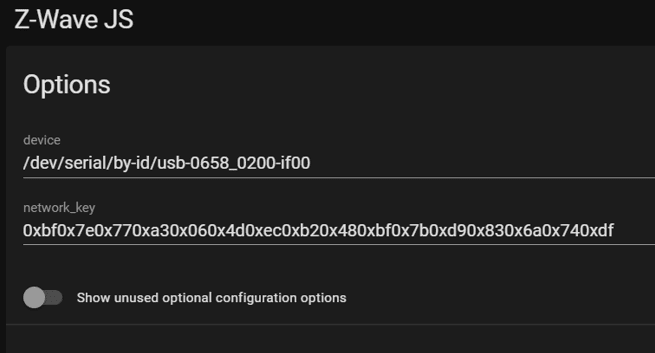
Open the Z-Wave JS addon and go to the Configuration tab.
Select by device the device path you located in your log ‘/serial/by-id/###’. Before you add the network key you need to remove the ‘, ‘ (comma and space) between the numbers. After that copy in the network key. See example below.

Click save. Now it’s time to start the addon.
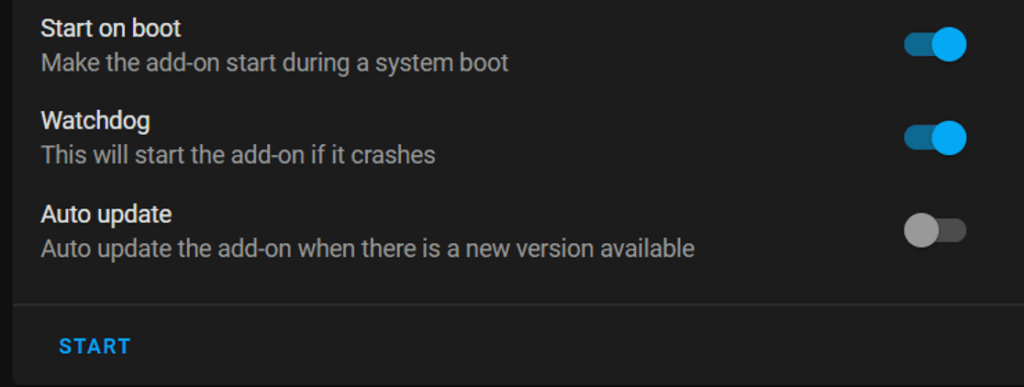
Go to Info tab. Enable the watchdog and start the addon.
That’s it all good to go, now it’s time to add the integration and configure the devices.
Add Z-Wave JS integration to Home Assistant
Go to configuration, integrations and click add integration. Search for Zwave-JS and click Add. Make sure that the checkbox ‘use supervisor add-on’ is selected and click add.
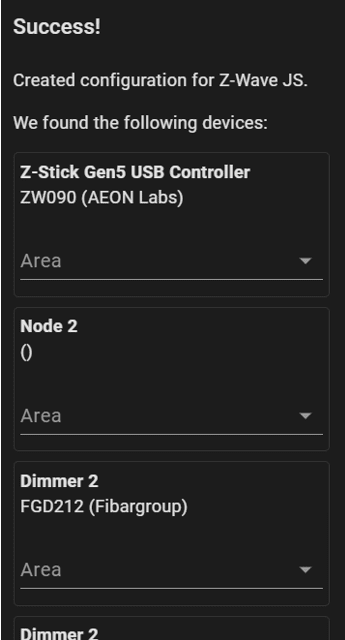
Victory! Your Z-Wave devices should now show up.
Manually migrate entities from Zwave2Mqtt to Zwave-JS
We want to make sure that all Lovelace and automation references keep working. To do this I choose to rename the entities to match the old entities.
I did this using following steps.
- Open two browsers showing device listing of the integration. One browser with Zwave2Mqtt devices and the other with new Zwave-js devices.
- In my case I have multiple dimmers all named Dimmer2. First step is to identify which dimmer2 are connected to which light in the home. You can simply do this by opening the device and switching on the light, after that you’ll see what light turns on. First rename the device to a recognizable name and define the area.
- Now go to the ‘old’ Zwavetomqtt device configuration and click on the device you just located. Open the entity (or entities) that is used in Lovelace and automation flows. Copy the entity ID, in my case light.keuken_muur_dimmer
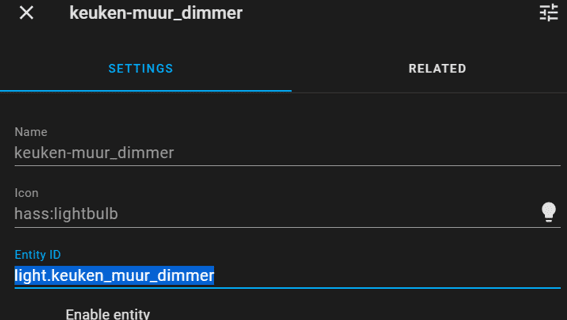
- Entity IDs need to be unique so we need to rename the old entity ID before saving the new one. I prefer adding a prefix like ‘_old’ to the entity ID.
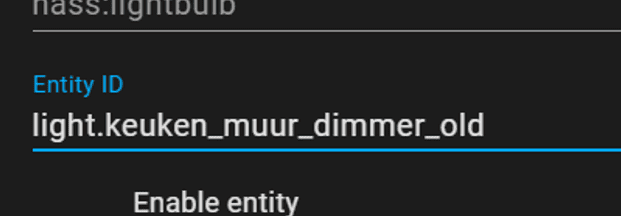
- Rename the entity and press save.
- We can now apply the copied name to the new Z-Wave JS entity.
Repeat this exercise for all Z-Wave entities that you are using in Lovelace or in automations.
Another approach for the migration is to name the new devices and update all Lovelace and automation references. I prefer this copy of entity ID because it ensures me that all automation keep working as is and that I am not forgetting to update any references, which will result in my kids or wife to be very unhappy with Home Assistant ;).
I already benefitted from the copying the entity ID method for the migration, my Google integration kept working without any additional configurations. This makes totally sense as Home Assistant exposes the entities to Google based on entity ID. But I would never identify Google Home as a breaking factor during the migration, so this would have broken down if I would go for new entity IDs and updated all automations and Lovelace.
The real test is tomorrow when the family wakes-up :). Hope it helps.
Experiences and outcomes after two days with Z-Wave JS
- Zwave JS is much faster. E.g. motion-triggered lights are reacting much faster.
- Zwave JS has better support for devices. E.g.my Fakro windows is now seen as a cover and works seamless
- Zwave JS provides better Zwave network reach. I can now control my windows on the attic without delay.
- Zwave JS provides less details and options to control the network. Zwave2Mqtt provides more, but this is expected and also referred to in the documentation.
Thank you for this guideline. Do you know how this works if you do not run Hass.io Supervisor?
My configuration is on a Synology NAS in docker containers, and I am struggling left and right with ZwaveJS2MQTT losing its persistent configuration each time the NAS reboots or the ZWave app is being updated. Interviews are running as long as 72 hours and often do not complete
Hey Joe, sorry I can’t help you there. In the beginning I had Home Assistant, but I moved over to Hassio as that will also spin up the containers for you. But this might not be an possible on a Synology NAS.