
This article will provide a walkthrough of how you can build a Particulate Matter Air Quality meter that integrates with your Home Assistant for under 20$, without any soldering or coding skills needed.
The sensor will provide multiple air-quality measurements directly visible in Home Assistant.
After seeing all kinds of air purifiers in the market, like the one from Xiaomi and Philips. I got interested in the topic air quality. First, I needed to learn more about how and what to measure, followed by actually measuring the air quality in my home. I don’t want to buy a air purifier if the quality of the air in my home is not bad. But how do you measure air quality?
What is a Particulate Matter sensor?
My search started with looking for a particulate matter sensor. A particulate matter sensor measures tiny particles or droplets in the air that have a specific size in microns or micrometers (µm). Like inches, meters and miles, a micron is a unit of measurement for distance. There are about 25,000 microns in an inch.
Particulate matter is the sum of all solid and liquid particles suspended in air many of which are hazardous. This complex mixture includes both organic and inorganic particles, such as dust, pollen, soot, smoke, and liquid droplets. These particles vary greatly in size, composition, and origin.
Source: www.greenfacts.org
Particulate matter (PM) is generally classified into two main size categories: PM10 and PM2.5. As an example, the particulate classified as PM2.5 is the size of 2.5 µm and would be thirty times smaller than that of a human hair.
How can Particulate Matter affect my health?
Small particles can travel deeply into the lungs. Exposure to fine particles can cause short-term health effects such as eye, nose, throat and lung irritation, coughing, sneezing, and shortness of breath. Exposure to fine particles can also affect lung function and worsen medical conditions such as asthma and heart disease.
That doesn’t sound all to good, so let’s get started with measuring the quality of the air.
Building of Buying a air quality sensor?
That brought me to the investigation of buying or building an air quality measuring device. After some short investigation I couldn’t find an affordable device. So I decided to start investigation building a solution.
What do we need to build an air quality measurement sensor
The air quality sensor
To measure the air quality, we’re using a PMS5003 Particulate Matter Sensor. This sensor measures Particulate Matter concentration of three size of particles <1.0µm, <2.5µm and <10.0µm concentrations.
The PMS5003 sensor uses laser technology to measure the concentration of particulate matter in the air. This laser light has life span of 30.000 hours, which is about 3.5 years. We will be expanding this life span by enabling the device for 20 seconds every two minutes. This will bring the lifespan of the sensor to about 18 years :).
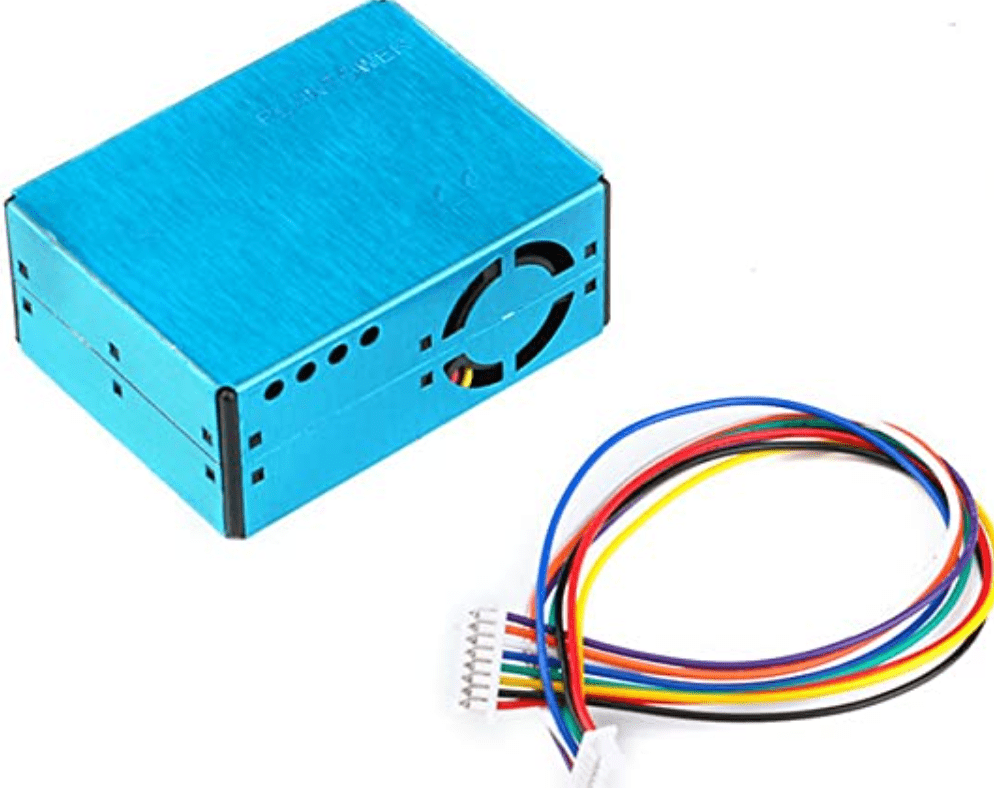
The PMS5003 sensor can be bought at your favorite electronic store. Here are deep links to AliExpress.com, Banggood or Amazon.
Make sure that the sensor comes with the cable for ease of installation.
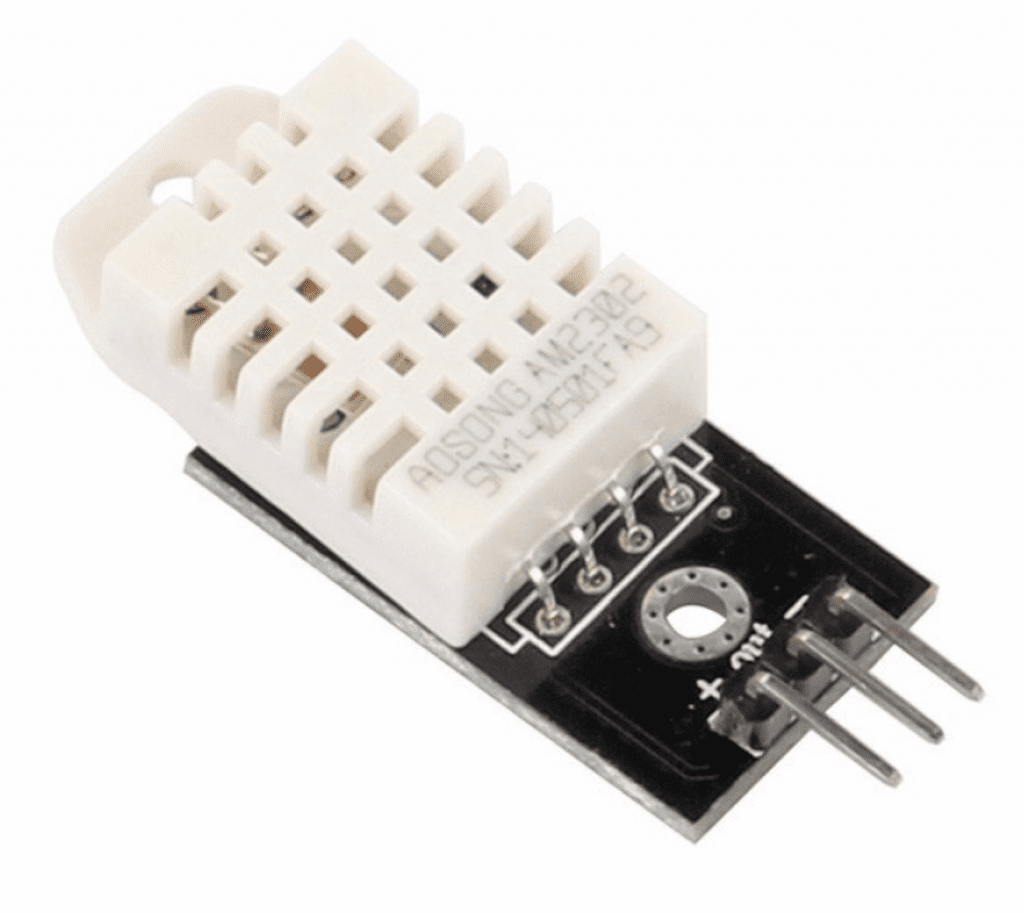
Humidity and temperature sensor
The DHT22 sensor provides accurate humidity and temperature measurements for a low cost. Measuring hum and temp is not a requirement for air quality, but it’s a nice extra for a few dollar. For example on AliExpress.com, Banggood or Amazon.
ESP controller board
ESP boards are a low cost Wi-Fi chips that have built in flash chips allowing you to build a single chip device capable of connecting to Wi-Fi. newer versions like the ESP32 boards also provide you BLE (Bluetooth low energy) and there’s loads of variety of boards you can use.
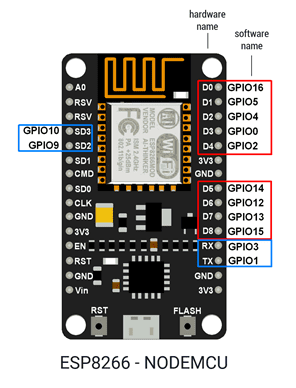
For this project, I’m using the ESP8266, NodeMCU board. I prefer using a Development Board because it comes with a USB and all the pins are pre-soldered, making it easy to use. You can buy this board at your favorite Chinese shop somewhere for a price between 3-10 euros (e.g. on AliExpress.com, Banggood, Amazon)
Now we have the particular matter sensor (PMS5003) and the ESP to use as a controller. Now we need software that will run on the ESP. Software that we can be used to expose the air quality measurements to Home Assistant. ESPHome is the perfect solution for this.
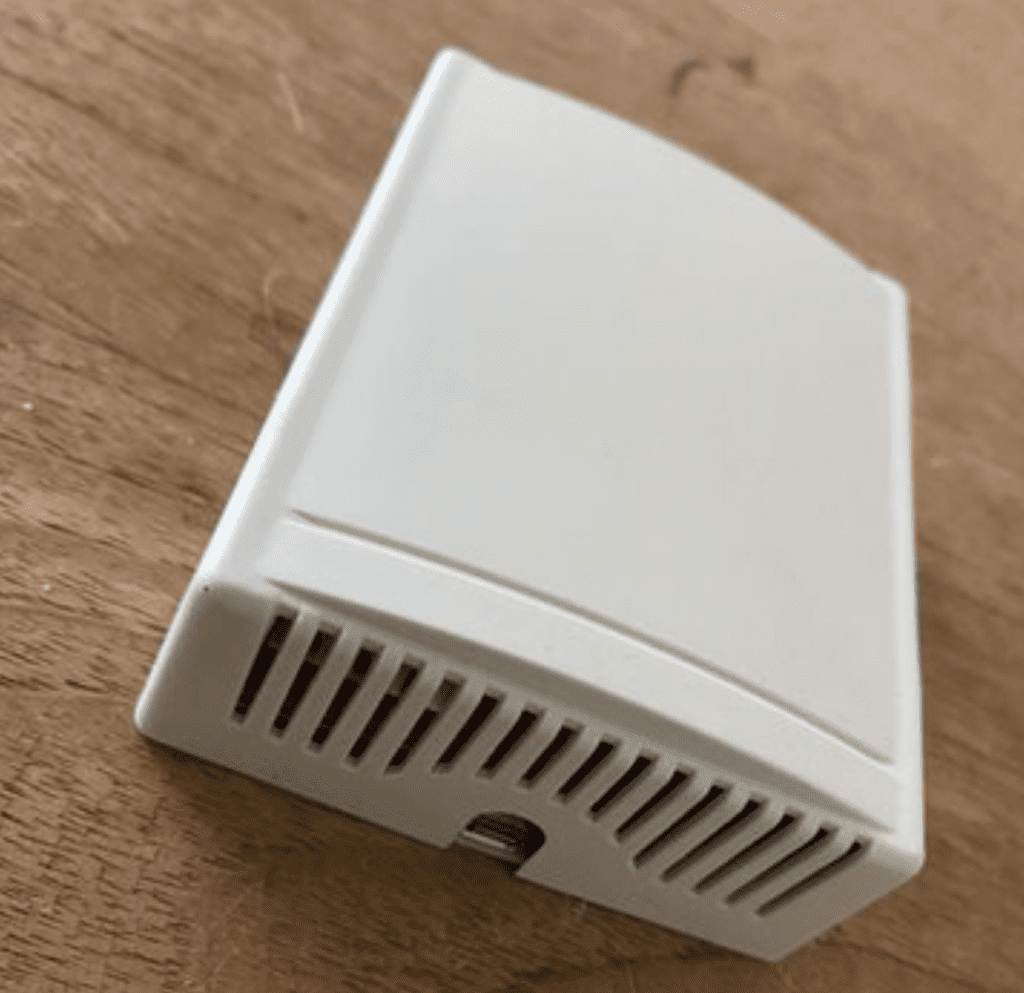
A nice housing to fit all electronics
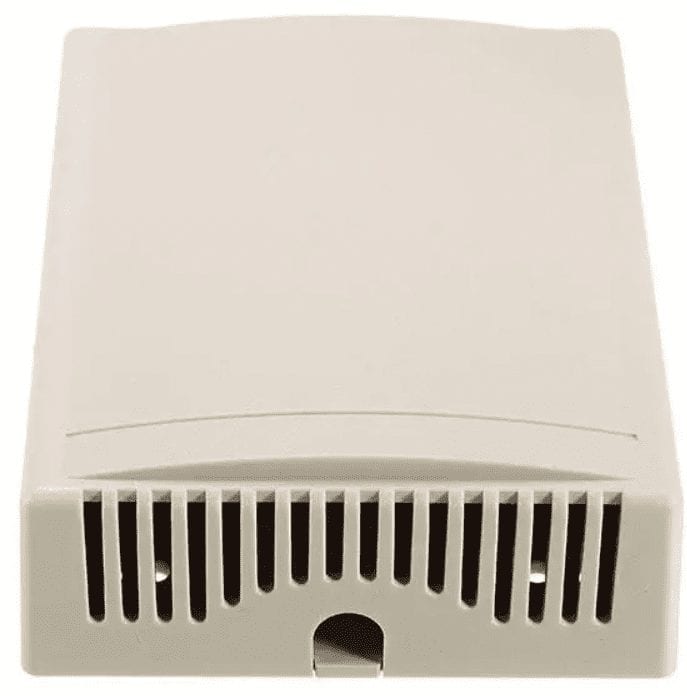
You need to protect the electronics. I really like this housing (for sale at Banggood and AliExpress). It fits all electronic parts very well, it allows airflow needed for the sensor and the housing has predefined hole for your power cable.
ESPHome
ESPHome is a system to control your ESP8266/ESP32 by simple yet powerful configuration files and control them remotely through Home Automation systems like Home Assistant.
ESPHome is amazing, it’s extremely powerful and, more important very stable. It has never failed me. The integration with Home Assistant is seamless, including autodiscovery within Home Assistant and one-click configuration. More information on ESPHome can be found in my introduction to ESPHome post.
I’m a big fan of ESPHome. I also made my fireplace smart using ESPHome and a relay. Find the can find the full article series here.
Let’s build the air quality sensor
To build the sensor we need to buy an ESP board, the PMS5003 sensor and a optional DHT22 sensor.
Shopping list
Required
- A ESP8266 board or ESP32 if you also want to use Bluetooth features (not required)
Buy on AliExpress.com, on Banggood or Amazon - PM2.5 Air particle/dust – particular matter sensor.
Buy on AliExpress.com, Banggood or Amazon - DHT22, humidity and temperature sensor
Buy on AliExpress.com, Banggood or Amazon - Housing to securely fit all electronics on Banggood (or buy 5 and it’s way cheaper)
Optional
- Dupont cables and a Hot Glue gun or Soldering iron
The steps to success
Building the air quality sensor is done in a few easy steps, even soldering required is optional.
Every step will point to an article, some will be generic introduction articles. Make sure you find your way back to this article to follow allong.
Note: Step 1 and 2 have been changed with new UI and features in both Home Assistant and ESPHome. Read the updated article to flash ESPhome on your ESP32 / ESP2866 NodeMCU board and skip step 1 and 2 below.
1. Install ESPHome in Home Assistant and create node
First step is to Install ESPHome in Home Assistant and create your first note. If this is your first time doing this you can follow the step-by-step guide covered in the Install ESP home and Create your first node article.
2. Flash the ESP with ESPHome firmware
Now we have ESPHome running and our first node created, it’s time to compile the firmware and flash the ESP board with vanilla ESPHome firmware. You can find step-by-step guidance in the Flash ESP chip with ESPHome node firmware article.
3. Wire the PMS5003 Particular Matter sensor and DHT22 to the ESP board
We’re all set the ESPHome node is recognized in Home Assistant. Now let’s connect the sensors to the board.
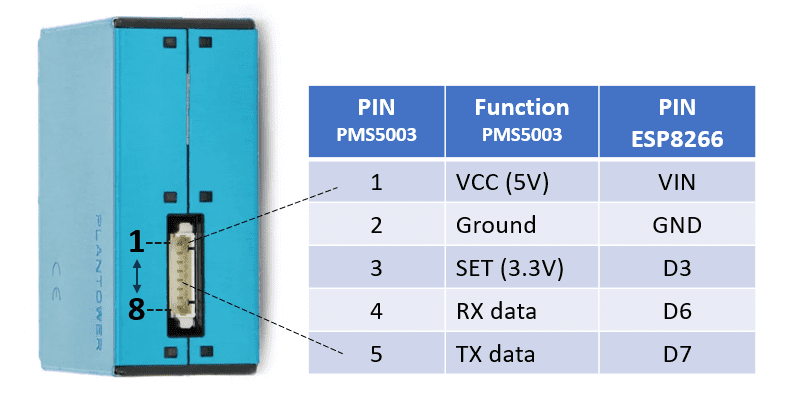
Starting with the PMS5003. To connect the PMS5003 we’re only going to use the first 5 pins. First connect the cable supplied with the PMS5003. Now cut of the connector at the end and strip coper of the the first 5 wires. You can cut the latest 3 wires short.
Note: Mind the pin alignment, the top pin is PIN 1 the bottom pin is PIN 8. See image below for more details.
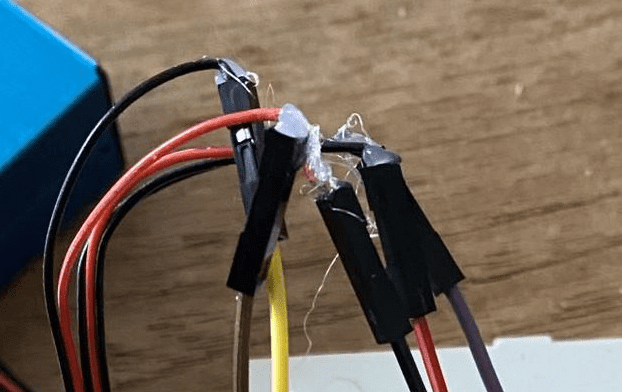
If you want to connect the PMS5003 without soldering you can push the coper wire ends into dupont female female cables. I used some glue to keep it together.
The wiring
PMS5003 wiring
The PMS5003 uses 5V power and 3.3V for control.
- Connect pin one to the 5v VIN pin on the ESP.
- Connect Pin 2 to any ground pin.
- Connect Pin 3 to D3
- Connect Pin 4 to D6
- Connect Pin 5 to D7
You’re free to connect pin 3-5 to any free D pin on the ESP. If you use the pins in this diagram than the configuration examples below will work without the need of updates.
DHT22 wiring
Wiring the DHT sensor is straight forward.
- Connect the GND to any free GND pin on the ESP
- Connect the VSS to any free 3V3 pin on the ESP
- Connect the DATA to D4 on the ESP
Note: Pin layout of the DHT22 may vary depending on manufacturer, read the printed icons on top the pins.

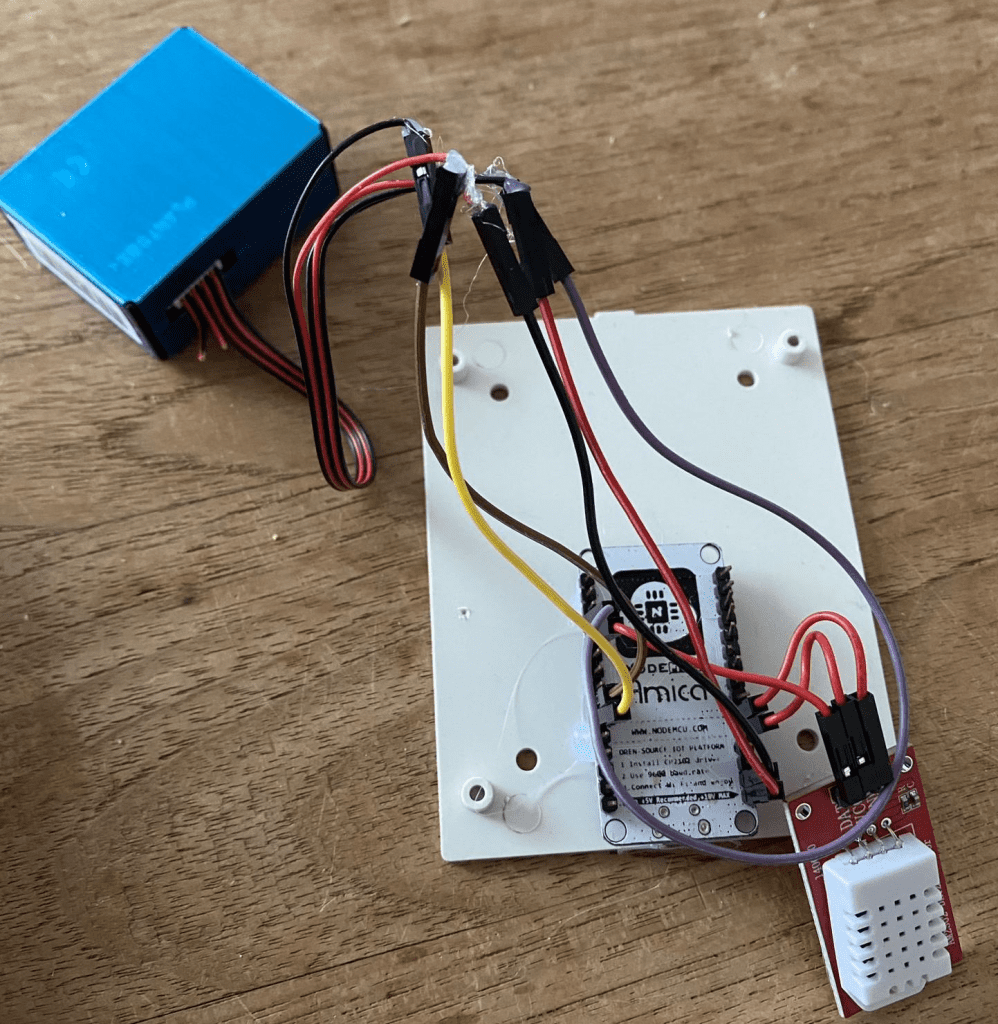
The final result will look like this.
4. Configure ESPHome to read the measurements and supply them to Home Assistant
Now it’s time to expose the measurement values to Home Assistant.
Open ESPHome and click EDIT on your node. The ESPHome configuration editor will now show. Add the following configuration at the bottom of the configuration.
uart:
  tx_pin: D6
  rx_pin: D7
  baud_rate: 9600

sensor:
  - platform: pmsx003
    type: PMSX003
    pm_1_0:
      name: "Particulate Matter <1.0µm Concentration"
    pm_2_5:
      name: "Particulate Matter <2.5µm Concentration"
    pm_10_0:
      name: "Particulate Matter <10.0µm Concentration"
  - platform: dht
    pin: D4
    temperature:
      name: "Air quality meter Temperature"
    humidity:
      name: "Air quality meter Humidity"
    update_interval: 20s
5. Extending the life span of the PMS5003 sensor
The PMS5003 sensor uses laser technology to measure the concentration of particulate matter in the air. This laser light has life span of 30.000 hours, which is about 3.5 years. We will be expanding this life span by enabling the device for 20 seconds every two minutes. This will bring the lifespan of the sensor to about 18 years :).
Wire 3 is called the SET wire, you can enable and disable mearing by providing high voltage to enable and low voltage to enable. We already connected this wire to D3. We will now expose the D3 pin directly as a switch in Home Assistant and trigger the switch on the two minute interval in ESPHome.
Go back to ESPHome and click EDIT on your node. Now add following configuration for the switch and interval timer at the bottom of the configuration using the ESPHome configuration editor.
switch:
  - platform: gpio
    pin:
      number: D3
    id: pms_set
    name: "Start measuring"

interval:
  - interval: 120s
    then:
      - switch.turn_on: pms_set
      - delay: 20s
      - switch.turn_off: pms_set
When ready, press the Upload button and ESPHome will flash the new firmware OTA. Wait till ready and you should be good to go.
You can verify the new switch and interval by going to Home Assistant and open the device. You will see that it will have a Start Measuring switch. Enable the switch and notice that the measurements value start changing.
Wait a two minutes and notice that the switch will be turned on for 20 seconds and then turned off again.

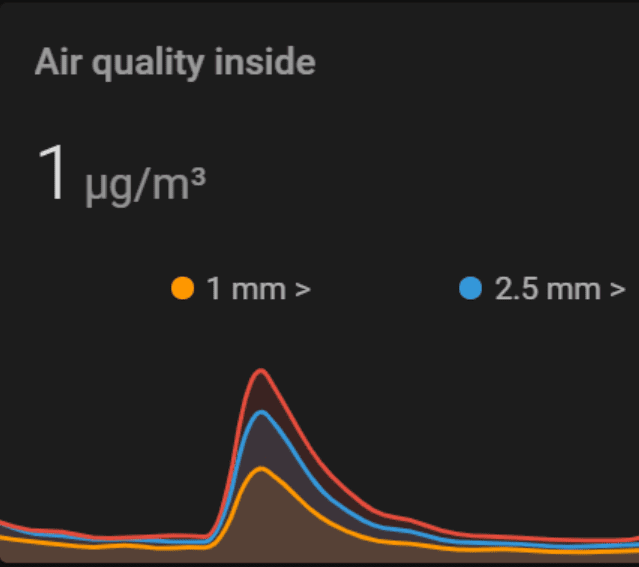
Now add the some graph to your dashboard.
6. Add air quality measurements to Home Assistant
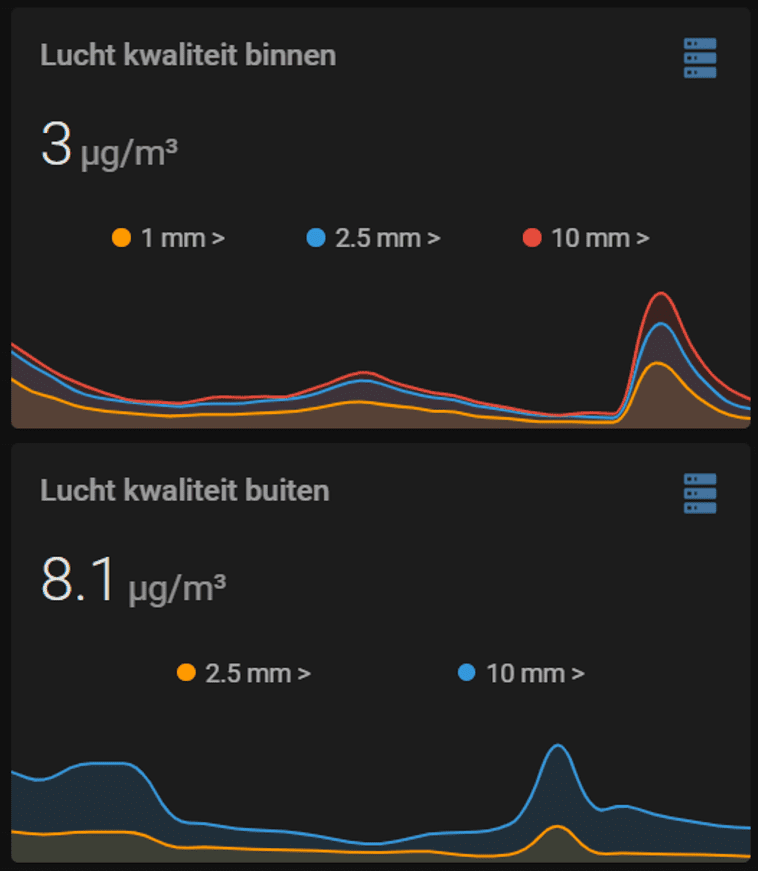
For viewing the measurements in my lovelace dashboard I used a custom card called mini-graph-card, this card can be easily installed using HACS. I used the following Lovelace configuration.
type: 'custom:mini-graph-card'
name: Air quality inside
icon: 'mdi:server'
line_width: 2
animate: true
hours_to_show: 24
points_per_hour: 1.5
entities:
  - entity: sensor.particulate_matter_1_0um_concentration
    name: 1 µm >
  - entity: sensor.particulate_matter_2_5um_concentration
    name: 2.5 µm >
  - entity: sensor.particulate_matter_10_0um_concentration
    name: 10 µm >
Adding measurements of outside air
To create additional context I also use Luftdaten integration to get outside air quality measurements nearby. This way you could automate opening windows or triggering ventilation to get better quality air from outside.
Luftdaten is making the world a better place through community driven, open environmental data. The coverage within northern Europe is impressive.

Exposing both inside and outside air quality with a vertical stack card will provide a nice comparison view.
That’s it. Now it’s time to start measuring and learn more about the air quality in your house. Let me know if you have any questions and if you managed to make it work!