
In this post I will create a e-mail template for ECM from scratch. This article is based on a Webinar (in Dutch) I did about the Email Campaign Manager (ECM) you can see the Webinar on YouTube.
[youtube]hGmzaK79cvI[/youtube]
We build a custom template the same way that we build a page. First we will create the templates, than we will create the presentation components and at the end we will bind the presentation components to the template standard values. Let’s start building!
Create Basic Newsletter template
1. Open the template manager and create a new template called Basic Newsletter, Select the following base templates
/sitecore/templates/Modules/Email Campaign/Messages/Inner Content/Message Root
2. Specify the following fields :
a. Title
b. Text, set the source property to /sitecore/system/Settings/Html Editor Profiles/ Message Content
c. Header Text
d. Header Link Text
e. Footer Text
The Basic Newsletter template in will look like this:

3. Set the following standard values:
| Field | Standard value |
| Title | Newsletter title |
| Text | Newsletter Text |
| Header Text | Are you having trouble viewing the e-mail? |
| Header Link | Text Please click here to see the online version. |
| Footer Tekst | <table width=”100%” style=”font-family: arial,helvetica,sans-serif; font-size: 11px;” border=”0″ cellspacing=”0″ cellpadding=”0″> <tbody> <tr valign=”top”> <td> <div><b>Organization Name</b></div> <div>Street</div> <div>City</div> <div>Country</div> </td> <td align=”right”> <div>This message was intended for: “$email$”</div> <div><a href=”/link to unsubscribe page.aspx” style=”color: #c73318; text-decoration: underline;”>Unsubscribe</a></div> </td> </tr> </tbody> </table> |
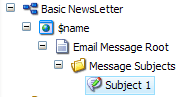
Create Basic Newsletter Branche template
1. Create a branch template
2. Select the /sitecore/templates/Modules/Email Campaign/Messages/Pre-existing page template
3. Rename the create Pre-exiting Page branche template to Basic NewsLetter
4. Underneath the $name item create the Email Message root item based on the Basic newsletter template
5. Underneath the created Email Message root item insert a folder called Message Subjects. This folder will contain all subjects for the e-mail.
6. Remove the folder template to insert options of the Message Subject folder and add the Subject template: /sitecore/templates/Modules/Email Campaign/Messages/Inner Content/Newsletter/Subject.
7. Insert a Subject item in the Message Subject folder with the name Subject 1.
The branche template should look like this:

8. In the content tab of the $name item select in the Web page field the Email Message Root item:
Sitecore/templates/Branches/Modules/Email Campaign/Messages/Newsletter/Basic Message/$name/Email Message Root
INFO: The $name item will be used for showing an online version of your newsletter and the message preview within ECM.
Create the presentation components
For the basic newsletter we need a few presentation components.
Create the Basic Newsletter Layout
1. Create Basic Newsletter Layout
Insert the html-title placeholder in the <title> tag
[code language=”html”]
[/code]
Add the following table to within the <Form> tag
[code language=”html”]
|
|
|
|
[/code]
Create the rendering components
1. Create the Basic Newsletter Header rendering.
In the Developer Center select Create a New XSLT rendering. Name the rendering Basic Newsletter Header.
Copy the following code into the rendering.
[code language=”xml”]
[/code]
2. Create the Basic NewsLetter TitleAndText rendering
In the Developer Center select Create a New XSLT rendering. Name the rendering Basic NewsLetter TitleAndText.
Copy the following code into the rendering.
[code language=”xml”]
[/code]
Set the Parameters Template of the Basic NewsLetter TitleAndText rendering to templates/modules/Email Campaign/ID Source Based Parameters

Binding presentation and content
1. In the Basic Newsletter Branche template set the layout details of the Email Message Root item
For the default device;
– Set the layout to the Basic Newsletter layout
– And add the following controls:
| Control | Description | Placeholder |
| Set page title | Required for e-mail subject support. Also print the e-mail subject, put this control in the title tag. Preferred use is to dynamic bind this to a placeholder. Set the datasource to: sitecore/templates/Branches/Basic NewsLetter/$name/Email Message Root/Message Subjects/Subject 1 |
Html-title |
| Basic NewsLetter TitleAndText | Shows Title and Text field | email-content |
| Basic Newsletter Header | Print the header field, containing a link to the online version. | Email-Header |
The dynamic binding of the controls should look like this:

2. In the Basic Newsletter Branche template set the layout details of the $name item. This will be the layout settings for the online page.
For the default device;
– Set the layout to the Basic Newsletter layout
– And add the following controls:
| Control | Description | Placeholder |
| Process Personalization Tokens | Processes all tokens like $name$ or $email$ in the e-mail. | email-content |
| Basic NewsLetter TitleAndText | Shows Title and Text field Set the datasource to: sitecore/templates/Branches/Basic NewsLetter/$name/Email Message Root |
email-content |
| Set page title | Required for e-mail subject support. Also print the e-mail subject, put this control in the title tag. Preferred use is to dynamic bind this to a placeholder. Set the datasource to: sitecore/templates/Branches/Basic NewsLetter/$name/Email Message Root/Message Subjects/Subject 1 |
Html-title |
Set the insert options
Go to the draft folder /sitecore/templates/Modules/Email Campaign/Target Audience/Drafts and unprotect the item.
Add the Basic Newsletter Branche template to the insert options.
NOTE: If you already created some target audiences you need to do this for the draft folder of all the target audiences.
Create a Basic Newsletter
Go to ECM select the draft folder and create a Basic Newsletter. The result should look like this:

This is a basic Newsletter from which you easily can design different more complex newsletters.
This is the first part of the How To create custom e-mail template for ECM. In part II I will add a listing to the custom e-mail template. Part II will follow in the next week.
Update: Part II can be found here: Sitecore ECM: How to create a Email template from Scratch – Part II
Hey Pieter,
I have folowed your tutorial for ecm, but Got some problems. When I have created my new newsletter, and hit the “Edit” button in message preview, I dont get the ribbon, and I can’t cahnge images. Another problem I have is the online version of the newsletter. The newsletter content is not visable. I can only see the layout.
I hopre you can help me. Thanks for the great tutorial for ecm.
Hi Frank,
Which version of Sitecore do you use? The version I used is Sitecore 6.4, the page editor with ribbon looks like this from version 6.4.
Have you published the newletter? Try publishing your site and then visit the online version?
Good luck,
Pieter
Greate tutorial!. I followed the steps and it works great.
Only a couple of remarks to implement ECM even easier.
– Took me a while to figure out this error: “Message: Empty strings are not allowed. Parameter name: clName”. Turns out i forgot to implement the common opt-out role in the email campaign settings. So if you get this message, you probably forgot to add an role somewhere.
– To test the unsubscribe functionality you can’t use the “test”button. You only can test this with the “dispatch messages” button. Sitecore adds an extra tag (sc_camp) to all links (including unsubscribe). If this variable is not in unsubscribe link of the email message, the unsubscribe functionality won’t work.
Greetz
sivard donkers
Thanks for your comments! That will definitly help.
Cheers,
Pieter
Thank you so much. I’m new to the ECM and Sitecore in general and just ended my two hour search for this fix!